Machine Connections

Machine Configuration Video
This section will describe how to correctly connect the power cables and communications cables to the AMAYA. This section will also show the connections required when connecting the machine to a computer.
An Ethernet network connection is required to establish communications between AMAYA OS and AMAYAs. These connections must be done in order to send designs, and to monitor and control the operation of AMAYA machines.
To set up your machine(s), you will need the following items. If you have purchased any of these items from Melco, they will be located in the Options box.
Single Machine Setup:
-
Power cable
-
1 crossover cable OR Ethernet switch and 2 Ethernet cables. (If using the Ethernet switch, you will need a power cord for the switch).
Multiple Machine (2 or more) Setup:
-
Power cables
-
Ethernet switch
-
Ethernet power cord
-
Ethernet cables
Note on crossover/Ethernet cables:
A crossover cable allows you to directly connect an AMAYA machine to a computer. You cannot use crossover cables when networking multiple machines. Crossover cables are wired differently on each end, whereas Ethernet cables have exactly the same wiring on each end. If you have purchased a crossover cable from Melco, it will be yellow.
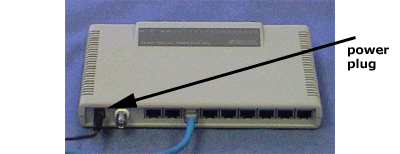
Connecting Power Cables
-
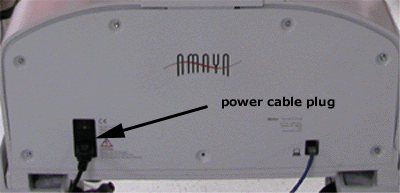
Locate the power cable you will be using with your machine.
-
Locate the power cable plug in the rear of the machine.
-
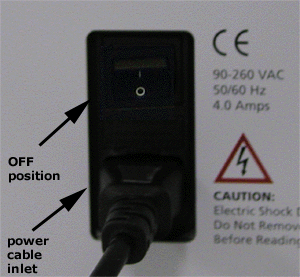
Make sure the machine power switch is in the OFF position. Plug the power cable into the inlet.
-
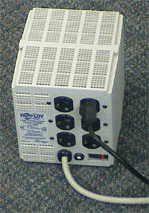
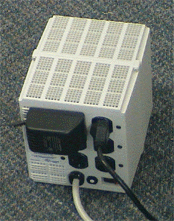
If you are using a line conditioner, as recommended by Melco, plug the other end of the cable into the dedicated line conditioner.
-
Connect the line conditioner into a power source.
Power Switch Fuse Replacement
The fuse at the bottom of the power switch is operator-replaceable. To replace the fuse, complete the following procedure:
-
Make sure you have turned off power to the machine and have unplugged the machine from the power source.
|

|
WARNING!: You must unplug the AMAYA before replacing the power switch fuse.
|
-
With your finger nail or a screwdriver, pry the fuse holder out of the power switch.
-
Either replace both fuses, or use an ohmmeter and verify the continuity on both, replacing the one with little or no continuity. Replace fuses with 5x20, Time Lag Ceramic Body Cartridge fuses, Rated T5A, 250V (Melco PN: 010162-05). Fuses of equivalent size, capacity and quality can be used.
-
Reinstall the fuse holder in the power input switch assembly by pushing it in until the face of the fuse holder is flush to the face of the switch.
Networking Connections
This section explains how to connect single and multiple machines to an Ethernet network.
Single Machine Connections
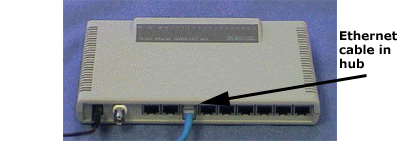
For a single machine to computer connection, a crossover cable is required. (You can also use 2 Ethernet cables and an Ethernet switch).
1. Connect one end of the crossover cable into the Ethernet jack on the computer.

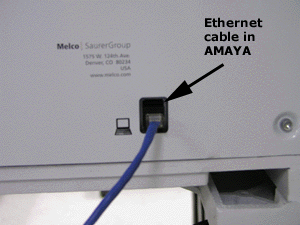
2. Connect the other end of the crossover cable into the cable jack on the machine.
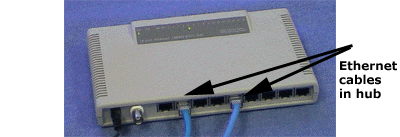
Multiple Machine Connections
For connecting multiple machines to the computer, an Ethernet switch device and cables are required. The switch is a small electronic device that allows multiple devices (in this case AMAYAs) to be connected through a network. You can connect as many machines as your switch will allow (up to 30).
-
Connect the Ethernet switch to the switch.
-
Plug the power cable in to a power source.
-
At least two Ethernet cables are required with the switch. Connect one end of the Ethernet cable into any port on the switch.
-
Connect the other end of this cable directly into the Ethernet jack on the computer.
-
Now using the other cable, connect one end into another numbered port on the switch.
-
Connect the other end into the cable jack on the first machine you want to connect.
-
If there are other machines, continue to connect the next cable(s) from the Ethernet switch to the machine(s).