Cart Assembly
These instructions are for the metal cart released in 2012. For the original cart instructions, click here.
|
The cart (Melco PN: 34262) consists of the items assembled as shown in the figure to the right. This assembly requires a 3mm and 5mm hex wrench included in your Operator’s Kit.
Note: If you did not purchase the cart option with your AMAYA BRAVO, you will find a bench top pad (PN: 33423) in the options box. Please ensure that you place the machine on this pad to secure the machine.
|
Item #
|
Qty
|
Description
|
|
1
|
1
|
Upper Suport Shelf (Tabs Up)
|
|
2
|
1
|
Lower Support Shelf (Tabs Flat)
|
|
3
|
2
|
Cart Leg
|
|
4
|
2
|
Swivel Caster
|
|
5
|
2
|
Swivel Caster with Lock
|
|
6
|
16
|
M5 Button Head Screw
|
|
7
|
16
|
M6 Socket Head Screw
|
|
8
|
16
|
M6 Split Lock Washer
|
|
9
|
16
|
M6 Fender Washer
|
Optional Tray Instructions may be found at the bottom of this page.
|
 |
Step 1
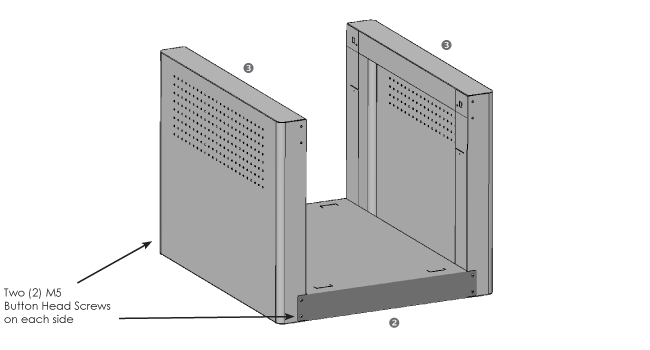
Place a Cart Leg (Item 3) on a flat surface like a carpet to prevent scratches. Attach the Lower Support shelf (Item 2 with tabs flat) by inserting the two hooks into the cutouts of the cart leg as shown below. Loosely assemble four M5 Button Head Screws (Item 6). They will be fully tightened in a later step.

Step 2
Place the Cart Leg and Lower Support Shelf upright as shown. Assemble the other Cart Leg (Item 3) to the Lower Support Shelf as shown below and loosely assemble four M5 Button Head Screws (Item 6). They will be fully tightened in a later step.
Step 3
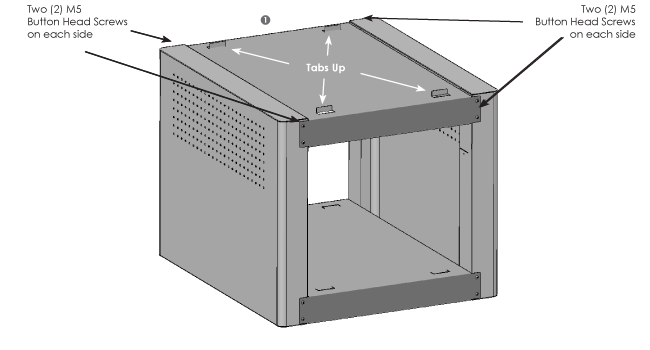
Assemble the Upper Support Shelf (Item 1) to both Cart Legs as shown. Loosely assemble eight M5 Button Head Screws (Item 6) and then fully tighten them.
Fully tighten all the Item 6 screws from the previous two steps.
Step 4
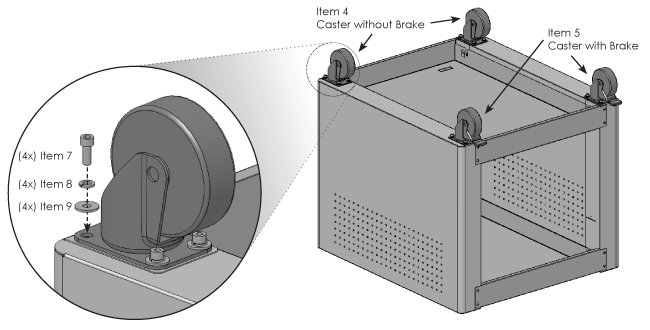
Position the cart assembly upside down and assemble the casters (Items 4 & 5) with hardware (Items 7, 8 & 9)as shown below. Flip the cart back over with all four casters on the floor.
Step 5
|
Position the cart behind the machine. Make sure the caster brakes are engaged.
Remove the Base Cover from the Amaya machine. Carefully lift the machine (two people are required) using the hand-holds. Place the machine in between the four bent up tabs on top of the cart as show on the right. Make sure the machine is centered between both Cart Legs (Item 3). Place the Base Cover back on the machine.
|
 |
Important!
-
When moving the machine with the cart, it is recommended that you push near the bottom of the machine. Disengage the caster brakes to move the machine.
-
Remember to engage the caster brakes after the machine is in the desired location.
-
To optimize your cart’s functionality, keep thread away from the wheels. When the cart is moved around, the wheels pick up thread, which wraps around the wheel axle. This eventually prevents the wheel from turning.
Optional Tray Assembly
|
The optional tray assembly (Melco PN: 34272) is available on www.shopmelco.com and contains the following parts.
|
Item #
|
Qty
|
Description
|
|
1
|
1
|
Cart Tray
|
|
2
|
2
|
Sheet Metal Screw
|
|
3
|
1
|
Cart Tray Pad
|
|
 |
Step 1
|
Place the tray inside the cart body by rotating or tilting it between the cart legs. Straighten the tray and align the tray tabs with the slots in the cart legs.
Slide the tray forward and into the slots in each of the cart legs.
|
 |
Step 2
|
Align the holes in the tray and the cart legs. Tighten it into place using the two sheet metal screws (Items 2).
|
 |
Step 3
|
Place the pad into the tray.
|
 |