Click on a menu item below to learn more.

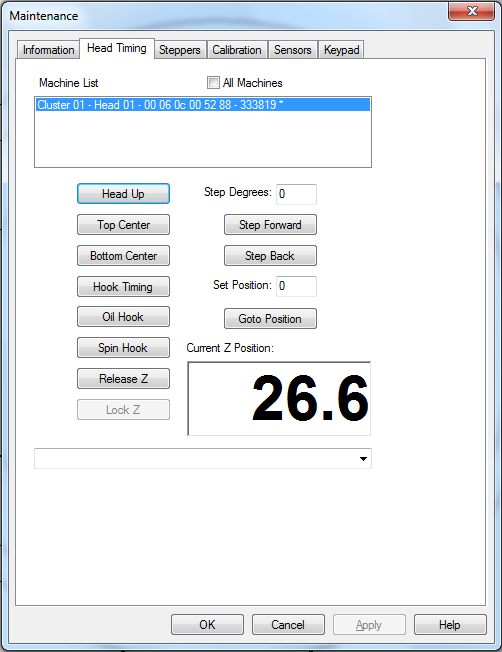
The Head Timing menu allows the user to interact with the machine for troubleshooting and maintenance purposes.
If multiple AMAYA machines are assigned to the same dongle, and you want to perform head timing operations on all machines in the cluster, check the All Machines box.
If you want to perform head timing operations on a single machine, uncheck the All Machines box, and select the machine from the Machine List.
Moves the machine to the Head Up position.
Moves the needles to their highest position.
Moves the needles to their lowest position. You will also need to do this if you ever adjust the presser foot height on your machine.
Clicking this button will rotate the hook forward in 20 degree increments. It is used when performing hook timing when replacing a hook. See the Technical Manual for additional information.
Clicking this button rotates the rotary hook to the optimum position for oiling the hook.
Clicking this will spin the hook. It is used after oiling to help distribute the oil you have placed on the hook.
Click this button to turn off power to the Z motor. Clicking this button also releases the electrical lock on the Z-position.
Click this button to turn on power to the Z motor and lock the Z-position.
This box reflects the current Z-position (in degrees).
Enter the number of degrees you want to move the Z-position. When the step forward or step back command buttons are clicked, the machine will move the Z-position the number of degrees entered here.
Moves the Z-position forward the number of degrees entered in the Step Degrees box.
Moves the Z-position back the number of degrees entered in the Step Degrees box.
Used with the Goto Position button, the machine will move to the exact Z-position entered here. Enter the exact Z-position you want to move the machine to.
Moves the machine to the exact Z-position entered in the Set Position box.
When the Head Timing tab is open in AMAYA OS, several special keypad functions are available. These keypad functions are only available when the Head Timing tab is open. The following table describes these functions:
|
Function |
Press these key(s) |
Keypad Pictures |
Notes |
|
To go to the Head Up position |
Adjustment + Up Arrow |
|
|
|
To go to the Bottom Center position |
Adjustment + Down Arrow |
|
|
|
Rotate hook forward |
Adjustment + Right Arrow |
Rotates hook in (approximately) 20 degree increments |
|
|
Rotate hook forward |
Hoop + Down Arrow |
|
Rotates hook forward in 1 degree increments |
|
Rotate hook backward |
Hoop + Up Arrow |
|
Rotates hook backward in 1 degree increments |
|
Microstep hook forward |
Trace + Up Arrow |
|
Rotates hook forward in .10 degree increments |
|
Microstep hook backward |
Trace + Down Arrow |
|
Rotates hook backward in .10 degree increments |
|
Move needlecase right |
Trace + Right Arrow |
Used for AMAYA XT Color Change Calibration |
|
|
Move needlecase left |
Trace + Left Arrow |
|
Used for AMAYA XT Color Change Calibration |
|
Head Up, Bottom Center |
Frame Back |
|
Always starts at needle one. When this key is pressed once, machine goes to Head Up position twice, then goes to Bottom Center. When the Frame Back key is pressed again, the machine color changes to the next needle, then goes to Bottom Center on that needle. |