![]()
|
|
WARNING!! This procedure is intended to be performed only by specially trained Melco service technicians and personnel. Disassembly by untrained individuals will void any warranty protection and can result in personal injury or damage to the machine.
|
|
|
WARNING!! Do not attempt to replace or service any component in the rear of the lower bed without disconnecting the A/C power input cord. Failure to do so will leave the power supply and power switch energized with dangerous levels of voltage even when turned off and can result in severe injury from electrical shock. |
1. Disconnect the leads from the power switch interface harness from the bottom wiring block of the power supply unit and the back of the switch.

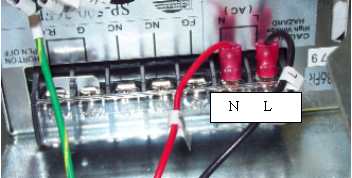
Figure 1 - Power Switch Interface Harness Wiring to Power Supply
2. Install the replacement harness to the bottom wiring block as shown in Figure 1 above. Tighten the screws in the wiring block just enough to hold the wire connectors securely.

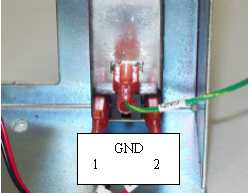
Figure 2 - Power Switch Interface Harness Wiring to Switch
3. Connect the red wire connectors on the replacement harness to the back of the power input switch as shown in Figure 2 above. The labeling of the leads should be identical to the text in the above picture.