![]()
After replacing the adjustable fixed knife or the movable knife, the adjustable fixed knife will need to be adjusted using the following procedures.
With the machine turned on, disconnect the connecting link from the moveable knife drive arm by lifting it from the front pin.
Pull the moveable knife forward using a small Allen wrench.
With a black marking pen, mark the areas of the movable knife as shown in the illustration to the very far left in Figure 1 below.
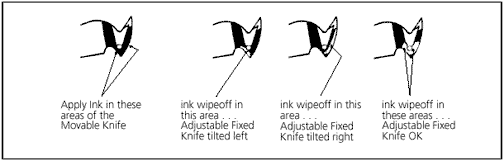
Figure 1 - Ink Wipeoff Test
Push the movable knife back under the adjustable fixed knife to simulate the thread cutting action.
Pull the knife forward again and inspect the area where the marking pen ink has been wiped off. Refer to the remaining three illustrations in Figure 1 above to determine if the adjustable fixed knife or the moveable knife needs adjustment.
Should the "ink wipeoff" test show that adjustment to the adjustable fixed knife is required, use the following steps to perform the knife adjustment.
Refer to Figure 2 below, and locate the two small set screws in the bottom of the needle plate bracket directly under the under thread presser.
You will adjust these two set screws and the larger socket head screw that secures the adjustable fixed knife and under thread presser at the top of the needle plate bracket to perform the knife adjustment.
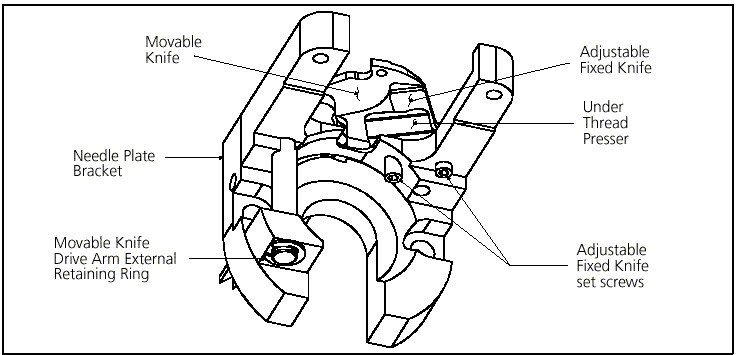
Figure 2 - Bottom View of Trimmer Parts
Refer to the "ink wipeoff" test and determine what direction the adjustable knife is tilted.
Knife Adjustment:
a. If the "ink wipeoff" test indicates that the adjustable knife is tilted to the left, slightly loosen the top socket head cap screw, then tighten the left bottom set screw.
b. If the "ink wipeoff" test indicates the adjustable knife is tilted to the right, slightly loosen the top socket head cap screw, then tighten the right bottom set screw.
After either of the adjustments in Step 8, perform the "ink wipeoff" test again to check the position of the adjustable fixed knife.
Repeat the previous steps until the "ink wipeoff" test shows equal ink removal on both sides of the moveable knife and the pull force to move the moveable knife under this condition should be 1/2±1/4 lbs (200g±100g).
Check the tightness of the top socket head cap screw (set to Melco Torque Specifications) and recheck the adjustment by performing the "ink wipeoff" test once again.
When you are satisfied with the "ink wipeoff" test, you may check the thread cutting ability by performing actual thread cuts at several locations across the cutting range of the knives. To do this, use the following steps:
With the machine turned on, disconnect the connecting link from the moveable knife drive arm by lifting it from the front pin.
Pull the moveable knife forward by using a small Allen wrench.
Obtain a piece of upper thread from the tensioner assembly and drape it over the movable knife.
With the thread draped over the movable knife from back to front, gently hold the thread so there is some slack and then push the knife back until the thread is cut. The cut itself should be clean and not frayed.
Repeat the previous step with the thread positioned at different locations across the cutting surface.
If the thread is frayed at any location, you may need to replace the adjustable fixed knife, movable knife, or both.
![]()