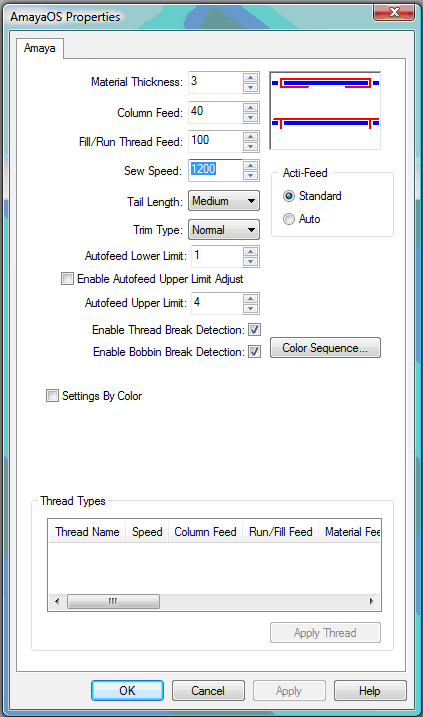
DesignShop provides an AMAYA Machine Settings tab. To access this tab, go to the Tools->Amaya Settings. This will allow you to save AMAYA machine settings with a design. When you open the design in AMAYA OS, it will open with the settings saved with it in DesignShop but to use these settings you have to click the Load Machine Settings button in AOS. This is only available through the project level.

Material thickness: This number represents the thickness of the material you are sewing on. The thicker the material, the higher this number should be. The default for this setting is 3, but you may need to adjust this setting depending on the thickness of your fabric. A guideline for this is that 1 point is equal to the thickness of a piece of paper.
Column Feed: This setting determines how much thread the AMAYA feeds when sewing column stitches. The number in this field represents the percentage of the column that is showing bobbin (this is represented visually by the white line in the image to the right of the number). Use the up and down arrows to adjust column thread feed. To increase the thread feed for columns, you need to decrease the column feed. The default for this setting is 50.
Run/Fill Feed: This setting determines how much thread the AMAYA feeds when sewing run and fill stitches. To increase the thread feed for run and fill stitches, you need to increase the run/fill feed. The default for this setting is 100.
Sew Speed: This is the maximum machine sewing speed.
Tail Length: This parameter (choices are short, medium, and long) refer to the length of thread tail left after a trim. The default is medium tail.
Trim Type: The AMAYA can be set to trim differently for metallic thread than other threads. When sewing with metallic thread, this parameter should be set to metallic; otherwise it should be set to normal. If you are sewing a design with both metallic and other thread types, you can use Needle Settings on the Settings by Color tab to set the trim type to metallic for specific needles.
Autofeed Lower Limit: Use this field to specify how low you want your Autofeed to go.
Enable Autofeed Upper Limit Adjust:When this is checked, the user is able to use the upper Autofeed limits. If this is not checked, the upper Autofeed limit is set to the default of 40.
Autofeed Upper Limit: Use this field to specify how high you want your Autofeed to go.
Enable Thread Break Detection: If this is checked the thread detection will be turned on for each individual color. This means the machine will stop when there is a thread break.
Enable Bobbin Break Detection: If this is checked the bobbin detection will be turned on for each individual color. This means the machine will stop when there is a bobbin break.
Acti-Feed: When Auto is selected, the material thickness is automatically set by the AMAYA machine while sewing, depending on the sensed tension in the thread feed system. The material thickness adjusts automatically while the machine sews. When Standard is selected, the material thickness is set manually by the user. The user sees an Acti-Feed Presets window where they can choose the proper material thickness. The default is Auto.
Color Sequence: This brings you to the Color Sequence tab. On the Color Sequence tab there is a button for Color Groups. Clicking it will open the Color Group Setup tab. The color groups feature allows you to put the same colors on different needles and then group the needles together. If there is a thread break on one needle, the machine automatically begins sewing with the back up color you named in color groups. For example, you choose Needle #1 as your primary color. You designate Needles 2 and 3 as your back up color. When the thread on Needle #1 breaks, it goes to Needle #2. When Needle #2 breaks, the machine goes to Needle #3.
Settings by Color: When this box is checked, you can adjust the machine settings for each color. In the box where the color sequence colors are shown, click on the box of the color number you want to use to change machine settings. Machine settings will only change for the stitches sewn in that color number. You can turn on and off Thread Break Detection for specific colors. Repeat this process for any color. Please note that if Settings by Color is turned off (box is not checked) when you click OK or Apply in this tab, any settings by color will be removed from the current design.
Thread Types: You can also apply settings to a color number based on thread type. (For example, the first color in your color sequence may be sewn with metallic thread.) In the thread type area at the bottom of the dialog box, you will see a list of pre-defined thread types (Rayon, Polyester, Cotton, and Metallic). Each of these thread types provides pre-defined settings for the parameters available on the AMAYA Machine Settings tab (i.e., speed, column feed, material thickness, etc.). Note that Thread Types are only available if Settings by Color is turned on.
To use these thread types, click the box of the color number you want to change, then click the thread type you wish to use, then click the Apply Thread button. The machine settings for the color number you selected will be changed to the pre-defined settings for the thread type you selected.
IMPORTANT: Please note that these thread type settings are only meant to be used as guidelines. You may need to adjust these settings, depending on the fabric type, design being sewn, etc. After you apply the thread settings to a color number, you can adjust them in the settings area of this tab (this will not change the stored pre-defined settings).
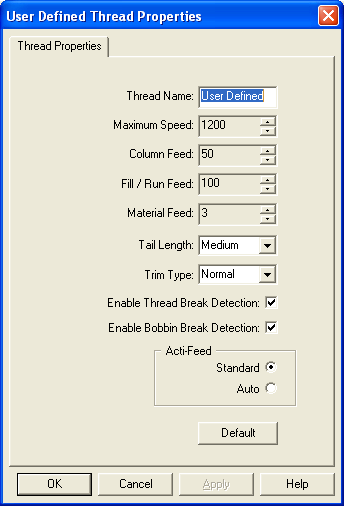
You can also create up to eight user-defined thread types. To do this, under the thread name list, right-click on User Defined. You will see the following dialog:

Type a thread name, then choose your desired settings for this thread type. Click OK to apply the settings and close the window. The new thread type will appear in the Thread Type list.