
This section describes the basic functions involved with manipulating items such as designs, elements (e.g., columns), and points in DesignShop.
 Clipboard Functions Video
This function copies the selected item(s) to the clipboard; then it/they can be pasted into another location if desired.
You can access this function in four ways: you can press CTRL + C on your keyboard, you can click the Copy toolbar button, you can select Edit->Copy, or you can right-click the selected item(s) in the View Window (or the Project View tab) and select Copy from the pop-up menu.

This function inserts the contents of the clipboard into the area that you have selected with your cursor and replaces any item or element that is selected. You can only use paste after you have cut or copied an item to the clipboard.
You can access this function in four ways: you can press CTRL + V on your keyboard, you can click the Paste toolbar button, you can select Edit->Paste, or you can right-click in the View Window (or the Project View tab) and select Paste from the pop-up menu.
To paste an object from DesignShop to Adobe Illustrator, select the object(s) and hit Copy (Control + C). Go to Adobe Illustrator and hit Paste (Control + V).
To paste an object from Adobe Illustrator to DesignShop, select the object(s) you would like to transfer from Adobe Illustrator and hit Copy (Control + C). Go to DesignShop and hit Paste (Control + V).
Tips:
When pasting to Adobe Illustrator, use the Paste in Front menu item found under the Edit Menu in Adobe Illustrator to avoid objects shifting when you paste them back into DesignShop.
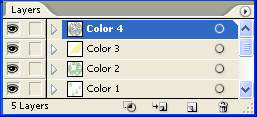
When pasting to Adobe Illustrator, if the Pasting Preserve Layers option is enabled in Adobe Illustrator the different colored objects will be grouped into separate layers. See picture below:
For best results, when transferring outlines to/from DesignShop and Adobe Illustrator use Bezier Digitizing Mode.
When doing lettering in Adobe Illustrator, the lettering MUST be converted to outlines before copying/pasting into DesignShop or saving as a Vector file. If it is not, it will not come into DesignShop properly. In Corel Draw, a lettering object must be Converted to Curves, then Broken Apart. If not, it will not come into DesignShop properly.
NOTE: For information on the Adobe Illustrator Clipboard (AICB), please refer to Vector Import/Export Options.

This function removes a selected item (or items), and places it/them on the clipboard where it/they can be pasted into another location if desired. This function can also be used to delete items.
You can access this function in four ways: you can press CTRL + X on your keyboard, you can click the Cut toolbar button, you can select Edit->Cut, or you can right-click the selected item(s) in the View Window (or the Project View tab) and select Cut from the pop-up menu.
This function deletes whatever item(s) you have selected. You can access this function in three ways: you can press the DELETE key on your keyboard, you can select Edit->Delete, or you can right-click the selected item(s) in the View Window (or the Project View tab), right-click, and select Delete from the pop-up menu.
Duplicate and Grouping
Features Video
This function duplicates whatever item(s) you have selected. When you duplicate an item (e.g., an entire design, a fill, etc.) this item is copied and then pasted into the project directly after the original item.
You can access this function in three ways: you can
press CTRL + D
on your keyboard, you can select
Edit->Duplicate, or you can right-click the selected item(s)
in the View Window (or the Project View tab), and select Duplicate from the pop-up menu.

This function is used to undo certain actions. Not all actions are supported by Undo. Clicking the drop-down arrow next to the Undo toolbar button will display a list of actions you have performed that may be undone. In this box you can left-click and drag the mouse to highlight the actions you want to undo. You can only undo actions in the opposite order that you performed them.
You can access this function in three ways: you can press CTRL + Z on your keyboard, you can click the Undo toolbar button, or you can select Edit->Undo.

This function is used to redo certain actions on which you used the Undo tool. Not all actions are supported by Redo. Clicking the drop-down arrow next to the Redo toolbar button will display a list of actions you have performed that may be redone. In this box you can left-click and drag the mouse to highlight the actions you want to redo. You can only redo actions in the opposite order that you undid them.
You can access this function in three ways: you can press CTRL + Y on your keyboard, you can click the Redo toolbar button, or you can select Edit->Redo.
Under the Edit menu, you will see a dialog to search for elements within the project view (Edit->Find). When the dialog appears, click on the down arrow to choose the element type to search for, then click Go To. This will highlight the element type you choose to search for within the project view. You can also be more specific and enter the number of the stitch or element.
You can also access this function by pressing CTRL + F on your keyboard.
(Available in Pro and Pro+)
Cost factors allows you to calculate costs and stitch count for a design. You can choose to input the maximum dollar value you want the design to cost and it will give you the necessary stitch count. Conversely, you can input the stitch count you want to use and calculate the cost of sewing the design. In addition, scale factors on this tab allow you to globally (throughout an entire design) scale some properties of wireframe elements.
To access these scale factors, select Tools->Cost Factors.
To use Cost Factors regarding cost:
Open DesignShop.
Select Tools->Cost Factors. The following dialog box appears:
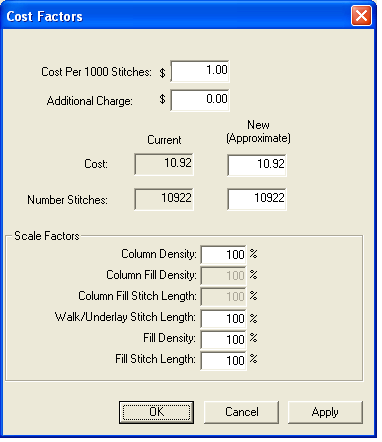
Input the cost per 1,000 stitches for your company.
Input any additional charges that your company has, such as base fees. cost of garment, thread, supplies, etc...
Change the number of stitches or the monetary amount.
Click Apply.
Cost Factors automatically adjusts all the scale factors according to what your input was.
Scale Factors
This feature allows you to globally increase or decrease certain properties by percentages. For example, you can increase the density of all fills by 30% by entering 130% in the Fill Density text box. More density is less stitches and less density is more stitches.
Changing any of these factors changes the approximate cost:
Column Density: This scales the density all columns.
Column Fill Density: This scales the density of all column fills.
Column Fill Stitch Length: This scales the stitch length of all column fill stitches.
Walk/Underlay Stitch Length: This scales the stitch length of all walk and underlay stitches.
Fill Density: This scales the density of all fills.
Fill Stitch Length: This scales the stitch length of all fills.
![]()