(Available in DesignShop and higher product levels)
This tool converts a group of files (of any embroidery file type) to any embroidery file format. To use the converter, complete the following steps:
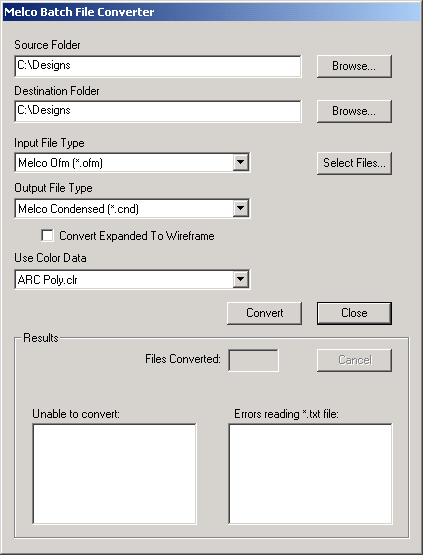
Select Tools->Batch Converter. You will see the following dialog:

Select a Source Folder and a Destination Folder. The Source Folder is the location in which the files you wish to convert are stored. To change this folder, click the Browse button and navigate to the appropriate folder. The Destination Folder is the location to which the converted files will be saved. (You can also click this folder’s corresponding Browse button to change the folder). Note that when you change the Source Folder the Destination Folder also changes (but not vice versa).
Select the file type you wish to convert in the
Input File Type pull-down menu,
and select the output file format in the Output
File Type pull-down menu. By default, all the files of the input
file type in the Source folder
will be converted to the output file type and saved in the Destination
Folder. However, if you only want
to convert a few files at one time, click the Select
Files button. In the dialog that appears, select the files you
want to convert. When you convert the files, only the files you have selected
will be converted.
Convert Expanded to Wireframe: When this setting is turned on
(box is checked), if any of the files of the selected input type contain
expanded objects and you are converting to a wireframe output type, all
expanded objects will be converted to wireframe elements. (This feature
is only available at the DesignShop Pro and DesignShop Pro+ product levels).
Select a color palette from the Use Color Data pull-down menu. This color palette will be used to save color information during the conversion. Please note that this pull-down menu will not always be available because color information is not saved with all file types.
Click the Convert button to start the conversion. If Batch Converter cannot convert all of the files, the file names will be displayed in the Unable to Convert box.
NOTE: If you are using the Batch Converter to convert Tajima (dst) files, and you want to change the Jumps per Trim setting from the default of 6, open any file, then save the file as a dst file. When saving the file, change the Jumps per Trim setting to the desired value and click OK. This will change the default value used by the Batch Converter.