
(Available in DesignShop Pro and higher product levels)
This feature allows you to select an element and change it to another element type. Besides being able to replace one element type with another element type, you can also add an element type to another element type. This feature can be used on all element types except Manual Stitch.
There are different methods for changing element type. You can convert one or more expanded elements.
How to Use Change Element Type:
Select the element.
Hold down the Ctrl key and click on the input button (ie: Fill, Column, Walk, etc...) to change the element to that type.
NOTE: Holding down the Shift key and clicking on the input button adds elements of that type instead of changing the type. Use this, for example, to place a singeline border around a fill.
Changing Element Type Through the View Window or Project View:
 .
.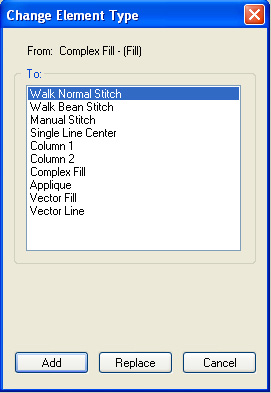
Click on the element you want to change to and then click Replace.
Select an element from the dialog and click Add if you want to add that element instead of changing it.
Example of when to replace an element type:
A walk stitch used to outline a design just doesn't seem to be wide
enough to stand out on a "plush" type of fabric (i.e. thick
fleece) that the design is being sewn on. In this case you can select
the walk stitch outline, hold the Ctrl
key, and select the singleline column input type. The element changes.
This will be a lot thicker and show up better on the fabric. You can also
select the walk stitch outline, click on the Change
Element Type toolbar button, select singleline
column, click Replace.
Example of when to add an element type:
After creating a complex fill, it is a lot faster to use the Change
Element Type to add a border to the fill instead of
digitizing around it. To do this, simply create a complex fill, hold down
the Shift key, and click on the input type that you want to add. This
is also very useful for changing fills to walk or singleline column for
applique purposes. You can also click on the Change
Element Type toolbar button, select walk stitch
or column stitch, then click Add.

When using the Change Element Type function, some minor editing may need to be performed after. This is especially true around corners of elements and first and last points of columns. You can edit your new element just as you would any other digitized element.
You can always edit an element that you have added or replaced.
When you have a complex fill selected that has a hole in it, you will get one element for the complex fill and another element for the hole.
You can also select multiple elements to change as long as they are of the same element type (e.g., all complex fills).
When you add new items, they will be inserted (in the project view "stitch list") directly after the element that they were created from except for the following cases:
When you create a walk, click on Change Element Type, select Complex Fill, then click Add: The complex fill will be inserted before the walk because there is an assumption that the walk is supposed to be the border.
When you have created an element (i.e. fill or column) and choose to Add a Singleline With Input Line: The Singleline column will always be inserted before the original element because there is an assumption that the singleline is to be the border.
![]()