
Walk Stitches
are
linear input methods that you create by entering the points in sequence
from beginning to end. The four types of walk stitches discussed in this
section are: normal, bean, jump, and decorative.

Digitizing Walk Stitches Video
Setting Walk Stitch Properties Video
(Available in DesignShop and higher product levels)
Walk normal stitches are particularly useful in making underlay and outline stitching. The stitch length of the walk stitch determines when the needle comes down.
Walk stitches are the most simple stitches to digitize. They can be generated in two methods, straight lines or automatic curves.
You can access the Walk Stitch input tool by clicking the toolbar button
, selecting Insert->Walk,
or by right-clicking in the View Window
and selecting Walk from the pop-up
menu.
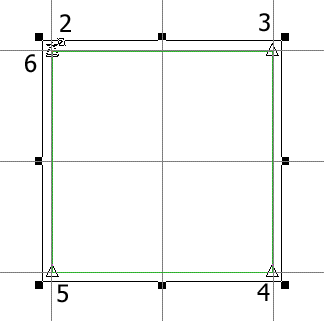
As an example, you would complete the following steps to digitize the outline of a square:
NOTE: If a point is entered incorrectly, pressing the BACKSPACE key on your keyboard will remove the points in reverse order. You can also press ESC to cancel an entire walk stitch as you are digitizing.
Select Walk Stitch.
Left-click at the first corner of the square.
Go to the second corner and left-click.
Go to the third corner and left-click.
Go to the fourth corner and left-click.
Go back to the first corner and left-click.
Press ENTER on your keyboard. Steps 2-6 are displayed in the image below.

Pressing and holding the ALT key as you input straight points will input perfectly straight lines.
It doesn't matter how big the square is when you are using walk stitch; needle penetrations will be inserted every 30 points (default setting) along the way.
Before you begin digitizing a walk stitch, you can right-click the toolbar
button to change the properties, such as the stitch length.
The changes you make will be applied on all future walk normal stitches,
until you make any more changes. You can also change the properties of
existing walk normal stitches (see Walk Stitch Properties
for information on changing stitch length and other walk stitch properties).
Remember that straight input points are represented by a small triangle and curved input points are represented by a small circle.
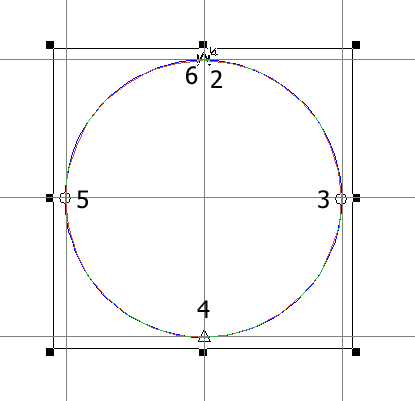
As another example, you would complete the following steps to digitize the outline of a circle:
Select Walk Stitch.
Left-click to begin your circle.
Move the mouse down and to the right to create a diagonal line from the first point. Right-click.
Move the mouse down and to the left to a location that is aligned with the first point. Left-click. You should see half a circle.
Move the mouse up and to the left to a location that is aligned with the second point. Right-click.
Left-click over the first point you entered.
Press the ENTER key. Steps 2-6 are displayed in the image below.

(Available in DesignShop and higher product levels)
Where a normal stitch lays one length of thread down for each stitch, a bean stitch lays down three lengths of thread. The bean stitch design consists of laying down a normal stitch in the forward direction, then going back to the original start of that normal stitch with another needle penetration, and again forward to the end of the first stitch with another needle penetration. The bean stitch is often used to digitize a thicker outline around an element.
The input method is the same as the Walk Stitch, using a combination of straight and curve wireframe points. Left-click for straight points, right-click for curved points.
You can access the Bean Stitch by selecting Insert->Bean, by right-clicking in the View Window and selecting Bean from the pop-up menu, or by selecting Bean in the Walk Type drop down menu.
You can change the bean stitch length and the thickness of the stitch. (See Walk Stitch Properties for information on changing stitch length and other walk stitch properties).
NOTE: If a point is entered incorrectly, pressing the BACKSPACE key on your keyboard will remove the points in reverse order. You can also press ESC to cancel an entire walk stitch as you are digitizing.
If you have DesignShop or higher product level, you can also use Auto Shapes to digitize walk bean stitches.

(Available in DesignShop and higher product levels)
The Walk Jump Stitch element is used to position the needle in the hoop without sewing stitches to the new position. The Walk Jump Stitch does not create needle penetrations; therefore it can be used to manually connect sections of designs and to position the needle outside of the boundaries of the design to position material for an applique.
The input method is the same as the Walk Stitch element using a combination of straight and curve wireframe points. Left-click for straight points, right-click for curved points.
You can access the walk jump stitch by selecting Insert->Jump Stitch, by right-clicking in the View Window and selecting Jump Stitch from the pop-up menu or selecting Jump Stitch from the Walk Type drop down menu..
You can change the stitch length of the jump stitch. (see Walk Stitch Properties for information on changing stitch length and other walk stitch properties).
Since Jump Stitch elements consist entirely of expanded jump stitches, the Accumulate jump stitches field in the Design Filter should be disabled. If Accumulate jump stitches is enabled the Jump Stitch element will be filtered out and the needle will not be positioned correctly in the expanded design.

(Available in DesignShop Pro and higher product levels)
Decorative stitch is used to repeat a digitized design along a walk input line. Decorative stitches can consist of walks, columns, fills, and lettering or a combination of elements.
You can choose from several decorative stitches included with Design Shop or create your own.
Decorative stitches are saved in a custom file named CustomFactory.cff. If you obtain a custom factory file that contains new decorative stitches that you want to import into DesignShop, you need to do the following:
Open DesignShop, then select File->New.
Select Custom->Insert Custom File.
Navigate to the directory that contains the new custom factory file (*.cff).
Select the custom factory file.
Click OK.
You will now be able to access the new standard decorative stitches.
You can choose from several of the standard decorative stitches included with DesignShop or create your own using Create Decorative Stitches.
The following standard decorative stitches are available:
|
|
Select Insert->Decorative Stitch or right-click in the View Window and select Decorative from the pop-up menu.
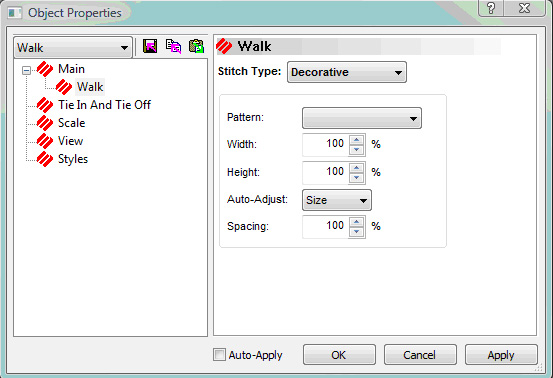
Choose the stitch that you want to use from the pull-down menu (Click the Stitch View/Select button for a preview of all of the available decorative stitches.)
You can resize the decorative stitch by changing the width and height percentages. You can also change the spacing of your decorative stitches, making the stitches either further apart or closer together.
Click OK, then digitize the same as a normal walk stitch using straight and/or curved input points.
To edit decorative stitches, choose the stitch that you want to use from the pull-down menu (Click the Stitch View/Select button for a preview of all of the available decorative stitches.) Digitize your design and then select the element you want to edit and convert it to wireframe. You can now edit the element and save it.
![]()