Open a graphic (a vector graphic works best).
Click the Graphic
to Embroidery Assistant Button  .
.
The Digitizing Wizard appears at the top, starting with Step 1.
The Digitizing Wizard guides the user, step by step, through digitizing an image.
Open a graphic (a vector graphic works best).
Click the Graphic
to Embroidery Assistant Button .
The Digitizing Wizard appears at the top, starting with Step 1.

The Vector Conversion
dropdown allows the user to choose a fabric style. You can also choose
a fabric style by clicking the Fabric
Styles button  .
.
Click the Next>> button to get to the next step of the Digitizing Wizard.
Click the <<Previous button to go back a step.
Click Cancel if you want to exit the Digitizing Wizard while you are in the middle of the steps.
Step 1) Color Reduction

Specify the number of colors you want your design to have by using the up and down arrows.
Use the Color
Picker button  to duplicate/replace colors.
Use the Fill Region
button  to fill the holes of an area of the design in.
Step 2) Click on First Color to Stitch

Click on the first color you want to stitch.
Click Flatten if you have multiple layers to your graphic and you want to separate one object from the others (make sure you have the correct object selected that you want separated).
Flatten Overlap allows you to specify how much you want the separated object to overlap with the others.
Step 3) Edit Elements in color

Use
the Add Element to Color Layer
button  to add elements.
Use
the Remove Element from Color Layer
button  to remove elements.
Use
the Fill Region
button to fill in a region.
Use
the Delete All Holes  button to delete all the holes in your graphic.
Step 4) Edit element sew sequence

Use
the Manual Sequence button
 to manually sequence
how you want your color layer to sew.
to manually sequence
how you want your color layer to sew.
Use
the Insert Entry/Exit Points button
 to input entry and
exit points into your color layer.
to input entry and
exit points into your color layer.
Use the Left
to Right button  to change the sequence order to left
to right.
to change the sequence order to left
to right.
Use the
Right to Left button  to change the sequence order
to right to left.
to change the sequence order
to right to left.
Use the Center
Out button  to have stitching start in the middle
and proceed to the farthest right, then come back to center and proceed
to the farthest left.
to have stitching start in the middle
and proceed to the farthest right, then come back to center and proceed
to the farthest left.
Step 5) Edit Stitch Splices to Elements

Use the Insert
Splice button  to insert a splice.
Use the Insert
Curved Splice button  to insert a curved splice.
Use the Auto
Compute Splice Lines button  to let DesignShop automatically
insert splice lines.
to let DesignShop automatically
insert splice lines.
Use the Insert
Stitch Direction button  to insert stitch direction
lines into each element of your color layer.
to insert stitch direction
lines into each element of your color layer.
Use the Insert
Curved Direction Line button  to insert curved direction lines into your color layer.
Use the Auto
Compute Direction Lines button  to let DesignShop
automatically insert direction lines.
to let DesignShop
automatically insert direction lines.
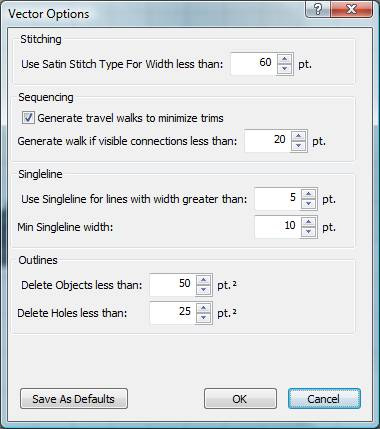
Clicking Options... brings up the following dialog where you can specify your vector settings:
Click Next>> after Step 5 to take you to the next color layer. Repeat the above steps for all your color layers.