 .
.Note: When using pattern fills, always turn on the 3D stitches tool so you can visualize how the pattern looks.
1. Select the complex fill that you wish to add a pattern fill to.
2. Click on the Select Stored Pattern button
.
3. Select the stored pattern you want to use for your fill.
NOTE: Pattern Fills only work if Satin, Fill, or Edge Fill are selected as the stitch type.
4. The pattern fill appears in your design.
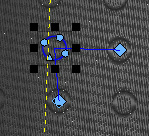
1. Select the pattern fill that you would like to scale by clicking on it. This highlights the pattern fill as shown below.
2. Now the pattern can be scaled just like any element/design within DesignShop by clicking on one of the black squares and dragging it in the direction you want.
Important: When a pattern fill is selected it can also be moved to another location within the complex fill and the wireframe points can also be edited.
Tiling a pattern means that the pattern will repeat in multiple rows and columns within the complex fill that it is inserted into.
1. Select the pattern fill that you would like to tile by clicking on it. This highlights the pattern fill as shown below.

2. Check Tiled in toolbar.

3. You will see that the pattern has been tiled and new handles for controlling the attributes of the tile have been provided.
4. To change the X-spacing of the tiled pattern, click on the handle of the horizontal tile control and drag it left or right. You will see that the spacing changes by the amount that the handle was moved.
5. To change the Y-spacing of the tiled pattern, click on the handle of the vertical tile control and drag it up or down. You will see how the spacing changes by the amount that the handle was moved.
6. To change the horizontal offset of the tiled pattern, click on the handle of the horizontal tile control and drag it up or down. The following examples show the horizontal offset set to 15 degrees, 30 degrees and 45 degrees.
7. To change the vertical offset of the tiled pattern, click on the handle of the vertical tile control and drag it up or down. The following examples show the vertical offset set to 15 degrees, 30 degrees and 45 degrees.
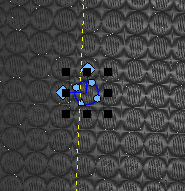
1. Select the pattern fill that you would like to change by clicking on it. This highlights the pattern fill as shown below.
2. Click on the Select Stored Pattern button
.
3. Select the pattern fill/custom shape that you want to change to by clicking on it in the menu.
4. The selected pattern is now replaced with the new pattern. Below is an example of changing a star pattern fill to a circle.
1. Select the pattern fill that you would like to change the stitch type for by clicking on it. This will highlight the pattern fill as shown below.
2. Select the stitch type that you would like to change to using the Stitch Type drop down.
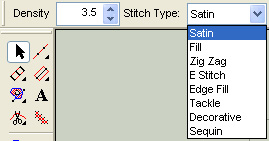
3. The stitch types that pattern fills work with are: Satin, Fill, and Edge Fill.
![]()