(Available at the Pro+ Product Level)
Photo Fill Video
Photo Fill allows you to take photographs and sew them as a color or black and white design.
To use Photo Fill:
Open DesignShop.
Select File->Open.
Browse to find your graphic file.
Load the picture in DesignShop.
Right-click on the graphic in the Project View
to the right of the View Window. This pop-up menu appears: 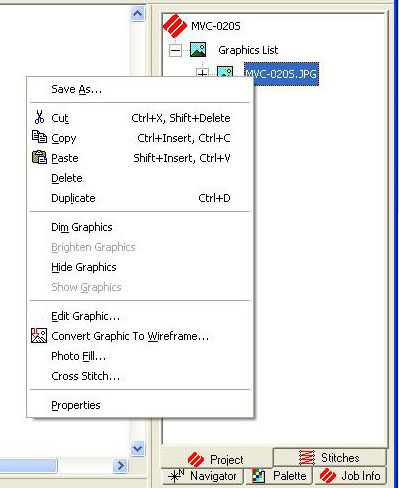
Click on Photo Fill. You will see the following screen:
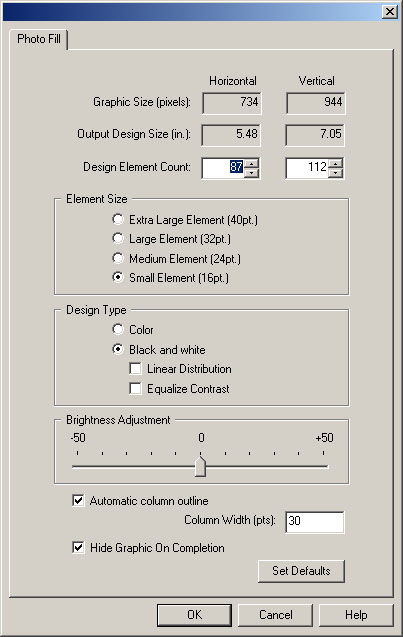
Graphic Size (pixels): The horizontal and vertical pixel count of the input graphic that is being processed. This measurement does not change.
Output Design Size (in.): The size of the finished embroidery design. This changes based on the element size and count that you specified. You cannot specify this measurement yourself.
Design Element Count: The number of elements (equivalent to pixels in a graphic) in the finished design. This is what you use to change the size of the design.
Element Size: Element size defines how much detail your picture has. The smaller the element, the more pixels per inch, which means a more detailed sew out.
Design Type: Choose Black/White or Color. Linear Distribution reduces the contrast of your photo. Equalize Contrast enhances the contrast of designs that appear gray or washed out.
Brightness Adjustment: Used to change the overall brightness of your output design.
Automatic column outline: Used to automatically create a singeline column object that outlines the design.
Hide Graphic On Completion: Autmatically hides the graphic when the finished design is displayed.
Set the element size.
You change the size of the output by adjusting the element count. This automatically adjusts the size of your picture.
Pick Color or Black/White.
If you chose Color, the best results are based on three colors in the following order: Yellow (ARC Poly 419), Magenta (ARC Poly 313), and Cyan (ARC Poly 444). If you have a border, this will be a 4th color and it can be any color (normally black).
If you chose Black/White you need to make decisions about Linear Distribution and Equalized Contrast. The default is that these properties are turned off. Photos of people are better with both of these properties unchecked.
If you want your picture to be outlined, click Automatic Column Outline and select your width.
You can choose Hide Graphic On Completion if you would like it to close after you are done.
Click Set Defaults if you want to go back to the original settings in this dialog.
Process your picture and look at it. If it does not appear the way you want it to, click Undo twice and create the design again with changed settings.
NOTE: It is not recommended that you resize your design or convert it to wireframe due to the nature of the stitching.