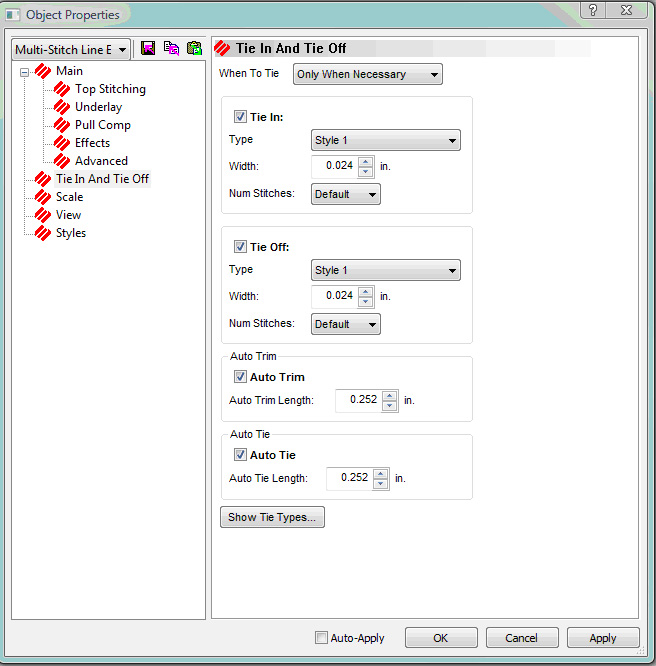
When you access the properties of a project, design, or element, you will also see the Tie In/Tie Off tab in the properties dialog (see the following image).
Remember that you can use the Tie In/Tie Off tab at the project, design, or element level (element level editing is only available in the DesignShop and higher product levels).
Lock Stitches are several small stitches sewn to prevent stitching from being pulled out. The term Tie In refers to lock stitches that can be placed at the beginning of elements, the beginning of a design, and after color changes and trims to lock the first stitches into place. The term Tie Off refers to lock stitches that can be placed at the end of elements, the end of a design, and before color changes and trims to lock the last stitches into place.
When
To Tie:
If Always is selected:
Tie Ins and Tie Offs will be inserted in all selected elements.
If Only When Necessary is selected:
Tie Ins will be inserted at the beginning of the design and after all color changes and trims.
Tie Offs will be inserted at the end of the design and before all color changes and trims.
- Tie In: Inserts Tie Ins based on what is selected in the When to Tie pull-down menu.
If Always is selected:
Tie Ins will be inserted before all selected elements, at the beginning of the design, and after all color changes and trims.
If Only When Necessary is selected:
Tie Ins will only be inserted at the beginning of the design and after all color changes and trims.
- Tie Off: Inserts Tie Offs based on what is selected in the When to Tie pull-down menu.
If Always is selected:
Tie Offs will be inserted after all selected elements, at the end of the design, and before all color changes and trims.
If Only When Necessary is selected:
Tie Offs will only be inserted at the end of the design and before all color changes and trims.

Type: This pull-down menu allows
you to select the style of tie in
used by DesignShop. To select a style, left-click the pull-down arrow,
then left-click the style you wish to select. You can also set the width
of the tie in points in the Width
box.
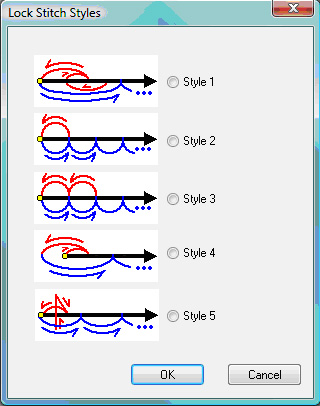
Style 1: This is a traditional pattern that doubles back on itself several times at the beginning of the stitching in the object. This pattern will automatically adjust its stitch length, stitch count, and position based on the type and size of the object. In a walk or fill object the pattern will be placed along the first stitch, in column object types the pattern will be moved in several stitches from the end of the object so it will not protrude from under the stitches.
Style 2: This pattern places one extra stitch at the next to last needle penetration. This is a very simple lock stitch type that would work well with walk or fill objects when it is critical that extra stitches are not visible. This lock stitch pattern is not intended for use with columns wider than about 10 pts.
Style 3: Another simple stitch reverse pattern similar to type 2, the type 3 pattern places stitches in the two penetrations before the end of the object. This lock stitch type will also work well with walk, fill, and narrow (<=10pts) column objects.
Style 4: This pattern is a modification of the traditional patterns that reverses on itself. This pattern straddles the first needle penetration of the object. For this reason the pattern is not suitable for use in a column type object since the lock stitches will be visible outside of the object boundaries. It should only be used for walk objects where the lock stitches will be covered by later stitching.
Style 5: This is a small traditional crossing star pattern consisting of three needle penetrations. This pattern automatically calculates its position in column objects so it will be inside the boundaries of the object. In walk and fill objects it will be placed between the first and second needle penetrations and will protrude out of the object boundaries. The type 5 pattern is suitable for most column type objects, but should only be used for walk and fill objects if the protruding stitches will be covered by later stitching.
You can select a style from this window by left-clicking the radio button next to the style, then clicking OK.
Tie Off Type: This pull-down menu allows you to select the style of tie off used by DesignShop. To select a style, left-click the pull-down arrow, then left-click the style you wish to select.
For all styles, there is a Num Stitches drop down menu. The Num Stitches default is Default and your other choices are 1, 2, 3, or 4 stitches.
Auto Trim: Check this box if you want auto trims inserted. Specify the auto trim length.
Auto Trim Commands Video
Auto Tie: Check this box if you want auto ties inserted. Specify the auto tie length.
Show Tie Types...: Clicking this button brings up a dialog that shows you the different tie styles.
![]()