Using the Double Waved Fill Effect
Start a new design.
Left-click the Complex
Fill button  .
.
Select Decorative
from the Stitch Type pull- down
toolbar at the top of the View Window
 .
.
Digitize a relatively large circle (so that you
can see the distortion effect).
Click the Edit
Mode button  .
.
Double-click the fill you just digitized. The
Properties dialog appears.
Click the Top
Stitching tab. Make sure the stitch type is set to Decorative
in this tab.
Choose any decorative stitch (such as Bows).
Click OK.
Click the Effects
tab.
Select Double
Waved from the Distortion Effect
pull-down menu.
Click OK. The
Double Waved effect will be applied to the fill.
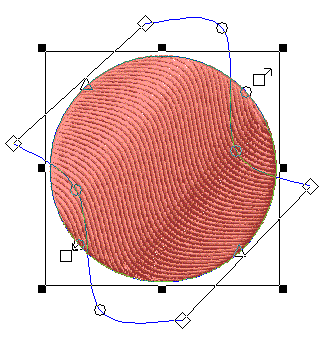
The double wave effect will be applied to
the fill. You
will now see a box around the complex fill, in addition to the selection
box. The
two blue lines are the stitch direction lines.
You can now add straight or curved points
to the stitch direction lines. You
can then move the points around to create curved effects. You
can also shorten or lengthen the stitch direction lines. The
image below displays a complex fill with a double wave fill effect.
NOTE:
The stitch direction lines can intercept the fill, but if the lines connecting
the stitch direction lines intercept the fill, the fill will not sew properly.
NOTE: Check the Trace
Borders option in the Top Stitching
tab to trace a border around your decorative fill.