 Accessing Lettering
Properties Video
Accessing Lettering
Properties Video
Accessing Lettering
Properties Video
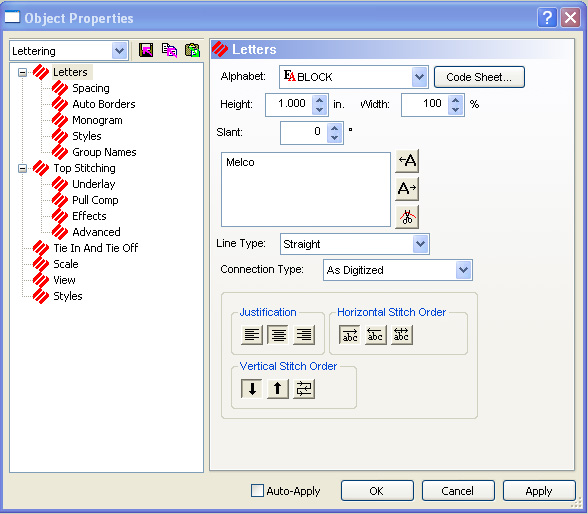
This section explains the properties that affect lettering. The properties that are unique to lettering are found on the Lettering properties tab. To access this tab, double-click a lettering object, or right-click the lettering object and select Properties from the pop-up menu.
Using Lettering Video
To select the font or alphabet that you would like the text design to appear in, left-click on the down arrow beside Alphabet:. Left-click the alphabet you wish to select.
Lettering Height Video
This is where you can set the overall height of a capital letter. The default is one inch.
|
This increases or decreases the overall width of each letter. The value is set at 100%, which is actual size. To increase the letter width, type in a percentage that is greater than 100% up to 190%. To decrease the letter width, type in a percentage less then 100% down to 0%. Below is an example: |
|
|
|
This inclines lettering in increments of one from +60 to -60. Positive values slant lettering to the right and negative values slant lettering to the left. Below is an example: |
|
You can also slant lettering on the workspace screen. To do this, left-click a selected lettering object. Then left-click and drag any handle (except for corner handles) to slant the lettering. |
When you click inside the large white box, your cursor will appear in the top left corner. This is where you will type out your text design.
Customized Letter Spacing
Sometimes text is too crowded or too loosely spaced. This often happens to arc and script lettering.
For crowded lettering, place the cursor in the lettering text box between
the letter that are too close together. Click the  button
or press F8
to add space. Click OK (or Apply) and the letters will move farther
apart. A > symbol will appear
in the text box. Each > adds
a space equal to 1/16 of the letter height. For example, with a 1"
letter, the space would be 1/16." With a 0.5" letter, the space
would be 1/32."
button
or press F8
to add space. Click OK (or Apply) and the letters will move farther
apart. A > symbol will appear
in the text box. Each > adds
a space equal to 1/16 of the letter height. For example, with a 1"
letter, the space would be 1/16." With a 0.5" letter, the space
would be 1/32."
You can also decrease the space between letters that are too far apart.
Again, you should place the cursor in the text box between the letters
that are too far apart in the text dialog box. Next click the  button or press F7
and a < symbol will appear in the text box. Click OK
(or Apply) and the letters will
move closer together. Each <
subtracts a space equal to 1/16 of the letter height.
button or press F7
and a < symbol will appear in the text box. Click OK
(or Apply) and the letters will
move closer together. Each <
subtracts a space equal to 1/16 of the letter height.
NOTE: You can also adjust spacing of a lettering element in the View Window. To do this, press and hold the SHIFT key, then left-click the letter you would like to adjust. A box will appear around the letter you have selected. Drag the letter to the desired location to adjust the spacing.
Lettering
Trim Video
A trim command causes peripherals equipped with trimmers to perform
a trim between each letter. Trims between lower case script lettering
are unnecessary. Add a trim in the text dialog box placing your cursor
(left clicking) between the letters you want to trim. When the cursor
appears, click the  button or click F9.
A ¤ symbol will appear in the
text dialog box to mark the trim. There will be no visible difference
in the View Window.
button or click F9.
A ¤ symbol will appear in the
text dialog box to mark the trim. There will be no visible difference
in the View Window.
To select the font or alphabet that you would like the text design to appear in, left-click on the down arrow of the alphabet pull-down menu, located under the text dialog box.
The alphabet pull-down menu provides a preview of each alphabet installed on your computer. When the pull-down menu is open, place your mouse cursor over an alphabet name. This will show you a preview of that alphabet to the right of the dialog box. (See image below).
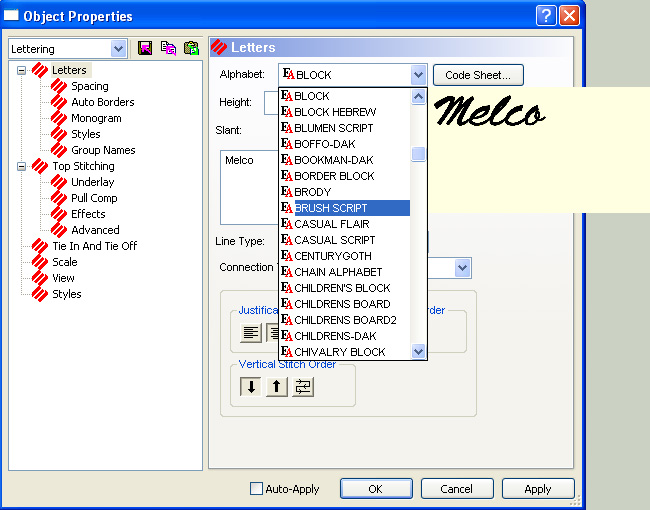
If you have the DesignShop or higher product level, you will be able to preview True Type fonts as well as embroidery alphabets. Auto-Font allows True Type fonts to be used as embroidery alphabets. These True Type fonts will be visible in the alphabet pull-down menu (they are identified by the True Type symbol). You can then select any of these True Type fonts from the alphabet pull-down menu and set the desired lettering parameters.
True
Type and Operator Alphabets Video
This setting allows you to change the type of base line, which is the line at the bottom of the lettering. (See the following image).

Changing the base line type adds special effects to your lettering by changing letter layout and/or appearance. The following base line types are available:
Straight Line - The bottoms of the letters are arranged along a straight, horizontal line. This is the default setting.
Straight
Line Type Video
Vertical Line - The letters are arranged along a straight, vertical line. The base line runs through the centers of the letters.
Vertical Line Type Video
Arc
- The bottoms of the letters are arranged on an arc. You can change the
radius and angle of the arc, and the direction of the lettering (clockwise
or counter-clockwise). The settings are displayed when Arc is selected
in the LineType pull-down menu.
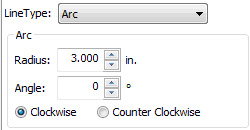
Arc Radius: The radius of a circle is the distance from the center of the circle to the circumference of the circle. The longer the radius, the less the amount of curvature in the arc (an arc is a piece of a circle).
Arc
Angle: The arc angle is a position on a circle where the center
of your lettering will be located. This position is entered in degrees,
with 0 (zero) degrees being the top of a circle, and 180 degrees being
the bottom of a circle.
Angle
Type CW or CCW: The angle type is a direction of sewing. In most
cases, you will want to be sewing in a CW (clockwise) direction if the
arc angle is in the top half of a circle. You will want to be sewing in
a CCW (counter-clockwise) direction if the arc angle is in the bottom
half of the circle.
A common occurrence when sewing counterclockwise is that the letters may touch. To correct this, you must use some positive horizontal spacing between the letters.
Tip on the Counter-Clockwise Direction:
Look at the first image below. Even though the word Denver was entered first before Colorado, the design sews as shown above when you have your arc properties set at 180 degrees and CCW. This can be corrected by making the Line Spacing a negative value, (example -1) instead of the default 1. The sewout will then look like the second image below.
|
|
|
You can also change the arc settings in the DesignShop View Window. When Arc is selected for the base line type for a lettering object, a radius will be drawn with the lettering (see the following image). You can drag and drop the endpoints of this radius to change the radius length and arc angle.
Arc
Lettering Video
Custom
- When Custom line type is selected, you can insert points along the base
line, then move these points to change the shape of the base line.
Click here
for information on adding and editing wireframe points.
Custom Line Type Video
Perspective
- When Perspective line type is selected, two points at the end of the
base line are created. A top line is also created, with points at the
ends. These points can be dragged and dropped to add perspective to the
lettering. You can also add curved points by right-clicking your mouse
along the base line and add straight points by left-clicking your mouse
along the base line. You can use these points to manipulate the perspective
base line.
Click here
for information on adding and editing wireframe points.
Perspective Lettering
Video
Envelope-
When Envelope line type is selected, a top line is created. Points can
be added to this top line and the base line, and these points can be dragged
and dropped to create various effects.
Envelope
Line Type Video
This setting determines how letters are connected (i.e., the locations of each letters entry and exit points). Select the desired setting from the pull-down menu. The following options are available:
As Digitized - Connections between letters are not changed (entry and exit points remain as they were digitized).
Closest Point - Entry and exit points will be inserted at the closest point between the letters.
Bottom Connect - Entry and exit points will be inserted so that letters are connected at the bottom.
Lettering
Justification Video
This is where you can select the justification of your lettering job, i.e. justify all lettering to the left, center, or to the right. This does not work for monograms.
There are many options available that can be applied to the stitch order of your letters or lines of text.
Horizontal Stitch Order: This option gives you more control of how each letter will sew out.
Left to Right  - Stitching
will start with the left letter and proceed to the right.
- Stitching
will start with the left letter and proceed to the right.
Right to Left  - Stitching
will start with the right letter and proceed to the left.
- Stitching
will start with the right letter and proceed to the left.
Center Out  - Stitching
will start in the middle and proceed to the farthest right, then come
back to center and proceed to the farthest left.
- Stitching
will start in the middle and proceed to the farthest right, then come
back to center and proceed to the farthest left.
NOTE: Center out stitching is commonly used to solve problems with registration, such as caps and difficult fabrics.
Horizont Horizontal
Stitch Order Video
Vertical Stitch Order: This option gives you more control of how each line will sew out.
Top to Bottom  - Stitching
order will start with the top line of letters and proceed to the bottom
line.
- Stitching
order will start with the top line of letters and proceed to the bottom
line.
Bottom to Top  - Stitching
will start with the bottom line of letters and proceed to the top.
- Stitching
will start with the bottom line of letters and proceed to the top.
Line Wrapping  - Stitching
will start at the side specified by the letter stitch option, left-to-right
or right-to-left and alternate the direction for each of the lines of
the lettering object. Center
out letter stitch order is not available with line wrapping.
- Stitching
will start at the side specified by the letter stitch option, left-to-right
or right-to-left and alternate the direction for each of the lines of
the lettering object. Center
out letter stitch order is not available with line wrapping.
Vertical
Stitch Order Video
Click on the Spacing button on the Lettering Tab to bring up this dialog.

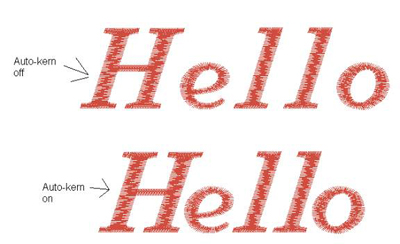
This feature moved letters closer together to improve spacing. Check Auto Kern to enable auto-kerning. Specify a percentage in the Spacing box to indicate what value you want to use as the minimum forced spacing between letters. Below are examples of spacing with and without auto-kerning:

Spacing
Line Spacing - If you have multiple lines of text, you can increase or decrease the spacing between the separate lines.
Line
Spacing Video
Horizontal Spacing -
By putting a positive value here, space will be added between the
letters. A negative value will take away space between the letters.
Horizontal
Spacing Video
Vertical Spacing - By putting a positive value here, vertical height will be added in between each letter, so that each letter is higher than the one before. A negative value will cause each letter to be lower than the one before.
If you have Use Default Spacing checked, your lettering uses the default setting. You can override the default setting by unchecking Use Default Spacing and specifying the exact value in the Word Spacing as percent of height box.
This feature adds borders around the selected lettering. To turn on this feature, check the box next to Enable Auto-Borders. You will see the following dialog:
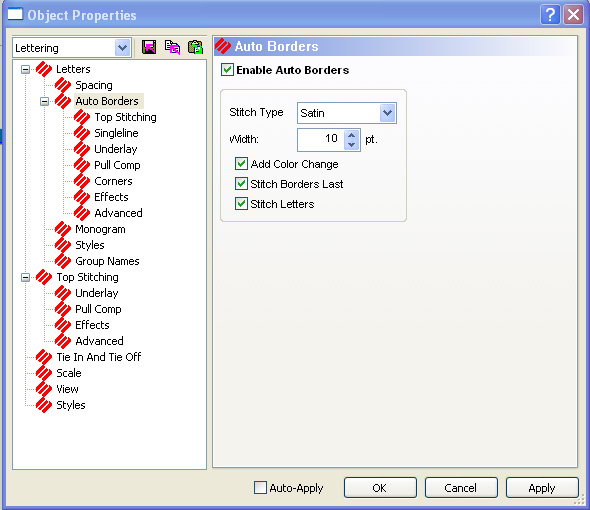
Choose the Stitch Type for your border and specify the Width. Check the box next to Add Color Change to insert color changes. Check the box next to Stitch Borders Last to stitch borders after all letters have been stitched. Note that if Stitch Borders Last and Add Color Change are both turned on, one color change will be inserted, between the last letter sewn and the first border sewn. If Add Color Change is turned on and Stitch Borders Last is turned off, a color change will be inserted between each letter and its border.
If Stitch Letters is turned off (box is unchecked) borders will be sewn without letters. The default for this setting is on.
Click OK to apply your changes and close the Auto-Borders dialog.
You can use a non-monogram alphabet to create a monogram by clicking in the box next to Enable Monogram Mode.
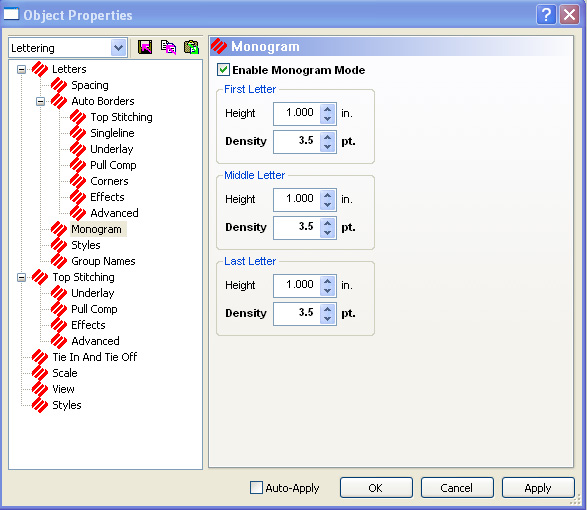
Monogram allows you to embroider three letters. For example, monogram embroidery is often someone's initials. When using a non-monogram alphabet you have the option to change the letter height and/or density of the individual monogram letters.
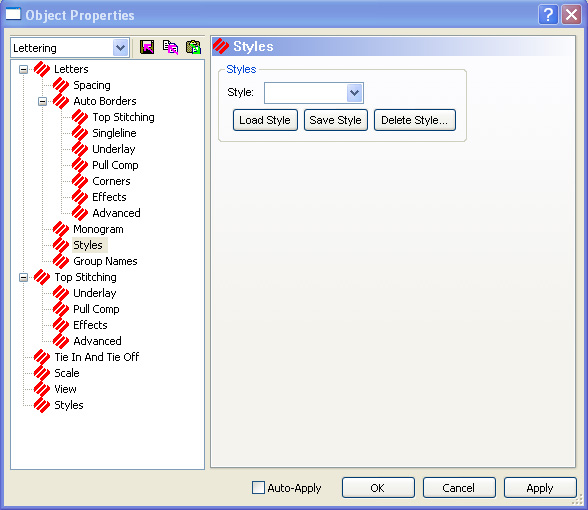
Lettering styles are named collections of lettering properties that can be loaded and saved from the lettering properties page. Styles include all user specified lettering properties, column properties, and lock stitch properties. Lettering styles can be saved by clicking on the Styles button, type the name for your style, click Save click OK. the new style will be added to your list of styles.
To load an already saved style, click on the drop-down arrow and select the desired style, click Load Style and click OK.
NOTE: Styles are saved in the DesignShop\Styles\directory. Two types of files can exist in this directory: files ending in the extension ST1 (DesignShop\Styles\*.ST1) and ST2 (DesignShop\Styles\*.ST2). The files of type *.ST1 are EDS III styles and files of type *.ST2 are DesignShop styles. You may copy your previously saved files from EDS III into this directory and they can be read into DesignShop, then saved as DesignShop styles. You cannot read DesignShop styles into EDS III.
NOTE: To see Group Names, there must be some text already on the screen.
Group Sewing (Group Names) allows you to add a single replaceable lettering field to a project and a list of names to be stitched into that field whenever you save the project to condensed or expanded files. This list of names becomes part of the project.
When working with group names, choosing the position and lettering properties
will often involve some experimentation and compromise considering that
the length of names to be substituted often varies considerably. Preview
capability allows substitution of any selected name into the replaceable
field at design time to assist with those choices. The full range of lettering
properties are available but cannot be varied from name to name (with
the exception of spacing and color changes between letters).
Similarly, the position of the Group Names field is fixed and cannot be
varied from name to name during a single File->Save
As operation. It is, of course, possible to select File->Save
As to generate expanded or condensed file output, then adjust the
position of the field, reselect long names, and generate another expanded
or condensed file.
While Group Names will most commonly be used to individualize uniforms for members of sports teams, the capability is generally applicable to batch personalization of multiple embroidered garments. A simple database of available names is associated with the project and can be updated, altered, and multiple different sets of names can be selected from available names. Copying the project file copies the available names but the list can be cleared and repopulated with a new set of names, possibly for a different customer. Risks of stitching an incorrect or misspelled name on a garment are reduced by allowing copies of the selected list to be made to the windows clipboard and then e-mailed or faxed to customers prior to actually generating the expanded or condensed files. Sending a copy of this list to your printer can provide identification of any particular name with the appropriately sized garment when not stitching on one-size fits all items.
The range of output options must be set prior to choosing File->Save As to generate either expanded or condensed files. These output options can be set from the same property page you will use to manage the lists of available and selected names. There are five options that result in generating from one file containing copies of the design and one name for all of the selected group names through separate files for each of the names. Understanding which option to choose from this list will allow you to shorten the total time required to stitch out embroidery designs that incorporate group names.
As you can see, there is considerable power and flexibility in the Group Names feature, but the workflow to add group names to any existing project could hardly be simpler.
Open a new screen in DesignShop. (Or if you wish to add group names to an existing design, open the design).
Click the Lettering toolbar button (or select Insert->Lettering). (To use group names functionality with an existing lettering object, double-click the lettering; proceed to Step 5).
Left-click in the View Window; you will see a blinking cursor.
Press ENTER.
The Lettering
properties tab will be displayed.
NOTE: The Group Names will
pick up the properties from the current settings in the Lettering parameters.
If you did not start with a lettering object, Group Names will
appear in the text box.
Choose the desired text values for the Group Names (example: Alphabet style, letter height, Column width, etc).
To
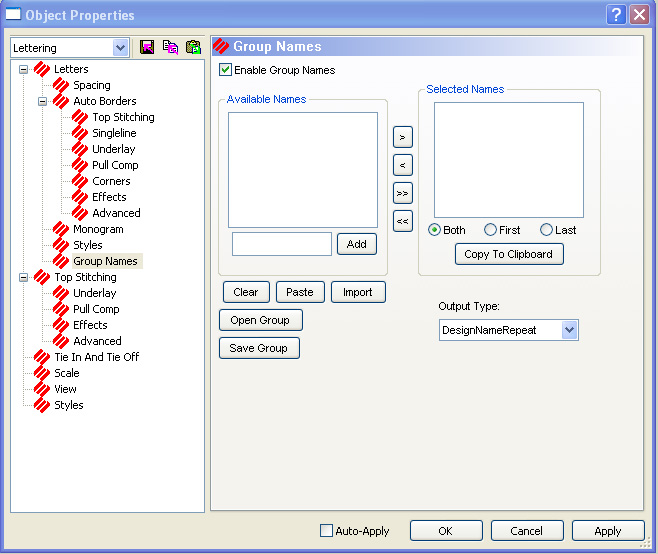
turn on Group Names, click on Group Names
to the left of the Lettering Properties screen and check Enable
Group Names.
The Group Names properties
dialog allows you to add, import, paste, clear, copy to clipboard, and
otherwise select names from the available list. Note that the list boxes
are intentionally not self-sorting so that names will remain in the order
added.
You can select the output format before or after entering the names. (See Output Options for descriptions of the output options.)
To add names (use one of the following methods):
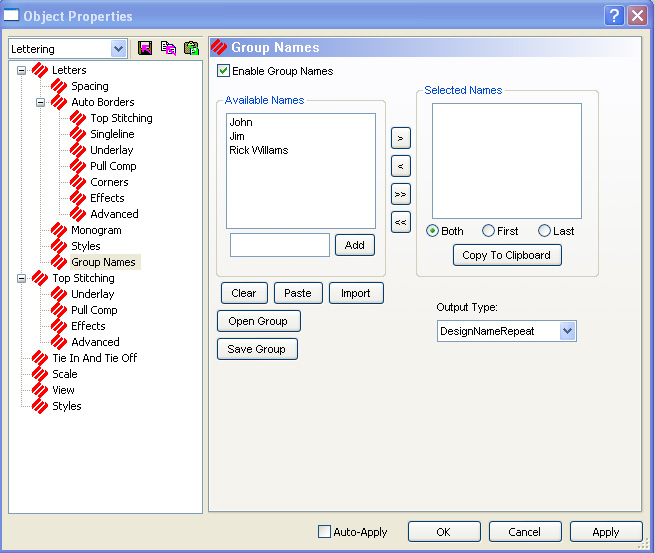
Add: There is a small edit window where you can type the name you wish to use. To add the name in the Available Names box, click Add. You can type a list of names, separated by commas, into that window (example: John Jones, Mary, Greg Smith, Lisa, Paul Johnson). Click on the Add button again to insert the names into the Available Names list.
NOTE: You should be aware that when you enter a name such as Mary Jo Williams, the first name will be considered Mary and the last name Jo Williams. If this is not what you want to happen to such names you should type Mary Jo as Mary_Jo. It will appear as Mary_Jo in the list but when stitched out the "_" will be replaced by a space.
NOTE: Clicking Clear will delete any highlighted names (left-click a name to highlight it) in the Available Names box.
Paste: Click on the Paste Button. The names will be inserted in the Available Names list.
NOTE: Prior to doing this, the names must first be pasted to the clipboard from another application. When using another application, a carriage return is the same as typing a comma in the Add section.
Import: Click on the Import button. The Open dialog box is displayed to choose the directory and text files to insert. Click on the file and the names will be inserted in the Available Names list.
NOTE: Prior to doing this, the files need to be saved as a *.txt file from another application (for example NotePad). When using another application, a carriage return is the same as typing a comma in the Add section.
Open Group: Click this button to open a group names file that was previously created and saved. An Open dialog will be displayed, and you can navigate to the desired group names file (*.grn) to open it. (See Step 12 for information on saving a group names file).
Once all the names have been added to the list, click the All button (>>) to move all the names to the Selected Names box. You can also click on the specific name, then click the (>) to send the names one at a time.
NOTE: You can edit the spacing, color changes, and trims for individual names. Once a name has been added to the Selected Names list, double-click on a the name you wish to edit and it appears on the screen. Here you can adjust the spacing and insert color changes and trims for the selected name only.
Choose First,
Last or Both.

Even if only using the first name, always store the first and last name for added flexibility at a later time.
If you wish to save the list of group names as a group names file, click the Save Group button. A Save As dialog will be displayed. Navigate to the desired location and type a name for the group names file. The file (which will contain names and lettering properties) will now be available for future use.
The names displayed in the Selected
Name list are the names that will sew.
To modify the Selected Name
list, click on the (<<)
button to empty the list of Selected
Names. Or select a specific name and click the (<)
button delete it from the list.
If you click Copy to Clipboard,
the names in the Selected Name
list will go to the Clipboard to be used in another application (such
as a text editor).
Select an Output Option. When saving just lettering, it does not matter which Option is selected.
Click on OK or Apply.
If desired, reposition the lettering. Remember that only a single position for the Group Names field is available each time you generate expanded or condensed files
Click on File->Save As.
Type the file name and desired directory to save in.
Select condensed or expanded (the file must be saved as condensed or expanded format before it can be stitched).
Click on OK.
Select File->Save As again and save the file as an ofm file. This will give you a project file you can edit in the future.
The group names are now ready to be sewn.
Once a name has been added to the Selected Names list, you can left-click to select a name, then click OK to return to the Lettering tab. Here you can edit the selected name only. When you return to Group Names, your changes will be applied.
You can also edit the Available Names list and the order of the names using NotePad or any word processor. First, if there are any names in the Selected Names box, click << to empty the list of selected names. Then click >> to place a complete copy of Available Names into Selected Names. Select the Both radio button to assure that the complete name is showing for each. Next click Copy to Clipboard to copy the list of Selected Names to the Windows clipboard and then paste it into whatever text editor you regularly use. You may note some additional information enclosed parenthetically but you can ignore it as balanced parentheses and enclosed text will be removed when pasting or importing files. With the list in your favorite editor you are free to edit it, then copy it to place it back into the clipboard.
Printing this list will assist the embroidery machine operator in associating the proper garment with the name. You can also associate comments with each name in the list as in the following example:
John Jones (male 16-32 left pocket)
Mary Jo Williams (female small left sleeve)
And so on...
NOTE: As mentioned above, balanced parenthesis and their contents will be ignored and ends-of-line can be substituted for commas to separate names. Beware of open parenthesis without a balancing close as you may lose names from the list.
The real power of this multi-step editing process is that lists of Available Names can be quickly extracted from e-mail without risk of misspelling and copied back to e-mail or fax before stitching to verify the names with customers.
The reason there are so many output options that result in a single file is that large Group Name jobs can be run simultaneously on multi-head machines. Generally, when stitching on a single-head machine you will use option 1, i.e. Design, Name, Repeat and change garments on color changes after the name, or use option 5, Separate Files for greater control of the process.
When saved in this format, the design and group names are saved together. The embroidery machine will sew the design, the first named typed, the design, the next name and so on.
When saved in this format the machine will sew the design once and then each name saved. This format is usually used for multi-head machines when the same design is sewn on all the heads, and then each name is sewn on each garment (the garment on one head is sewn on, while all other heads are turned off).
When saved in this format, the design will not be saved with the Group Names. This usually means the design is already sewn on the garment, then you decide you want group names added. This is typically used for a single head machine.
When saved in this format, the design sews where you place it in relation to the names for a later time. This is typically used for a multi-head machine.
When saved in this format, each name will be saved as a separate design. The first two characters of multiple group name files are numeric, i.e. 01Bill.exp 02Mary.exp, etc. These files can be used at a later date. When these files are placed on a diskette and viewed on a sewing peripheral, the numeric order will help the operator keep them in sequence.
You should choose the output directory carefully when generating multiple group names files to avoid mixing these with designs that do not contain group names. To assist in making this distinction, the first two characters of multiple group name files are numeric, i.e. 01Bill.exp 02Mary.exp, etc. so they will sort to the top of the list in Explorer when the list is sorted on name.
NOTE: After the design has been saved in Condensed or Expanded format, a color change command will be inserted after each Group Name.
Re-open the design in DesignShop.
The design will open with the names on top of each other with color changes added.
Send the file to the machine.
When programming the design to sew, use a P as Color 1 (in the machine Color menu) to force the machine to stop after sewing each name. This will enable you to insert the next hoop and press start to sew the next name. (Melco embroidery machines only, with the exception of the AMAYA)
All of this sounds more complex than it actually is, and once you have used group names for one to two projects your productivity in using it to personalize designs will soar by comparison with any other method, in any other embroidery design system. Being able to allow the production department to manage the database of names from computers that do not necessarily have DesignShop installed allows the workflow to be distributed in shops where networks may include multiple production workstations but only a single DesignShop design station. This is the kind of functionality you will come to expect from your embroidery system, and it is available exclusively from Melco.
![]()