![]()
To adjust the presser foot height, the machine must be turned on and AMAYA OS must be loaded. A hoop with fabric must also be installed. You can set the presser foot height in the middle of a design.
If you set the presser foot height over a sewn section of the design, set the presser foot so it barely touches the stitching.
If you set the presser foot height over a bare section (unsewn) of the fabric, set the presser foot so that it comes close to the fabric but does not touch it (leave a gap between the fabric and the presser foot roughly equal to the thickness of the thread). Always set your presser foot to allow for the highest point in the design. You can adjust the presser foot height at anytime in the design as long as the machine is stopped and the current needle is taken to bottom dead center.
Presser foot height may vary slightly with each machine and with each operator. It will be dependent on many variables such as thread type and thickness, fabric, needles, and operator preference. The ideal setting on presser foot height is so that the presser foot just touches the fabric at the point where the needle begins the upstroke (it starts to move back up).

Figure 1 - Presser Foot Height
Click the Bottom Center button in the Head Timing tab to take the needle to bottom dead center.
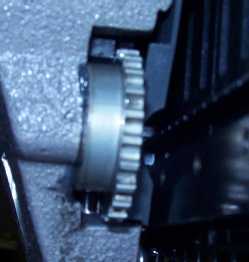
Figure 2 - Presser Foot Height Adjustment Eccentric
Use the presser foot adjustment eccentric located behind the needlecase and adjust the presser foot height up or down as needed. It is recommended that the presser foot is set at this point to where it just barely touches the fabric.
Click the Head Up button in the AMAYA OS Head Timing menu. Close the Maintenance menu screen in the AMAYA OS software by clicking on the OK button (Figure 1).
![]()