![]()
|
|
This repair requires timing and other adjustments and should be done by a Melco authorized service technician.
|
|
|
CAUTION!! DO NOT disassemble the needle case any further than what is provided in this manual. If you do so, the alignment of the needle case will be severely compromised and extremely difficult to reset without the proper fixtures used at the factory. |
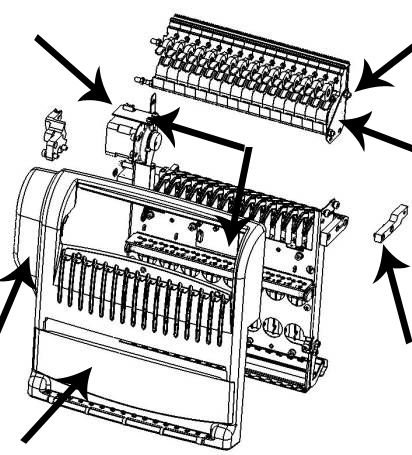
Figure 1 - Needlecase Assembly
1. Turn ON the AMAYA and load the AMAYA Control Panel software. Click on "Maintenance" menu and then "Head Timing" tab. Click on the "Head Up" button to bring the head to the HEAD UP position. If the machine is jammed or will not go to the head up position, contact Melco Technical Support for instructions.
2. Color change to either Needle 5 or 6.
3. Engage the emergency stop by pressing ![]() in.
in.
|
|
WARNING! Do not proceed without engaging the emergency stop button or by turning the machine off. The machine may begin operating if you do not do so. This can result in severe damage to the machine and/or personal injury. You do not need to disconnect the power input cord from the machine. |
4. Take the small access cover off the needle case assembly.
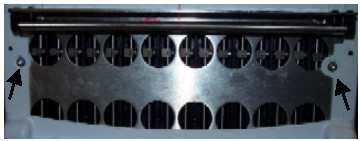
Figure 2 - Needlecase Access Cover Removed
5. Remove the 2 button head screws at the left and right of the access opening, holding the needle case cover, and remove the needle case cover (see Figure 2).
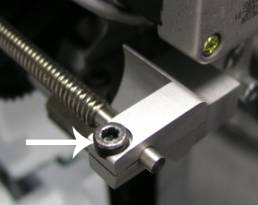
6. Loosen the top screw to the left color change spindle mounting bracket as shown in Figure 3.
Figure 3 - Loosen Top Screw
7. Remove the nut from the right color change spindle mounting bracket as shown in Figure 4.
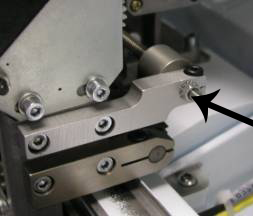
Figure 4 - Remove Nut
8. Loosen the top screw and remove the two side screws from the right color change spindle mounting bracket. Remove the right color change spindle mounting bracket.
9. Remove all of the thread tubes from the back of the thread feeder.
Figure 5 - Remove Thread Tubes
10. Disconnect the harnesses from the two PCB’s and the stepper motor.
11. Slide the needle case to the left while lifting the presser foot to clear the grabber bracket.
12. The needle case will now be free to remove from the head.
13. Handle the needle case carefully so you do not damage any components.
![]()
Stepper Motor
Needle Case Cover
Access Cover
Right CC Spindle Mounting Bracket
Two PCB Boards
Thread Feeder
Connecting Screw
Loosen