![]()
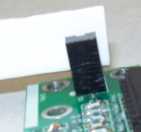
Figure 1 - Breaking Optical Sensor Signal
Prior to testing optical sensors, clean them using compressed air only. DO NOT use any liquid cleaners or solvents on the sensors. You will permanently damage them if you do.
Testing optical sensors is simply done by using a nonmetallic object and break the signal between the two sensors on the optical sensor PCB (use nonmetallic material in order to avoid shorts if you accidentally touch an electrical component). When you move an object between the two sensors on the optical sensor PCB, the corresponding LED on the Main PCB will illuminate on breaking the signal and turn off when you remove the object from between the two sensors.
If the corresponding LED on the Main PCB fails to illuminate but the Main PCB is functioning properly, then the optical sensor is probably defective, provided continuity in the harness is good on all leads (check only if you replaced the harness). Refer to the replacement section for the respective optical sensor PCB for locations of the corresponding indicator LEDs on the Main PCB.