Working with Hoops
Hooping a garment
Whether you are sewing flat goods, tubular goods, or caps, you must first place your material into the appropriate hoop.
Hooping the garment or fabric correctly is essential for quality embroidery. When you hoop, you are creating the foundation to receive the embroidery stitch. The goods must be held securely in the hoop or registration may suffer.
-
Start by working on a clean flat surface.
-
Use the smallest hoop possible for the design. The design should fit inside the hoop with a small margin of space between it and the hoop, but without a lot of extra material hooped.
-
Place the appropriate backing on the garment. To learn more about backing, see Backings and Topping.
-
Smooth the fabric as much as possible before hooping, including the lining and backing.
-
Place the outer hoop inside the garment.
-
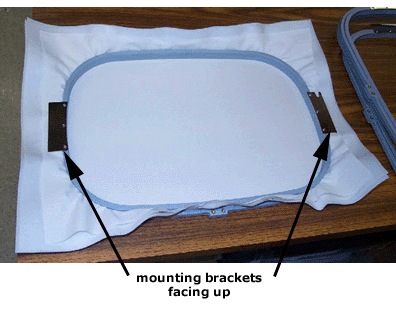
Place the inner hoop inside the outer hoop with the mounting brackets facing up.

-
Press down firmly with both hands to insert the top into the bottom hoop with the fabric and backing between them. Make sure the outer hoop is flush with the inner or extends past it slightly.
If the hoop is too loose, tighten the adjusting screw on the outer hoop before hooping the garment.
If the hoop is too tight, loosen the adjusting screw on the outer hoop before hooping the garment.
-
After hooping, verify the garment is taut and flat, checking to see if there are any wrinkles in the sew area. If the garment is loose, you may need to un-hoop and adjust the hoop size for better security.
|

|
Note: When sewing on knits and jersey materials, do not overstretch the material. These materials will stretch out of shape and distort the sewout.
|
Different fabrics and fabric weights may require you to loosen or tighten the hoop. It might take a few attempts to get the exact setting for the fabric you are working with. Most fabrics do not require the hoop to be tightened down once in the hoop.
A good hooping habit is to look at the back of every hooped piece before it is placed on the machine. Turn the hoop over to check that there are no wrinkles or other parts of the garment caught in the hoop. Also make sure the backing is held on all sides of the hoop.
|

|
Note: Many people prefer to sew a practice sewout before embroidering the garment. Although this is not essential, doing a sample sewout is an excellent way to prevent problems
|
For instructions on attaching the hoop to AMAYA, see Attaching the Hoop.
