Click on a menu item below to learn more.

The Design Queue is one of the tabs located in the Machine Views. It allows users to add designs to a pending designs list. While placing designs in the queue does not load them to the machine, it does provide faster access to them when they are ready to be loaded to the machine and sewn.
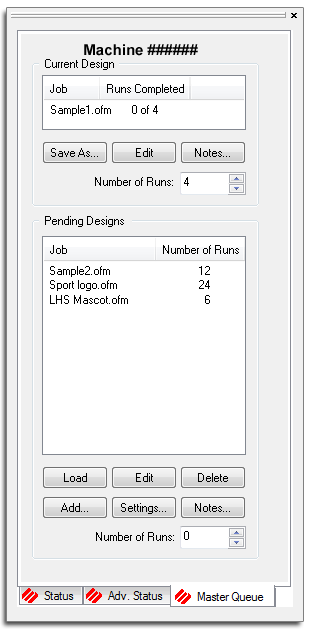
The Design Queue Tab contains three sections:
This is the serial number of the currently selected machine.
This displays the current job and the number of runs completed out of the number of runs needed.
- Allows the user to save the design that is currently loaded in the machine.
- Allows the user to edit the design that is currently loaded in the machine.
- Displays a dialog containing the design notes and operator notes.
- Allows the user to set the number of runs needed for that design. Click on the up or down arrows to the right of the field to change the number.
- Loads the currently selected design into the machine. If no design is selected, it will load the first design in the list.
- Allows the user to edit the selected design.
- Deletes all the selected designs from the queue.
- Adds new designs to the queue. The user can select more than one design at a time to add.
- Takes the user directly to the Settings Tab property page which contains all the options for the design queue.
- Displays a dialog containing the design notes and the operator notes.
- Allows the user to set the number of runs needed to complete the job for the selected design.
Designs can be added to the Design Queue in three ways.
Clicking on the in the lower half of the Design Queue tab will bring up an open dialog box. From here, select the design or designs you wish to add to the queue. Multiple designs can be selected by holding the CTRL key on your keyboard will clicking on the desired files. Click on to add the selected design(s) to the queue. If multiple machines are in the Machine List, a machine selection window will come up. From here, you can select which machine queue you would like to add the design to.
Menu commands can also be used to add designs to the queue. By going to File>Queue Design, an Open dialog box will come up. From here, select the design or designs you wish to add to the queue. Multiple designs can be selected by holding the CTRL key on your keyboard will clicking on the desired files. Click on [Open] to add the selected design(s) to the queue. If multiple machines are in the Machine List, a machine selection window will come up. From here, you can select which machine queue you would like to add the design to.
Designs placed in the pending folders through Windows Explorer will appear inside the Design Queue. To use the pending folders, you will need to navigate to them through Windows Explorer. If this method is going to be used often, it may benefit you to place a shortcut to these folders in a more convenient location such as your desktop. Each machine has its own pending folder in the AMAYA OS install directory. (An example path for these pending folders would be C:\Program Files\Melco\AMAYA v#\Jobs\"Machine Serial Number"\Pending.) Designs can be copied from any folder and pasted into this Pending folder.
The order of designs in the Pending Designs list can be altered by selecting a design and then clicking and dragging it to a new position in the list.
To load a design to a machine from the queue, select the machine(s) in the machine list. If multiple machines are needed, hold the CTRL key on your keyboard while clicking on the desired machines. Each machine that is selected will show in the list with a highlighted color.
Next, click on the [Load] button located beneath the Pending Designs list. The selected (highlighted) design in the Pending Designs list will be loaded to the selected machine(s). If no design is selected, the top-most design in the list will be loaded.
Designs can be removed from the queue by either selecting the design in the Pending Designs list and clicking the [Delete] button, or they can be removed from the pending folder mentioned above.
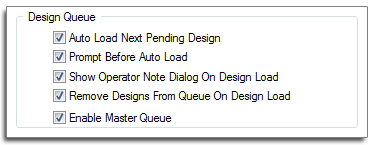
Designs can also be set to automatically be removed from the queue when they are loaded. To access these settings, click on the [Settings] button in the lower portion of the Design Queue tab. For more information, read the Design Queue section under the Settings Tab in this Help document.

When enabled through the Settings Tab, the Master Queue tab replaces the Design Queue tab in the Machine Views.
In most ways, the Master Queue functions like the Design Queue. Jobs are added, loaded, and removed through the software in the same way. The biggest difference is that with the Master Queue, all of the machines in the Machine List pull from the same queue. This means that they can share jobs, and that when designs are added to the queue, no machine selection window pops up.
Using multiple machines to complete large orders is an effective way to complete your Pending Designs. If a job is loaded to multiple machines, the Number of Runs tracks the number of times a design has been completed on any of the machines. As designs are completed, the Number of Runs goes down. When it reaches zero, the job is complete.

Combining the Master Queue with "Auto Load Next Pending Design" and "Remove Designs From Queue On Design Load" in the Settings Tab begins to automate your workflow. When all of the runs for a job have been loaded to machines, the job will removed from the queue. The next machine to finish sewing will automatically load the next pending job in the Master Queue. It can begin sewing on the next job while the other machines in the Machine List finish up the designs that they're running.
Using "Auto Define Color Sequence" in the Settings Tab will further speed up the process. With this setting enable, the software can automatically define the color sequence of the newly loaded design based on the color information in the thread cone display.
With all of the automatic settings, you may want a visual cue that a job has changed and you may need to switch the product you are sewing on. By enabling "Show Operator Note Dialog On Design Load" in the settings tab, the Operator and Design Notes will pop up on screen when a new design is loaded to a machine.
Although enabling the Master Queue through the Settings Tab enables it for all machines in the Machine list, the settings to "Auto Load Next Pending Design" can be set per machine. If a machine in the list does not have this setting enabled, designs can be loaded to the machine manually through .
Designs can be placed in the pending folder for the Master Queue through Windows Explorer just like they can for the Design Queue. The process is the same, but the location of the folder is different. An example path for the Master Queue pending folder would be C:\Program Files\Melco\AMAYA v#\Pending.) Designs can be copied from any folder and pasted into this Pending folder.