Click on a menu item below to learn more.
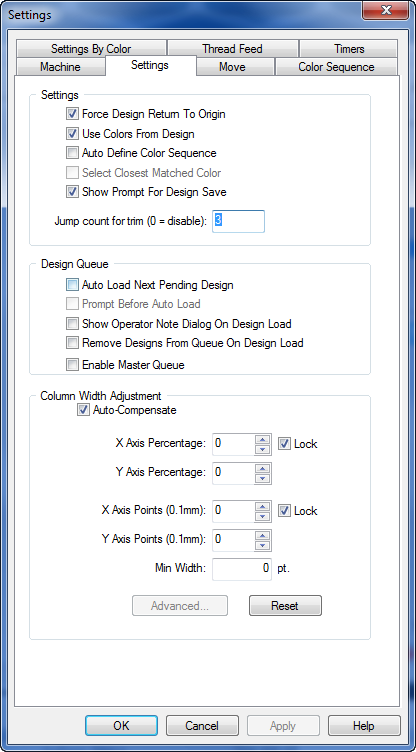
When this setting is enabled, the AMAYA will return to design origin after designs are sewn.
When this parameter is turned on, AMAYA OS will draw loaded designs with the colors stored in the design. This parameter does not affect the color sequence. This feature is permanently on for AOS Lite.
When this parameter is turned on, AMAYA OS will automatically create a color sequence based on the color information stored in the design and the color information associated with the needles in the thread cone display (displayed in the Color Sequence tab).
For every color number in the design, AMAYA OS will look for a match to the color in the thread cone display and insert that needle number (cone number) into the color sequence. If there is not a match, then you will be prompted to choose a color from the color palette. You will not be prompted to choose a color if you have turned on .
When this parameter is turned on, AMAYA OS will choose the closest color in the thread cone display when it is unable to find an exact match when automatically defining a color sequence. The default for this parameter is Off. You can only turn on this parameter when Auto Define Color Sequence is turned on.
Show Prompt for Design Save (SE & Flex+ ONLY)
When this is checked, the user is prompted to save their current design when opening a new design or closing the current one.
If more than the specified number or consecutive jump stitches occur in a design, an automatic trim will be executed by the machine. The machine performs the trim before the jump stitches are made. The default value for this is 3. Entering 0 in this parameter disables this feature.
|
|
Note: You must reload a design for any changes to jump count to take place. That is, if you load a design, then change the jump count, the change will not take place until you reload the design. |
For additional information on using the Design Queue, read the Design Queue section.
When this box is checked, the next design in the design queue is automatically loaded into the machine once the desired number of runs have been completed for the current design.
When this box is unchecked, the user must click on the Load button to load the next design into the machine. The default setting for this feature is Off.
When this box is checked, the software prompts the user with the dialog shown below before automatically loading the next design in the queue. This feature is only available when Auto Load Next Pending Design is turned on. This feature can save you from needing to reload a design at a later time for a repair. The default setting for this feature is Off.

When this box is checked, the Operator Notes dialog is automatically displayed when a new design is loaded. The Operator Notes dialog is only displayed if the design contains operator or design notes. The default for this feature is Off.
When this box is checked, designs are automatically deleted from the design queue when they are loaded into a machine. When this feature is turned off, the designs remain in the design queue until they are loaded. The default for this feature is Off.
When Master Queue is enabled, this feature removes the job from the queue after all the number of runs for the job reaches zero.
This checkbox affects every machine in the machine list. Turning this feature on or off for one machine will do the same for every machine in the machine list. When this box is checked, the Master Queue is enabled for all machines.
This setting allows you to adjust the width of all columns when they are being sewn. If you have Auto-Compensate selected, the column width values are selected automatically depending on if you are sewing on a cap hoop or a flat hoop. Width can be adjusted manually by percentages (up to 25%) or by points (up to 20; entering points will add or take away points in the column). You can increase or decrease (enter negative values to decrease) column width along the X axis (horizontal stitch direction) and along the Y axis (vertical stitch direction). If Lock is checked, X and Y will both be changed according to the value entered for either X or Y. The default values for all of the settings is zero, which means the column width is not adjusted. The user can specify a minimum width in points for column width so that the columns never sew less than this width. Click the Reset button to restore all of these settings to the default value. Un-check Auto-Compensate and click on the Advanced... button to get the Variable Pull Comp dialog. This allows the user to vary what the pull compensation is for various column widths. See the following picture:

The pulldown menu choices are: Disabled, Custom 1, Custom 2, and 2004 Cap Driver. Change the pulldown menu to Disabled if you want to disable this feature. If you want preset values for a flat hoop, use Custom 1. If you want preset values for a cap hoop, use Custom 2. If you want preset values for a 2004 Cap Driver, use 2004 Cap Driver. The user can then adjust the settings to their specifications.