Click on a menu item below to learn more.
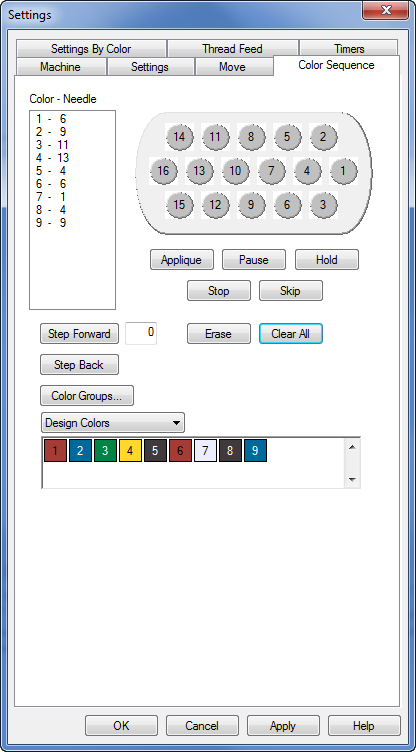
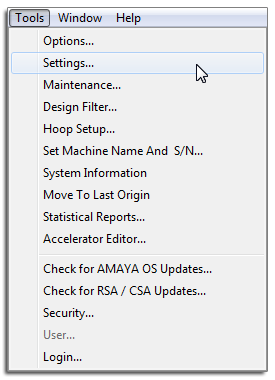
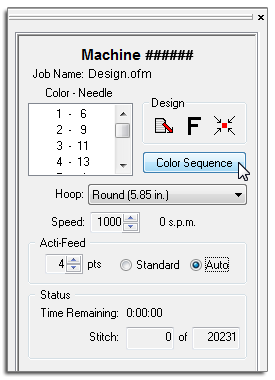
You can access the color sequence through the menu bar by clicking on Tools > Settings, and then clicking on the tab. This tab is also available by clicking on the button in the or tab of the Machine Views toolbar.
 |
 |
|
Tip: When you click the Color Sequence button in the Machine Views toolbar, the Settings By Color tab will also be available in the dialog that opens. Also note that when you have a multi-ring hoop open in the AMAYA OS View Window and you click the |
This area lists the needles in the order in which they are going to sew. The number on the left is the number of the color in the design. The number on the right is the number of the needle on which that color block is going to sew. In the image above, the first color to sew will be sewing on needle six. The second color to sew will sew with needle nine.
These buttons will allow you to walk through the color blocks in a design. To see this, you may need to move the color sequence tab window so that it is not blocking your view of the design on screen by clicking and dragging on the title bar of the color sequence window. Pressing once will cause the design will grey out and the color number beside it will go to “0”. This represents the beginning of the design. Every time the button is pressed, another color will appear in the design in the order that it will sew. Pressing will cause the colors to grey out again in reverse order. The number beside the step represents the latest color in the sequence to appear in color.
The button will open another window. In this new window, needles can be assigned to color groups. This means that multiple needles can have the same color of thread and can be configured to sew if another needle in the color group breaks the thread. In this way you can create back-up colors. For more information, see the Color Groups section.
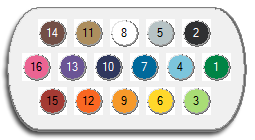
The thread cone display is a graphic representation of the thread tree on your AMAYA machine. This is used in setting your color sequence. The first time AMAYA OS is opened, the thread cone display will show as all grey.

This can be changed to reflect the actual thread colors on your machine. This can be accomplished a couple of ways.
You can click on any of the design color swatches and drag them up to the thread cone display. This will change the color of the circle, and give that needle the properties of that specific thread.
Another option would be to right-click on a needle in the thread cone to bring up the Color Properties window. Within this window, you can modify the properties of that color. (See Color Properties).
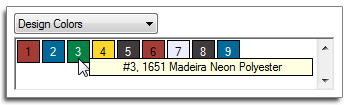
Design colors displays the color blocks from the design in the order in which they will sew. In the example below, the stitches displayed in red will sew first. The number displayed on the color block represents its position in the sew order. Hovering your mouse over one of the color blocks will pop up the suggested thread color for that block. Notice that the same color may be used multiple times in a design. If that is the case, the color will display each time it is to be sewn. The red, blue, and black in the example below all repeat in the design.
Representative design colors are only saved by a few file formats. OFMs keep design colors. Most other file formats do not.
If a file format does not contain design color information when loaded into AMAYA OS, it will be given a color for each color block in the file. These colors do not represent the colors in which the design was intended to sew. An example of the default colors give to a design that contains no color information is shown below. This is usually very noticeable from looking at the design on screen. For example, a design of a beach scene without any color information might show up with red water, green sand, and a yellow sky. These are not the colors in which you need to sew. You can choose to sew them in any color you wish.
To set the color sequence for a design with Design Colors selected, read the Setting Color Sequence section.
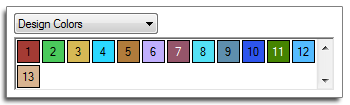
Choosing Active Colors from the drop-down will display each color from the design once. It may be helpful to think of these colors like the cones of thread used in sewing your design. Red may be used several times in a design, but you only require that one cone of that red to be on the machine. Hovering your mouse over one of the color blocks will pop up the suggested thread color for that block.
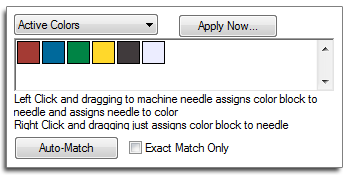
With Active Colors, needles are assigned to each color block. If that color is used more than once in the a design, AOS will use the needle assign to that color block. Color blocks will appear without numbers until a needle is assigned.
To set the color sequence or assign needles for a design with Active Colors selected, read the Setting Color Sequence section.
This button inserts an applique pause into the color sequence. When the machine encounters an applique pause, it pauses and moves the rack out (towards the operator). Press the Start button on the machine to move the rack back in and resume sewing.
See Sewing an Applique for instructions on this procedure.
This button inserts a pause after a color change and commands the machine to wait for an operator restart. The machine will also pause after every following color change and will wait for the operator to restart. To restart sewing after a pause, hit the Start button on the machine. Use this when you want to stop after every color in the color sequence.
This button inserts a pause after a color change. To resume sewing press the start button. A hold is used most often when a thread color must be changed during a design.
This button replaces a color change. Inserting a stop does not insert a color change. This command is used most often when an operator wants to insert a manual color change. To resume sewing, press the Start button.
This button inserts a skip, which cause the machine to skip the next color change and continue sewing on the same needle.
This button erases the selected color change from the color change sequence.
When Design Colors are selected, clicking this button will remove all color sequence information from the Color - Needle field.
When Active Colors are selected, clicking this button once will remove all color sequence information from the Color - Needle field. Clicking it a second time will remove any needle assignments from the active colors.
|
|
Note: Remember that when Auto Define Color Sequence is turned on, AMAYA OS will automatically match the colors in the design to colors in the color palette. If there is not a match, then you will be prompted to choose a color. You will not be prompted to choose a color if you have turned on Select Closest Match Color. |