![]()
Note: You can only sew on one hoop size at a time, that is, all hoops inserted into the spider frame must be the same size.
Melco offers a Twin Spider Frame Option for use with the AMAYA. This option consists of a frame (that attaches to the x-carriage) and several hoops that can be inserted into the frame. Using the Twin Spider Frame Option can increase productivity because it allows you to hoop garments more efficiently (that is, you can hoop one garment while the AMAYA sews on another garment).
If you wish to use another spider frame other than the Twin Spider Frame Option, you must use the Hoop Manager to create a custom Multi-Ring hoop. Click here for instructions.
Complete the following steps to install the twin spider frame and hoops.
|
|
Note: You can only sew on one hoop size at a time, that is, all hoops inserted into the spider frame must be the same size. |
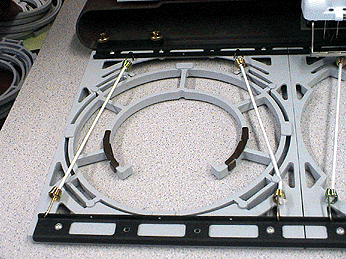
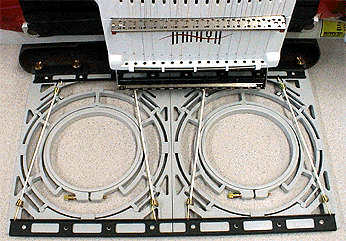
Place the spider frame on the tabletop.

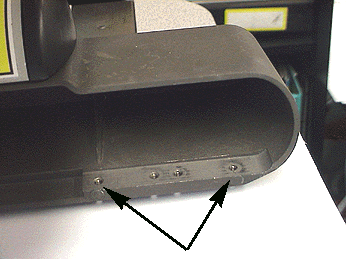
Line up the two holes on each side of the spider frame bracket to the x-carriage holes indicated in the following image.
Attach then loosely hand-tighten all four thumbscrews (note that your machine will either have brass thumbscrews or stainless steel thumbscrews).
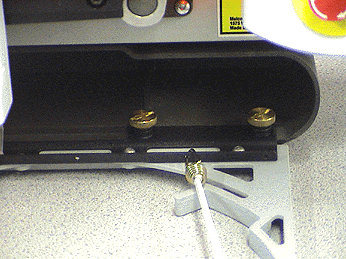
After all thumbscrews are attached, tighten them securely. If your machine has brass thumbscrews, use a screwdriver to tighten them. If your machine has stainless steel thumbscrews, use a 6mm hex wrench to tighten them.
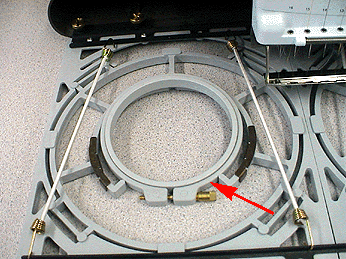
Insert the holders for the desired hoop size into the frame. (Before doing this, you may find it easier to remove the elastic cords that are attached to the spider frame.)
To insert a holder, line up the four extruding features of the holder with the corresponding notches in the frame, then push the holder into place. The holder should feel tight as it is pushed in. You will need to apply some pressure as you push in the holder. As indicated in the following image, note that the open area of the holder is facing away from the machine.
Before inserting hoops, hoop your garment(s)/material by following standard hooping guidelines.
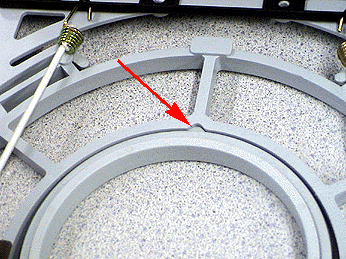
Insert the hoops. To do this, first insert the bottom of the hoop (where the adjusting screw is located) into the open area of the holder. (See the following image; please note the hoop contains no fabric / material for illustration purposes).
Line up the extruding notch of the hoop with the notch on the spider frame, then push the hoop into place.
Three hoop configurations are available for the twin spider frame. The following images display each of these configurations installed.
Two 12cm / 4.7 in. hoops
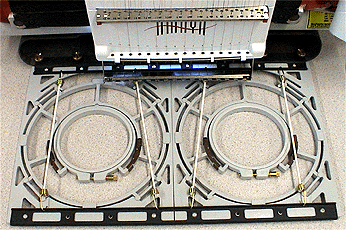
Two 15cm / 5.9 in. hoops
Two 18cm / 7.1 in. hoops
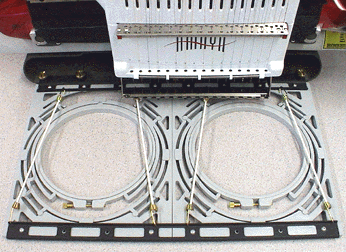
Use the provided elastic cords to secure the fabric / material that extends beyond the hoop. This will keep it out of the way during sewing.

After you have installed the spider frame and spider hoops, you need to select the spider hoop in the AMAYA OS hoop selection menu. Three preset spider hoop configurations are available in AMAYA OS. You must select the configuration that matches the hoops you have installed on your spider hoop frame.
Twin Spider (12cm / 4.7 in.) - two 12cm / 4.7 in. hoops
Twin Spider (15cm / 5.9 in.) - two 15cm / 5.9 in. hoops
Twin Spider (18cm / 7.1 in.) - two 18cm / 7.1 in. hoops
When a spider hoop configuration is selected, all inner hoops will be displayed in the View Window.
You can view the attributes of these preset hoops in the Hoop Manager (Tools->Hoop Manager), but these attributes cannot be changed. You can, however, control how the AMAYA machine sews in multi-ring hoops (by changing Multi-Ring settings).
To access Multi-Ring settings, open the Settings menu, then click the Multi-Ring Settings tab (this tab will only be visible if a spider hoop configuration is displayed in the AMAYA OS View Window). In this tab you can change sew order, turn on/off infinite sew order, and create color sequences for individual hoop rings.
|
|
Tip: When you have a multi-ring hoop open in the AMAYA OS View Window and you click the Color Sequence button, the Multi-Ring Settings tab will open. Note that the Settings by Color tab will also be available in the dialog that opens. |
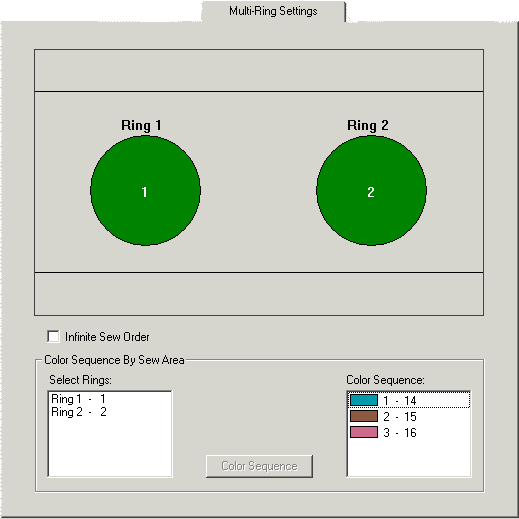
Sew Order: By default the hoops will be ordered from left to right. The quickest way to change the sew order is to right-click each of the hoops to remove them from the sew order. Then left-click the hoops in the order you wish them to sew.
Infinite Sew Order: When this setting is turned on (box is checked), while the machine is sewing in one of the hoops, you can hoop a garment in the other hoop, then press the Start button. Note that the Start button must be pressed while the machine is sewing, not during color changes or trims. When the machine completes sewing in the first hoop, it will automatically begin sewing in the next hoop. You can repeat this process as many times as needed.
When this setting is turned off, the machine will stop after completing sewing in each hoop. You will need to press Start to move the machine to the next hoop, then press Start again to begin sewing in the hoop.
Color Sequence by Sew Area: This feature allows you to create separate color sequences for each hoop in the spider frame. The color sequences can be set up so that while the machine is sewing in one of the hoops, the needlecase will not interfere with hooping a garment in the other hoop. When a ring is selected in the Select Rings list, you can create / edit a color sequence for that ring.
Complete the following steps to create these color sequences.
Select one of the rings in the Multi-Ring Settings tab (left-click the ring's name in the Select Rings list). The selected ring will be outlined (see the following image).
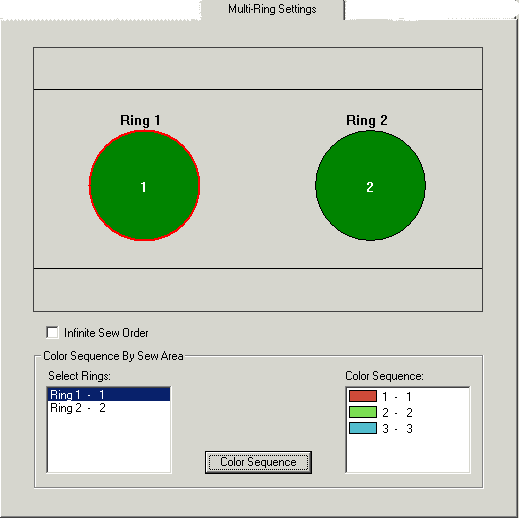
To change the color sequence for the selected hoop, click the Color Sequence button. The Color Sequence tab will open. Set up the color sequence using the Color Sequence Procedure. When you have finished creating the color sequence, click OK to apply your changes and return to the Multi-Ring Settings tab.
|
|
Tip: If you want to use the same color sequence for more than ring, select the desired rings: left-click one ring, press and hold the CTRL button, then left-click the other ring(s). Once all desired rings are selected, left-click the Color Sequence button. |
The color sequence you have created will be displayed in the Color Sequence area of the Multi-Ring Settings tab.
Complete the above steps for the other ring(s) in the spider frame.
When you have completed the color sequences, click OK to apply your changes and close the Multi-Ring Settings tab.
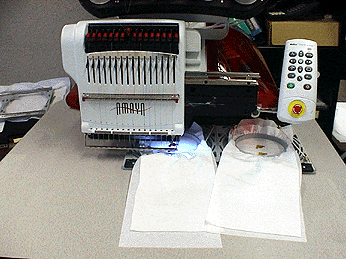
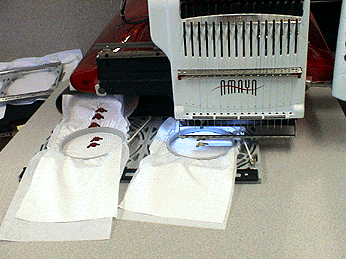
The pictures below display sewing in the Twin Spider Frame with different color sequences set up for each ring. In the picture on the left, the AMAYA is sewing in the left ring with a color sequence set up to use needles 1, 2 and 3. In the picture on the right, the AMAYA is sewing in the right ring with a color sequence set up to use needles 14, 15, and 16.
|
|
|
The above sections provide all the information you need to sew with a multi-ring hoop on the AMAYA. The following procedure, which uses the AMAYA Twin Spider Frame Option as an example, summarizes the steps involved in multi-ring hoop operation.
Install the twin spider frame and hoops.
In the AMAYA OS Hoop Selection menu, select the appropriate twin spider frame configuration.
Load the design you wish to sew.
To access Multi-Ring settings, open the Settings menu, then click the Multi-Ring Settings tab. (You can also click the Color Sequence button in the Machine Views toolbar). Make any needed changes to these settings (change sew order, turn on / off Infinite Sew Order, change color sequence). Click the OK button to apply change and close this tab.
Make any other settings adjustments in AMAYA OS.
Press the Start button to begin sewing. Remember that if Infinite Sew Order is turned on, while the machine is sewing in one of the hoops, you can hoop a garment in the other hoop, then press the Start button. When the machine completes sewing in the first hoop, it will automatically begin sewing in the next hoop. You can repeat this process as many times as needed. When this setting is turned off, the machine will stop after completing sewing in each hoop. You will need to press Start to move the machine to the next hoop, then press Start again to begin sewing in the hoop.
When the AMAYA machine is sewing, both rings will be displayed in AMAYA OS; the inactive hoop will be grayed out. AMAYA OS will also display a dialog that indicates which ring the machine is sewing in.
When Infinite Sew Order is not turned on, you can load another design / change settings at any time.
When Infinite Sew Order is turned on, you must press the Stop button to stop sewing (and to exit infinite sewing mode). Then you must click the Reset Design button ![]() if you wish to load another design / change settings.
if you wish to load another design / change settings.
If you would like to use a spider hoop other than the AMAYA Twin Spider Frame Option, you can create a user-defined spider hoop in the Hoop Manager. Please note that you must create a spider hoop for each configuration of hoops that you plan to use with the spider hoop (a configuration can only use one hoop size).