Setting the Color Sequence
To create or change a color sequence, you can click on the Color Sequence button in the Machine Views toolbar. You can also go to Tool>Settings, then click on the Color Sequence tab.
 |
Tip: When you click the Color Sequence button in the Machine Views toolbar, the Settings by Color tab will also be available in the dialog that opens. Also note that when you have a multi-ring hoop open in the AMAYA OS View Window and you click the Color Sequence button, the Multi-Ring Settings tab will open.
|

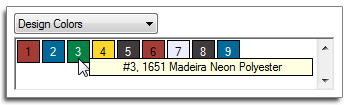
Setting Color Sequence with Design Colors Selected

Setting the Color Sequence
To enter a new color sequence:
-
Click the Clear All button. This removes the color sequence from the last design to sew.
-
Determine the needle order in which you would like to sew. This can be accomplished by using the design colors as a suggestion, or by using the Step Forward and Step Back buttons to determine the sew order of the elements in the design. Some designs like many stock designs may also come with a recommended color sequence.
-
In the example above, the first recommended color is red. The second color is blue. If you wanted to sew in those colors, find the red and blue thread on the thread tree of your AMAYA. The position of the cones of thread on the machine correlates to the positions on thread cone display in the software.
-
Click on the cone number (needle number) in the thread cone display in the order you wish to sew. If red was on needle 16 in the example above, you would click on the circled 16 first. This would place a "1-16" in the Color-Needle field on the left. This indicates that color 1 will sew on needle 16.
-
Continue in the same fashion for the rest of the color blocks in the design.
To change a color in the existing color sequence:
-
Determine which color number in the color sequence you want to change.
-
Double-click that color, and it will begin to flash. Now you may choose a new needle for that color. In the thread cone display, click on the needle number (cone number) that holds (or will be holding) the thread you want to sew for that color number. This will replace the current needle with the new needle.
To add a color to the existing color sequence:
-
If you missed a color and need to go back an add it, you can do so in the Color - Needle box. Click on the color you want to add. If you were missing color 2, that is the color on which you would click.
-
Once the color is highlighted, click on the desired thread cone number (needle number) in the thread cone display. This will insert the new needle number for that color and shift down all of the following colors in the sequence.
To remove a color from the existing color sequence:
-
Select the color you wish to remove from the Color - Needle box.
-
Once the color is highlighted in that box, click on the [Erase] button.
-
The remaining colors in the sequence will be shifted up.
Setting the Color Sequence and Assigning Needles with Active Colors
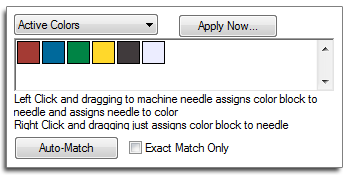
If a color sequence is programmed in the Color - Needle box, needles will assign to active colors based on that information. It may be best and far less confusing to click [Clear All] before beginning to assign needles.
Clicking [Clear All] once will clear any existing color sequence from the Color - Needle field. Clicking [Clear All] a second time will remove any needle assignments from the active colors.
Manually Assigning Needles
To manually assign needles to active colors, you can left-click and drag the active color block to the appropriate needle in the thread cone display. This gives the thread color properties to the needle, and it also assigns that needle to the active color block.
If you want to assign a needle to a color block but do not wish to change the color properties of that needle, you can right-click and drag the active color block onto the desired needle. This might be done if in a design with white lettering, you wanted to sew the lettering in bright green. You would right-click and drag the white active color onto the bright green needle number in the thread cone display.
When an active color has been assigned a needle, the needle number will be displayed inside the colored square. Unassigned colors display no number.
Automatically Assigning Needles
If your thread cone display is populated with thread colors, it may be faster to click [Auto-Match]. Auto-Match compares the active colors to the color properties for each of the needles in thread cone display and assigns needles to any color blocks that if finds matches for.
If it does not find match and "Exact Match Only" is unchecked, it will assign the needle with the closest color match (based on RGB values) AND set the color sequence in the Color - Needle field.
If "Exact Match Only" is checked, it will prompt you to choose an appropriate needle.
Setting the Color Sequence with Active Colors
If needles have been assigned to every active color, clicking [Apply Now] will set the color sequence based on that information.
Altering the design.
It is important to note that removing a color from the color sequence in AMAYA OS does not remove the stitches or the color change command from the design. It merely shifts the remaining colors in the sequence up. If fewer color sequence commands are in the Color - Needle box than are in the design, the color sequence will repeat until the design is finished sewing.
To add or remove color change commands from a design, DesignShop will need to be used.
For more details on color sequences, see Color Sequence Tab.
|
|
Tip: Remember that when Auto Define Color Sequence is turned on (in the Settings tab), AMAYA OS will automatically create a color sequence, based on colors in the color palette. If there is not a match in the color palette, then you will be prompted to choose a color. You will not be prompted to choose a color if you have turned on Select Closest Matched Color.
|