![]()
When the trimmers are not providing adequate trim quality, the physical condition of the trimmer parts should be inspected.

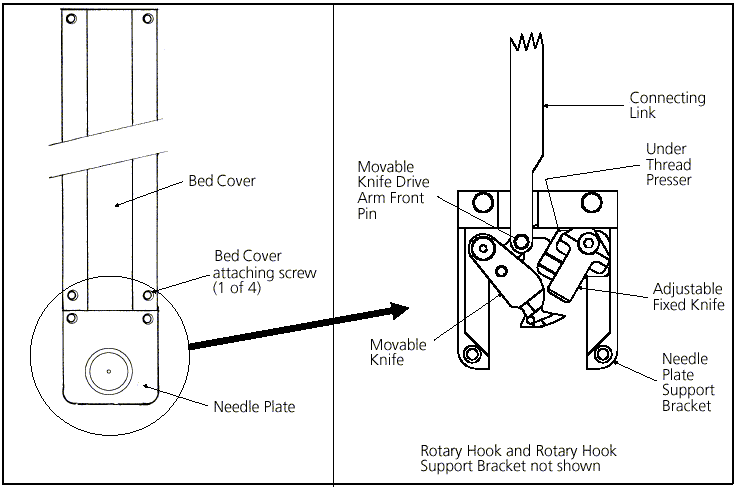
Figure 1 - Trimmer Components
The figure above identifies those components of the trimmer system: the adjustable fixed knife, the moveable knife, and the under thread presser. These components are covered by the bed cover and the needle plate (see inset in the figure above). Remove the screws holding these covers to gain access to the trimmer area. You may also test trimmer adjustments without the covers being installed in place, but they must be installed to embroider.
Poor trimming quality and non-trimming may be caused by the condition and adjustment of the adjustable fixed knife.
This situation may result if the adjustable knife is worn or is not parallel to the trimming action of the movable knife. Check this condition of the adjustable fixed knife by inspecting the marks left on the surface of the moveable knife that is under one edge of the adjustable fixed knife. The adjustable fixed knife may need to be adjusted or replaced, or both. Another method for checking this condition is to perform the "ink wipeoff" test as described in the steps for adjusting the adjustable fixed knife.

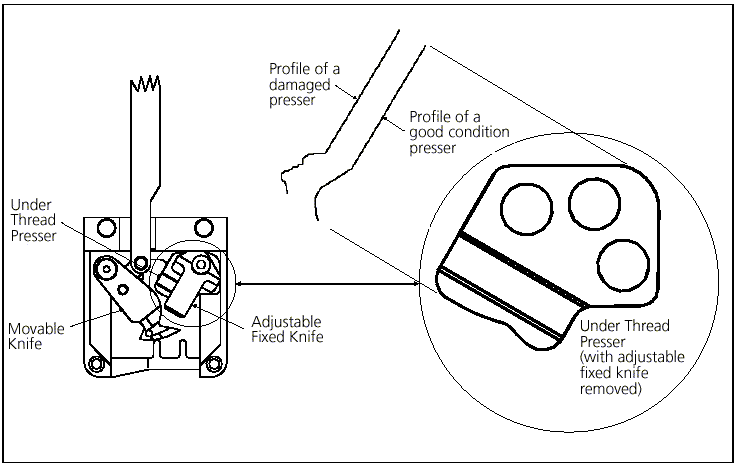
Figure 2 - Under Thread Presser
The under thread presser shown in Figure 2 holds the bobbin thread after a trim. This permits a loop of bobbin thread for the next stitch. While the under thread presser holds the bobbin thread there should only be enough pressure applied to hold the thread in place under the movable knife. Damage and/or improper position of the under thread presser can cause miss-starts and problems that look like tension troubles. For example, if the pressure of the under thread presser against the movable knife is too high, it may hold the bobbin thread and not allow a loop to be formed, or it may nick or fray the thread, again making it look like the bobbin tension is incorrect. Another example would be if the under thread presser is "crumpled" (see Figure 2), it does not allow the movable knife to pass under the adjustable fixed knife completely to cut the thread, causing a "no cut" condition. If the under thread presser is damaged it can cause intermittent long tails of the upper thread.
Checking the under thread presser is done in two parts. The first part is to look at the part itself to see if there has been any "crumpling" as shown in Figure 2. Crumpling is damage caused by the moveable knife hitting the under thread presser. If you see visual evidence of any damage, replace the under thread presser.
The second step is to check if the bobbin thread is in fact being held in place underneath the thread presser.
Turn the machine off.
Disconnect the connecting link from the moveable knife drive arm by lifting it from the front pin (see Figure 1).
Pull the moveable knife forward by using a small Allen wrench.

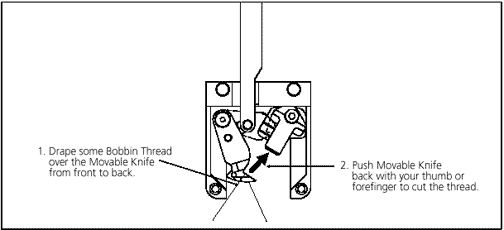
Figure 3 - Checking the Cut
With the bobbin thread draped over the movable knife from back to front, gently hold the thread so there is some slack and then push the movable knife back until the thread is cut. This cut should be clean, and should not be frayed.
|
|
If the thread is frayed, you may need to replace the adjustable fixed knife, adjust the adjustable fixed knife, replace the moveable knife, or any combination of these items. |
The "top" thread should be loose and fall away, because it has no support. The "bottom" thread should be held in place under the moveable knife by the under thread presser.
If the under thread presser does not provide the required action, replace and check it using steps 2 to 4 again.
After you are satisfied with the under thread presser, reattach the connecting link (see Figure 1).