
(Available in DesignShop and higher product levels)
This section explains how to digitize columns in DesignShop. The column types discussed are Column 1, Column 2, Singleline, and Complex Column.
Setting Column Properties Videos

Digitizing Column 1 Shapes Video
Column 1 is used to generate parallel columns. The stitches are generated back and forth between two outside lines that are parallel (or nearly parallel) to each other.
You can access the Column 1
input method by clicking the flyout button , selecting Insert->Column 1,
or by right-clicking in the View Window
and selecting Column 1 from the
pop-up menu.
Columns are usually digitized with satin stitches. However, other stitch types are available: Satin, Fill, ZigZag, E Stitch, Edge Fill, Decorative, or Sequin.

(In general, Zigzags can be used for underlays and borders around lettering. Use Column 1, 2 or Singleline input tools to digitize a Zigzag. E stitch's can be used for applique tackdowns or border stitching. Use Column 1, 2 or Singleline Input tools to digitize an E stitch.)
You can change the stitch type and other column properties in the Column Properties dialog. You can change these properties before you begin digitizing a Column 1 by right-clicking the Column 1 toolbar button and adjusting the element properties.
You can always refer to the status line below the View Window to give direction for the next step while digitizing an element.
The following are some guidelines for digitizing columns:
The left-click on the mouse is used to insert a straight input point. A triangle represents each straight point.
The right mouse button is used to insert a curved input point. A circle represents each curved point.
Always start with the left-click.
If the shape is curved, in some cases you will need to alternate between left-clicks and right-clicks. This ensures the proper curve in your design.
Notice the wireframe outlines that form on the screen as you digitize. If they cross, they will show an X and you will get a bow tie effect of the stitching.
Pressing and holding the ALT key on your keyboard will allow you to input a perfectly straight line. Lines can be horizontal, vertical, or angled (in increments of the constrained line input, see Constrained Line Angle).
If you make a mistake or click too many points, simply press the BACKSPACE key on the keyboard to delete the last input point. Each time the BACKSPACE key is pressed, the input points will be deleted in sequence.
Normally, the exit point of a column is determined by the last digitized point of the column. The exit point can be placed on the opposite side of the last digitized point at digitize time by holding down the CTRL key while pressing the ENTER key to end the column.
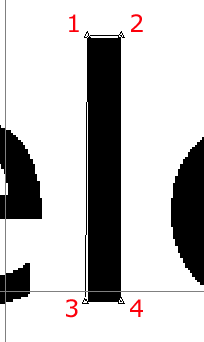
As an example, the simplest representation of a shape that would lend itself to a Column 1 stitching is the letter l. You would follow the instructions below to digitize the letter l.
Input your first point by left-clicking in the View Window; this will input a straight point.
Now input the second point parallel to the first input point.
Input the third point on the same side of the column as your first input point.
Input the fourth point parallel to the third point. (These steps are illustrated below.) Now press the ENTER key to complete your wireframe column and generate stitches. This is the simplest type of column.
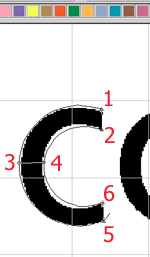
You can also use a Column 1 stitch to digitize a curved shape, such as the letter c. You would follow the instructions below to digitize this letter:
Input your first straight point (by left-clicking).
Input your second straight point parallel to the first point (left-click).
Input the third point halfway around the c on the same side of the column as your first input point, this point will be a curved point that you input by right-clicking.
Input another curved point (right-click) on the opposite side of the column, parallel to the third point.
Input the fifth point at the end of the c on the same side of the column as the first and third. This will be a straight point that you will input by left-clicking.
Input the final point on the opposite side of the column, parallel to the fifth point. This will be another straight point that you will get by left-clicking. The wireframe displays where the stitches will be placed. Press the ENTER key when you are finished. This example is illustrated below.

Digitizing Column 2 Shapes Video
Column 2 is used more often to generate column stitches for non-parallel columns.
You can access the Column 2
input method by clicking the flyout button , selecting Insert->Column 2,
or by right-clicking in the View Window and selecting Column 2 from the
pop-up menu.
For some guidelines on digitizing columns, see Guidelines for Digitizing Columns.
Columns are usually digitized with satin stitches. However, other stitch types are available: Satin, Fill, ZigZag, E Stitch, Edge Fill, Decorative, or Sequin. You can change the stitch type and other column properties in the Column Properties dialog. You can change these properties before you begin digitizing a Column 2 by right-clicking the Column 2 toolbar button and adjusting the element properties.
While you are digitizing, you can change your current input element to the previous element type by pressing P on your keyboard after entering the stitches.
To use the Column 2 stitch:
Digitize all of the outline stitches from the beginning on one side of an element (using straight and curved points as needed). Remember to start with a straight point.
Press ENTER.
Digitize from the beginning again on the other side of the element (using straight and curved points as needed).

Digitizing Singleline Shapes Video
Singleline is a method of producing columns that maintain an equal width throughout the column. Single line center, singleline left, and single line right are the three different types of single line input. The difference between these three types is the positioning of the stitch area surrounding the line that you create (i.e., in singleline right columns the stitching is positioned to the right of the centerline, in singleline left columns the stitching is positioned to the left of the centerline).
You can find each of these three functions in three locations: the flyout toolbar button, under the Insert menu, or by right-clicking in the View Window.
Columns are usually digitized with satin stitches. However, other stitch types are available: Satin, Fill, ZigZag, E Stitch, Edge Fill, Decorative, or Sequin. You can change the stitch type and other column properties in the Column Properties dialog. You can change these properties before you begin digitizing a Singleline by right-clicking any of the Singleline toolbar buttons and adjusting the element properties.
When creating a Singleline center
 column you will first digitize the basic wireframe outline
of the design. Then following the instructions located in the gray area
below the View Window (the status
line), input the first and second width points. The distance between these
two points will determine the width of your column with your wireframe
line in the center. Singleline automatically terminates after inputting
the width of the second point.
column you will first digitize the basic wireframe outline
of the design. Then following the instructions located in the gray area
below the View Window (the status
line), input the first and second width points. The distance between these
two points will determine the width of your column with your wireframe
line in the center. Singleline automatically terminates after inputting
the width of the second point.
This is the same procedure used to input a Singleline
left  and a Singleline right
 .
.
You would follow the steps below to digitize a singleline column using straight points. You could use any of the singleline tools in this example:
Input your first point by left-clicking in the View Window, which will input a straight point.
Input a second straight point (left-click). Click the ENTER key to complete the singleline.
Now you have to determine the width of the column that you are digitizing. Left-click to enter the first width point.
Move your cursor from the first point to the desired width and left click again to insert the second width point.
This example is illustrated below.
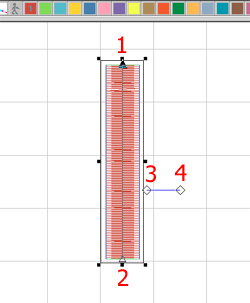
For this example, it didn't matter where the width points were placed, but if you are digitizing over a graphic (and need to be precise) you may want to place your width points over the graphic.
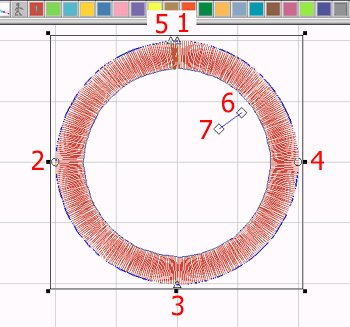
You would follow the steps below to digitize a singleline column using straight and curved points. You could use any of the singleline tools in this example of digitizing a circle:
Input your first point by left-clicking in the View Window; this will input a straight point.
Input a curved point 1/4 of the way around the circle by right- clicking.
Input a straight point 1/2 of the way around the circle by left- clicking.
Input a curved point 3/4 of the way around the circle with a right-click.
Input the final point slightly past the first point to ensure that the stitches meet up when sewn out. The final point should be a straight point that you get by left-clicking. When the wireframe outline is completed, click the ENTER key.
Now enter the first width point by left-clicking.
Determine the desired width and place your cursor that distance from the first width point and left-click to enter another width point. This example is illustrated below.
You can always refer to the status line below the View Window to give direction for the next step while digitizing an element.
![]()