
(Available in DesignShop and higher product levels)
Before you begin digitizing, you may want to have an image on the screen. This can be done by scanning a new design or loading an existing graphic image file.
Open Graphics Video
You can load an existing graphic image by selecting
File->Open or by clicking the Open
 button. Then browse your computer's directories to find
the desired graphic.
button. Then browse your computer's directories to find
the desired graphic.
NOTE:
(You can also select File->Insert
or click the Insert  button.)
Use the following tables to determine which graphic file types can be opened and saved in the different levels of DesignShop. (See Bitmap vs. Vector Images for an explanation of the differences between bitmap and vector file formats).
|
Format Acronym |
Format Description |
Extension |
Product Level Availability |
|---|---|---|---|
|
BMP |
Windows (and OS/2) Bitmap |
.bmp |
DesignShop and higher: Open and Save |
|
JPEG |
Industry Standard Compressed Format |
.jpg |
DesignShop: Save only DesignShop Pro and higher: Open and Save |
|
PCX |
PC Paintbrush Format (ZSOFT) |
.pcx |
DesignShop: Save only DesignShop Pro and higher: Open and Save |
|
TIFF |
Tagged Information File Format |
.tif |
DesignShop: Save only DesignShop Pro and higher: Open and Save |
|
Format Acronym |
Format Description |
Extension |
Product Level Availability |
|
EMF |
Enhanced Metafile |
.emf |
DesignShop Pro: Open only DesignShop Pro+: Read/Write |
|
WMF |
Windows Metafile |
.wmf |
DesignShop Pro and higher: Open only |
|
CDR (up to version 9) |
Corel Draw |
.cdr |
DesignShop Pro+: Open only |
|
EPS |
Encapsulated Postscript |
.eps |
DesignShop Pro+: Read/Write |
|
DXF |
Drawing Exchange File |
.dxf |
DesignShop Pro+: Open only |
|
AI |
Adobe Illustrator File |
.ai |
DesignShop Pro+: Open only |

After digitizing stitches in a design, the graphic is automatically saved with the project file (.ofm).
However, if you are saving to a floppy disk, you must save them separately.
(DesignShop Pro and DesignShop Pro + product levels only)
The other option is to scan an image directly into DesignShop. The scanning function allows you to scan a design directly into DesignShop for on-screen digitizing. This function works with any scanner that complies with the TWAIN scanning industry standard communications format. You may buy any TWAIN compatible scanner to implement scanning in DesignShop.
NOTE: TWAIN 32 compatible scanners are not the same as TWAIN compatible scanners and cannot be implemented from the DesignShop program.
NOTE: Be advised that Melco cannot and does not provide technical support for any scanners in the marketplace. Any technical assistance that may be required with the scanner you purchase must be obtained through the scanner dealer.
If you attempt to use a scanner that does not comply with TWAIN, you will not be able to access the scanning program directly from the Design Shop program. You must go into the scanning program independent from Design Shop to perform the scanning operation. Then you will be able to load any properly saved graphic files that have been scanned with that scanner.
The only requirement for loading a graphic file is that the file format is one of the formats supported by DesignShop. The graphic load and save functions support most industry standard graphic formats. See the below section on loading for information on which formats are supported.
An additional feature in the on-screen digitizing and scanning option allows you to import graphical data from the clipboard to the DesignShop View Window. (using the Copy and Paste functions). This feature allows you to import graphics from any Windows-based application.
Once loaded into the View Window, images can be scaled, rotated, dimmed, and zoomed to give you maximum flexibility in displaying your image for digitizing a design on screen.
This function need only be performed when you start the scanning process for the first time. You will not need to return to this function unless you add a scanner or want to change to a different scanner that already exists in the system. The last scanner you select in this function will remain the "default" scanner indefinitely.
If you have just opened DesignShop, select File->New. If already in a View Window, go to step 2 to start loading a graphic.
In the new View Window select File->Select Scanner.
The Select Source dialog box will appear, showing the available TWAIN compatible scanners associated with your system.
If your scanner does not appear in the Sources list, refer to the following discussion:
For the Select Scanner function to identify the available TWAIN compatible scanners attached to the computer system, the TWAIN software that came with your scanner must first be properly installed and configured for your system.
Melco has found that a common mistake is the failure to add the path for your scanner to the autoexec.bat file.
Refer to your scanner manual and the Microsoft Windows User's Guide for information on modifying the autoexec.bat file.
Click on the source you wish to scan with to highlight the desired source.
Click on the Select button to choose the scanner and return to the current DesignShop window.
Each time you open DesignShop and perform the scan function from this point forward, the scanner you just selected will remain the selected scanner. The scanner you select will remain the default scanner until you go into the Select Scanner function and select a different scanner.
DesignShop does not directly interface with any scanner. When you select Scan you are telling DesignShop to load the selected scanner's software to perform the scan and return the image to DesignShop. As a result, the screen that you see when you select Scan will depend on the software that came with your scanner. When the TWAIN driver you selected is finished, it will return the image to DesignShop for display. At that point you can change the size, orientation, etc.
Select File->Scan Image. The selected scanner manufacturer's operating software will appear on the screen and the scanning operation will begin. You will be able to work inside the scanner operating software just as if you had opened it independent of the DesignShop program.
High resolutions (such as 300 dpi) will consume lots of memory, and may slow down your system.
Color images may significantly slow your system and make it harder to see your stitches, even with dimmed graphics.
If you use color, use no higher color resolution than the driver you have installed in Windows. If your Windows uses 256 colors, then scanning a graphic as a 24 bit graphic uses more memory than it needs to. Check your scanner manual for instructions to select your color resolution.
After the scanning operation is completed and you close the scanner manufacturer's software program, the screen returns to the active Design Shop program and you may begin to perform some of the available image modifications or go directly to digitizing in the View Window.
(Available in DesignShop and higher product levels)
Once you have a graphic open in DesignShop, you can use DesignShop tools to modify the graphic.
You can Hide/Show a graphic and Dim/Brighten a graphic using the View Menu. You also have the option to change the position, orientation, and the size of the graphic or image. These options are all available to you by double-clicking the graphic in the Project View.
NOTE:
You can also Hide/Show
a graphic by pressing the  toolbar button. Another method
is to right-click the graphic when it is selected and select the operation
(Hide or Show Graphic) from the
pop-up menu.
toolbar button. Another method
is to right-click the graphic when it is selected and select the operation
(Hide or Show Graphic) from the
pop-up menu.
Hide Graphics Video
When you double-click on the graphic, a Properties dialog with three tabs will be displayed.

Under the Graphic General Properties tab you can view the name of the graphic and its location. The General Properties tab also gives you the ability to Hide/Show and Dim/Brighten the graphic. You can hide the graphic by putting a check mark beside Hide with your left mouse button. If the graphic is already hidden and a check mark appears beside Hide, then click again next to Hide to show the graphic. You may want to hide the graphic when you are digitizing. This will allow you to view the progress of your work better without the graphic behind the stitches. If you would like to see your stitches a little bit better, but not completely hide your graphic, you can left-click to place a check next to Dim. Left-click again to brighten the graphic.
Click on the Position tab. Here you can change the position and orientation of the graphic.
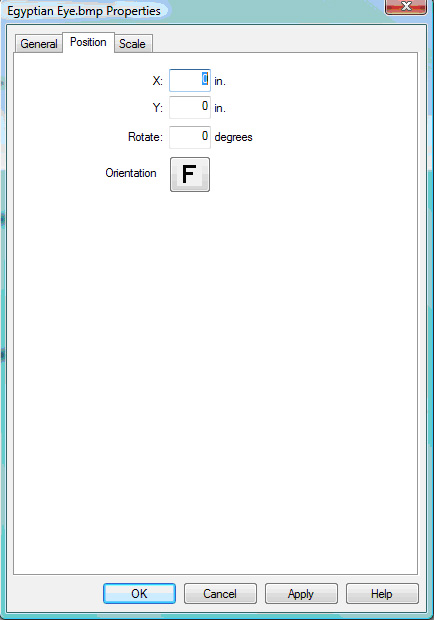
Position is a move command and does not show the current offset. The user specifies the measurements units to use (inches, points, centimeters, etc...). Position values are the distance a graphic will move from the current position when the user hits Apply.
X offset allows you to move the image left or right. Enter positive values to move right; enter negative values to move left.
Y offset allows you to move the image up or down. Enter positive values to move up; enter negative values to move down.
Rotate allows you to rotate the design by a specific number of degrees.
Orientation gives you the ability to manipulate the horizontal and vertical presentation of the image. This function presents combinations of axis mirroring and axis property swapping in such a way to display the 8 different views in the orientation box as you click on the box.
The F in the orientation box represents the new position after the user hits Apply.
Scale/Rotate Graphics Video
The Scale tab is for scaling the graphic or image.
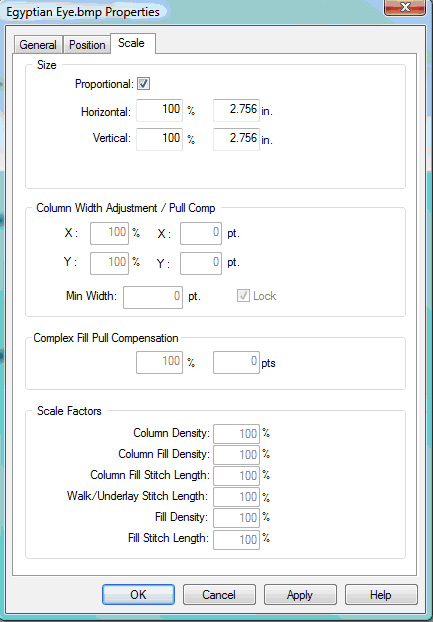
By scaling, you can reduce or enlarge an item horizontally, vertically, or equally in both directions. When you scale an item, all of the embroidery properties are preserved. After the scaling modifications are complete, the stitches are re-generated according to the new outline that you have created.
Remember that you can use the Scale tab at the project, design, or element level (element level editing is only available in the DesignShop or higher product levels).
You can scale multiple elements at the same time. You can also scale elements manually in the View Window. (See Scaling).
Proportional: By having this option on (with a check mark in the box), you are sure to scale the design equally both the horizontally and vertically. If you would like to only scale horizontally or only scale vertically, you can turn this option off by clicking on the Proportional box (which will remove the check mark).
Horizontal: This is where you can specify an exact percentage or measurement to scale horizontally.
Vertical: This is where you can specify an exact percentage or measurement to scale vertically.
Column Width Adjustment/Pull Comp: This allows you to specify the X Pct and Y Pct pull compensation individually. If Lock is checked, the X Pct and Y Pct pull compensation will stay the same for each. Uncheck Lock to set different X Pct and Y Pct values. You can also set the X and Y offset individually if Lock is not checked. Offset sets the pull compensation equally down the element. Minimum width makes sure a column never goes below the specified width. This is especially helpful with small lettering.
Complex Fill Pull Compensation: This property works as it does in partition fills. See Pull Compensation for more information.
This feature globally scales all like elements in a design.
Column Density: This will scale the density all columns. This works with expanded stitches and wireframe elements.
Column Fill Density: This will scale the density of all column fills.
Column Fill Stitch Length: This will scale the stitch length of all column fill stitches.
Walk/Underlay Stitch Length: This will scale the stitch length of all walk and underlay stitches.
Fill Density: This will scale the density of all fills. This works with expanded stitches and wireframe elements.
Fill Stitch Length: This will scale the stitch length of all fills.
An example of using this feature:
Select the design or element to scale.
Right-click to open Properties.
Choose the Scale Tab.
Change the column density to 110%. The following happens:
If the density in one element was 4.2 it will now be 4.4.
If the density in another element was 3.6, it will now be 3.8.
The final result is 10% less stitches in all columns.
The image modification attributes are only saved when you save them as part of a project.
You can also perform the following basic functions with graphics: copy, cut, paste, delete, and duplicate. To access these functions when working with graphics, left-click the graphic in the Project View to select it, then right-click the graphic in the Project View or the View Window. You will see all of the functions in the pop-up menu. You can also access these functions by their toolbar buttons or through the Edit menu. See Basic Functions for more information on these functions.
NOTE: You cannot select a graphic in the View Window. You can only select it by left-clicking the graphic in the Project View.
You can also edit the graphic after it has been opened in DesignShop. To do this, left-click the graphic in the Project View to select it, then right-click the graphic in the Project View or the View Window. You can then select Edit Graphic from the pop-up menu. This will open the graphic in your default graphics editing program (e.g., Microsoft Paint). When you have finished editing the graphic, save it, and close the graphics editor. Then return to Design Shop and click the OK button in the message box. This will reload the graphic with the changes you made. This procedure does not overwrite the original graphic. The edited graphic will be saved in the EditedImages folder in your DesignShop directory.
If you have purchased Auto-Digitizing,
which converts graphics to wireframe data, you can access the tool by
right-clicking the selected graphic and selecting Convert
Graphic to Wireframe from the pop-up menu. (You can also click
the toolbar button  ). See Auto-Digitizing for more information
on this tool.
). See Auto-Digitizing for more information
on this tool.