Managing Inputs
 MelcoRIP is designed to accept input
from multiple sources. Hot folders being the primary way in which jobs
are received. The printing mechanism, including hot folder, printer entities,
etc. is automatically set up at install time. The user does not have to
configure any of this to print normally. It is possible, however, to customize
the inputs for particular needs.
When MelcoRIP server is installed a hot folder and a Windows printer
is created for each output device that is installed. These are referred
to as “Printer Entities” by MelcoRIP. These three Windows printers (printer
entities) will in turn deposit PostScript files in three different hot
folders when they are printed to. These four hot folders are scanned periodically
by the MelcoRIP software.
This section will cover how to manage hot folders and printer entities.
At the end of this section, all the information will be combined in a
tutorial for adding an input (hot folder and printer entity) for your
printer which is hard-wired to print on Black Cotton with “Fine” quality
setting and Medium underbase (ignoring print-time settings).
Input management is controlled by the Configure Inputs dialog. This
dialog contains two sections, one for configuring Hot Folders and one
for configuring Printer Entities. To access the Configure Inputs dialog,
click the “Inputs” button on the MelcoRIP application main dialog.
Configuring the Hot Folders
A hot folder is simply a folder into which users can drop PostScript
or PDF files to be printed..
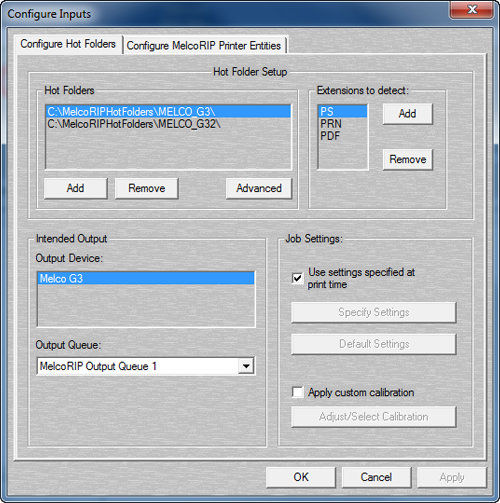
The Configure Hot Folders section of the Configure Inputs dialog allows
you to add/delete/configure hot folders. The information in the screen-shot
below shows the hot folders as they were created by the installer.
Hot Folders List:
This window displays all currently active hot folders. They are identified
by the full path to their location. You will notice that the hot folders
are all located in the “MelcoRIPHotFolders” folder. This is for organizational
purposes only, any folder can be used as a hot folder. Keep in mind that
files in the hot folders are volatile. They will be deleted once the job
expires
Extensions to detect:
This window displays all file extensions that will be treated as jobs.
The default extensions are PDF, PS and PRN. Any file in the hot folder
which has one of these extensions will be treated as a job and thus renamed,
opened, processed and deleted.
Configure Output Section
All settings in this section are documented in the section titled Output Configuration Section.
Advanced Hot Folder Scanning
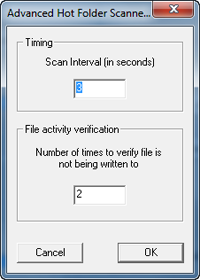 By clicking on the Advanced button under
Hot Folders, the settings window for scanning the hot folders will come
up. The top box contains the number (in seconds) of the scan intervals.
The bottom box contains the number of times to find the file unchanged
and closed before it is considered “complete” and is placed in the job
queue.
Configuring Printer Entities
It is not necessary to change these settings to print normally. Furthermore,
it is recommended that the settings for the default printer entities not
be modified unless you are sure of what you are doing. Wrong settings
in this section will cause problems when printing.
As mentioned before, upon installation, a Windows printer (appears in
the list of printers unders start/settings/printers) is created for each
output device selected at install-time.
These Windows printers are refered to as “Printer Entities”. When you
print to one of these printers, the resulting PostScript file is placed
in a Hot Folder (described in the previous section) which is in turn scanned
by the MelcoRIP application.
To access the Printer Entities configuration dialog, select the “Configure
Printer Entities” tab of the Configure Inputs dialog. If this dialog is
not already open, click the “Inputs” button on the main MelcoRIP dialog.
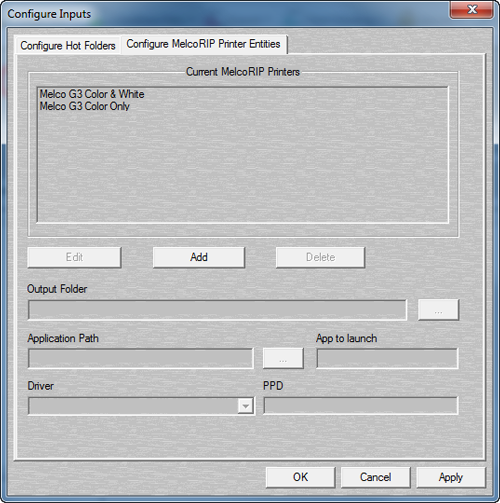
Current MelcoRIP Printers:
These are the currently defined MelcoRIP printer entities. These can
be seen in Start/settings/printers as well.
Edit:
When this button is clicked, the setting options below will switch from
read-only mode to read/write mode, enabling you to change the settings.
When in edit mode, this button will change to “Cancel Edit”. To save any
changes made during the edit session, click “OK” or “Apply”
Add:
Enables the creation of a new Printer Entity. See “adding an input tutorial”
in the next section.
Delete:
Deletes the selected printer entity. When deleting a printer entity,
don’t forget to delete the hot folder entry associated with it (if one
was created)
Output Folder:
This is where the selected printer entity will deposit its PostScript
jobs when you print a job. There must be a hot folder entry telling MelcoRIP
to scan this folder. Since this printer
Application Path:
Part of the printing mechanism is to automatically launch MelcoRIP when
a job is printed to one of the MelcoRIP printer entities. This parameter
tells the system the location of the application’s executable file. The
reason this is selectable is because it is theoretically possible to have
more than one version of MelcoRIP loaded and this would enable different
printer entities to launch different versions. This is a very advanced
setup though and should not be attempted by the faint of heart. Normally,
this should be left at the default, which is the path to the MelcoRIP
executable (launchinit.exe)
App To Launch:
This is the executable that will be automatically launched when a job
is printed to one of the MelcoRIP printer entities. It will launch this
app from the “Application Path”.
Driver/PPD:
The driver selected here is the driver that will be used by the printer
entity. You MUST use one of the “MelcoRIP” drivers and it must match the
destination printer. The PPD box will always be read-only and automatically
updated as the driver selection changes.
Adding a Printer Entity and Hot Folder Tutorial
The previous 2 sections describes the operation of the Hot Folder Configuration
and the Printer Entity Configuration dialogs. This section will walk you
through the creation of a printer entity/hot folder to help you understand
how they work together.
Lets say we want to add a printer entity that, when printed to, outputs
with settings hard-wired to “Black Cotton, Fine Color Quality and Relatively
Heavy White. We’ll call this printer entity “BCottonHeavyWhite”. The object
in this scenario is to have a printer entity that will always print the
same way regardless of the print settings the user specified when he/she
printed the job. This will also leave us with a hot folder where you can
deposit virtually any PostScript or PDF file and have it print with our
hard-wired settings.
Create the Hot Folder
The first step is to create the hot folder. We like to keep all the
hot folders in the “MelcoRIPHotFolders” folder. This is just to keep things
organized. A hot folder can be anywhere on the server system (the machine
running MelcoRIP) or even on the network.
Open the “configure inputs” dialog by clicking the “Inputs” button on
the main dialog.
Click Add, the “Choose Hot Folder” dialog will appear:
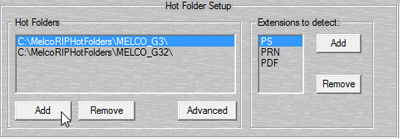
You will notice that the dialog comes up by default to the “MelcoRIPHotFolders”
folder. A new folder can be created using the "Make New Folder"
button. In this case, it will be labeled “MELCO_G3_BCHW”. Type that in
the folder name field when it is highlighted.
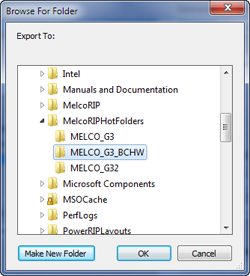
Click OK. The folder is created and added to the hot folders list.
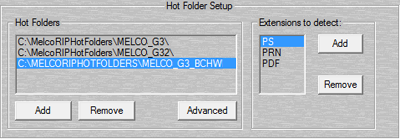
With the new folder selected, let's set the output options. First, set
the target output device, in this case, the Melco G3. In the “Intended
Output” section select the Melco G3 as the printer and the appropriate
output queue. In this case, MelcoRIP Output Queue 1 (which is pointed
at the port the Melco G3 is connected to). If you want to assign
a higher priority to the jobs that arrive in this hot folder, you may
change that now by using the “Job Priority” settings.
Since we want all jobs that are processed from this hot folder to have
the same settings, we’re going to un-check the “Use settings specified
at print-time” and define our own settings. When you un-check this box,
the “Specify Settings” button becomes enabled. Click the Specify Settings
button.
The printer setup dialog will appear. Set the Media Type first, this
will enable the proper range of resolutions. Click on the “Media” drop-down
list in the Paper tab and select “Black Cotton” Your dialog should now
look like this:
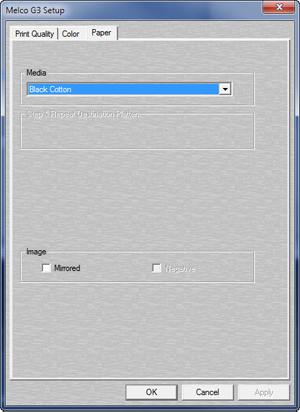
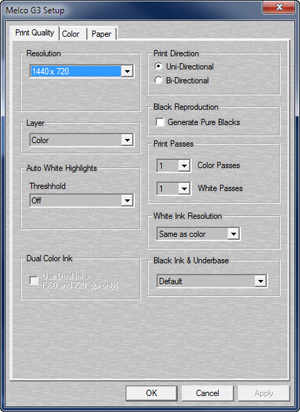
Now that we’ve chosen our media type, lets choose the resolution and
screening mode. Click on the “Print Quality” tab, select 1440x720 resolution
(Fine), Color Auto-Mask layer type, 1 color pass and 1 white pass. Set
the white resolution at 1440x720. Your dialog should now look like this:
Create the printer entity
Now that we have the hot folder configured, lets create a print manager
entity which, when printed to, will deposit PostScript files into this
newly created folder.
If not already opened, open the “Configure Inputs” dialog by clicking
the “Inputs” button on the main dialog. Click the “Configure MelcoRIP
Printer Entities” tab. The dialog will appear.
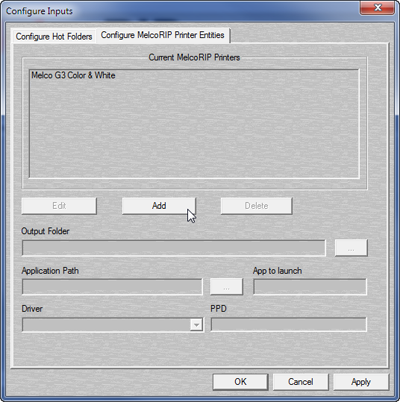
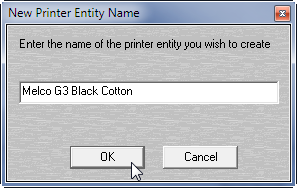
Click Add. A dialog will appear asking you for the name of the new printer
entity. Type “Melco G3 Black Cotton” without the quotes and click OK.
The new entity name will be added to the list and you will be returned
to the Configure MelcoRIP Printer Entities in edit mode. You will notice
that the button formerly named “Add” now reads “Cancel Add” you can click
this button at any time to cancel the add operation.
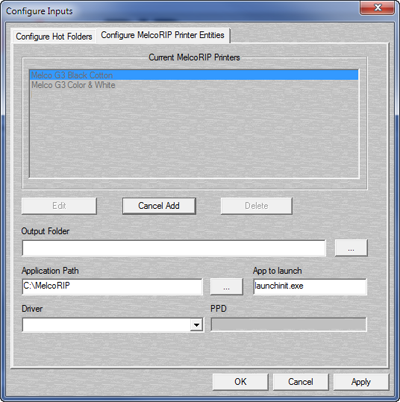
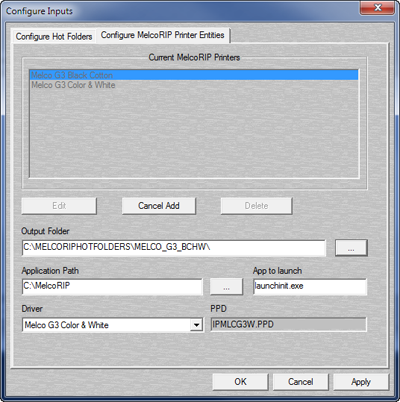
Go to the “Output Folder” section and click on the “...” button to navigate
to our hot folder.

Navigate to the hot folder we created during the hot-folder setup phase
and click OK. This instructs the new printer entity to deposit its PostScript
files into this folder. Your dialog should now look like this:
Next we’re going to select the printer driver to use. Since we’re going
to be ripping jobs to the Melco G3, we need to use that driver. Note:
The driver is really the same for all of MelcoRIP’s devices (Windows PostScript
driver version 5) what differentiates the drivers on the list is the PPD
that is used, and it is very important to use the right PPD.
Click the “Driver” drop-list and select “Melco G3 Color & White”.
You CANNOT use any other drivers with the G3.
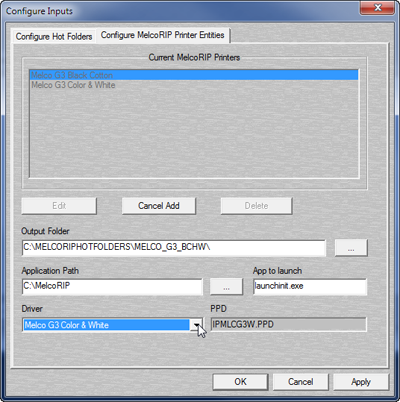
Once you select the proper driver, you will see the PPD name appear
in the box next to the driver name in this example the PPD is “IPMLCG2W.PPD”.
Almost done. The last two settings are always the same (unless you have
a VERY creative configuration). The last step is to enter the Application
Path and App to launch settings. This tells the printer entity what application
to launch when a job is received.
Click the navigation button (“...”) next to the “Application Path” box
and navigate to the folder where you installed MelcoRIP. The default folder
is usually C:\MelcoRIP. Once you’ve navigated to the folder, select “launchinit.exe”
and click “Open”. Your dialog should now look like this:

Click “Apply”
Click “OK”
The printer entity is now created. Any jobs printed from any application
to the Windows printer called “Melco G3 Black Cotton” will be printed
with the settings we hard-wired regardless of the settings selected at
print-time. You can also share this new printer entity and print to it
from remote workstations just like the ones that were created at install-time.
 MelcoRIP is designed to accept input
from multiple sources. Hot folders being the primary way in which jobs
are received. The printing mechanism, including hot folder, printer entities,
etc. is automatically set up at install time. The user does not have to
configure any of this to print normally. It is possible, however, to customize
the inputs for particular needs.
 By clicking on the Advanced button under
Hot Folders, the settings window for scanning the hot folders will come
up. The top box contains the number (in seconds) of the scan intervals.
The bottom box contains the number of times to find the file unchanged
and closed before it is considered “complete” and is placed in the job
queue.


