MelcoRIP is designed to support printing to multiple printers connected to multiple ports. It employs “output queues” which are actually Windows print queues that are used to send rasterized page data to the printer(s).
Upon installation, one output queue is created for each printer selected. The default name for the output queues are “MelcoRIP Output Queue 1”, “MelcoRIP Output Queue 2”, etc. Assuming you selected the correct ports when prompted during the installation, you shouldn’t “need” to touch the output queue configuration. Note: In the case of your printer, MelcoRIP Output Queue 1 and MelcoRIP Output Queue 2 are created but pointed at the same output port.
It is possible, however, to add additional output queues for special purposes. Below are two examples of how additional output queues might be used
In the Managing Inputs section, there is a tutorial that creates an input (Print Manager entity/hot folder setup) for printing with hard-wired print settings.
If you added a second printer, for instance, you would want to add an output queue that is pointed at the port to which it is connected.
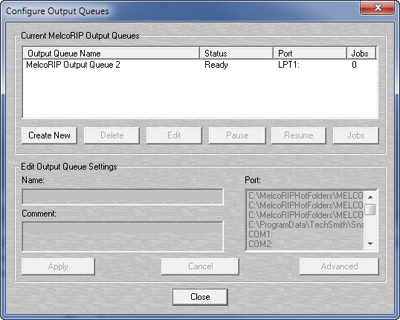
To launch the Configure Output Queues dialog click the “Outputs” button on the MelcoRIP main dialog.
This dialog allows you to manage the jobs in the different queues as well as modify the queues themselves. You can also add and delete queues.

The current output queues are listed in the section labeled “Current MelcoRIP Output Queues”. The name, status, port and number of jobs currently in the queue are plainly displayed.
Below the list of queues are the control buttons which let you control and edit the different output queues.
From this dialog you can pause and resume an output queue. You can also open the queue and list the jobs that are in a queue and pause/resume/restart/delete individual pages. You can do this from the “Pages Being Printed” tab in the main MelcoRIP dialog but this dialog is more “direct” as you can list the pages in a particular output queue, as the “Pages Being Printed” displays all pages being printed in all queues.
For example if you wanted to purge all pages from only from “MelcoRIP Output Queue 1” it is much easier to do it from here.
To pause or resume an output queue, select the queue by clicking its name in the list then click the “Pause” or “Resume” buttons. If the queue is paused, the only the “Resume” button will be enabled. If the queue is not paused, only the “Pause” button will be enabled. Keep in mind that when you pause a queue, it will not send any “additional” pages but if there’s a page already printing it will continue to print until its completion. To pause the printing page, you must pause the page itself.
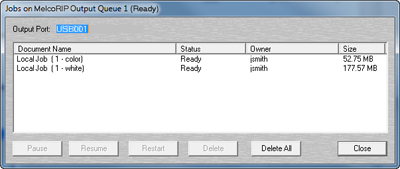
To view a queue’s jobs double-click the queue name or select the queue by clicking on it’s name and click the “Jobs” button.

The jobs dialog will appear. While in this dialog, you can manipulate all pages currently in the selected output queue. You can delete, pause, resume, restart any number of pages or you can purge the entire queue by clicking “delete all”. Simply select the pages you wish to act upon and click the proper button.
To change the physical port to which an output queue sends jobs, select the queue by clicking on its name then click the Edit button. The dialog will enter “edit mode” and you can them make changes to it’s configuration. select the new port in the “ports” list and click “Apply”.
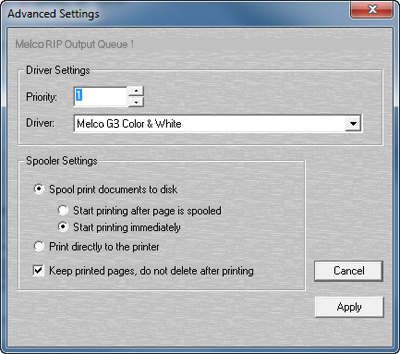
The advanced settings dialog allows you to set some of the same attributes that you can set in Windows without having to open start\printers\ etc. To change the advanced settings, select the queue and click the Edit button. The dialog will enter “edit mode”. Click the “Advanced” button.

This will assign a default priority to the output queue. This will be overridden, however, by the priority setting of the individual pages.
The driver used makes little difference on an output queue. The jobs (pages) arrive here already rasterized and ready to send directly to the printer. The driver does nothing but pass the data through to the output port. In some rare cases, it is advantageous to use the printer’s native driver as the driver for the output queue. Most of the time, however, this setting is irrelevant.
This enables page spooling. If this is not selected, the data is sent directly to the output port and the “start printing after page is spooled” and “start printing immediately” features are disabled. It is preferable to have this selected.
When selected, Windows will not start sending the page data to the printer until the entire page has been spooled.
When selected, Windows will start sending page data to the printer as soon as the page starts to spool.
When selected, Windows will not spool page data to disk. It will send the data directly to the output port. This is discouraged.
After the page is printed, it remains in the output queue with a status of “Printed”. This is handy for re-printing pages by just issuing a “restart” from the output queue dialog or the “Pages Being Printed” queue. NOTE: This must be set in order for the Production Run feature to function.
Care must be used when deleting an output queue. If there are hot folder configurations using an output queue and this queue is deleted without first changing the hot folder configuration, the hot folder mechanism will pick the first available output queue at print-time instead. The pages might end up going to the wrong port. Before deleting an output queue, be sure no hot folders are using it.
To delete an output queue, just select it’s name and click the Delete button.
To add a new output queue, click the “Create New” button. The dialog will go into “edit mode”. Select the name,
port and any advanced options you wish and click Apply. NOTE: When setting advanced options it is necessary to click Apply when exiting the Advanced menu and then again to save the new output queue.