This section will assist you in using your Conventional Cap Frame (CCF).
Click on any of the links to below to quickly access a topic in this section.
Introduction
Installing the Visor Holder
Hooping with the CCF
Selecting CCF in AMAYA OS
The Conventional Cap Frame is designed to embroider on caps of most sizes and shapes, by attaching to the current Wide Angle Cap Frame driver modified for CCF adaptation. The maximum embroidery field for the CCF is 2.75" (70 mm) X 6.00" (152 mm).
|
|
Important: If your Wide Angle Cap Frame option was purchased prior to February, 1999, the driver must be modified to accept the CCF cap frame. Contact your Melco sales representative to arrange for obtaining WACF driver modifications. |
If you have not yet installed and adjusted the WACF driver, see WACF Driver First Time Adjustment and Installation.
If you have previously installed and adjusted the Wide Angle Cap Frame driver, see the WACF Driver Installation section for general installation instructions.
Use the following step-by-step process for proper hooping with the CCF cap frame to achieve the best quality embroidery.
|
|
Important: For sewing on caps with the original AMAYA (prior to the cylindrical lower arm), Melco recommends using the raised needle plate (Melco P/N: 32196) that is included in the Wide Angle Cap Frame Driver Kit (Melco P/N: 32198). To install the needle plate, simply remove the regular needle plate by removing the screws holding it in place. To do this use the special tool that is found in the AMAYA Operator’s Kit. Then attach the raised needle plate by securely tightening the screws in place. When using this raised needle plate, you may encounter an increase in noise level. |
Before sewing with the Conventional Cap Frame, you must select it in AMAYA OS. To do this, go to the Machine Views toolbar in AMAYA OS. Select the cap frame that corresponds to your driver. For example, "Graphite CCF". For more information, see the Hoop Selection section of this manual.
|
|
CAUTION! You must choose the proper hoop in AMAYA OS to enable the correct software limits. If hoop definition is not selected properly, severe equipment damage may result. |
If you ordered the visor holder option for the CCF / WAD, installation instructions for it accompanied the kit. If you have not ordered a visor holder option and wish to, contact your local Melco sales office and order the CCF / WAD Visor Holder Option, part number 12180.
This section provides hooping information for the CCF conventional cap frame.
|
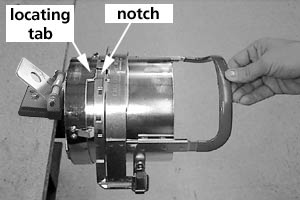
1. To make hooping fast and easy, use the cap gauge supplied in the Wide Angle Cap Frame option. |
|
|
2. Slide the cap frame onto the gauge, making certain the locating tab on the cap gauge fits into the cap frame's notch, and the cap frame slips firmly under the two roller clips. |
|
|
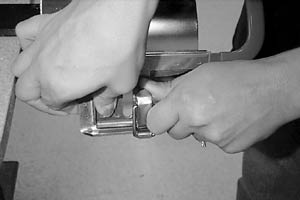
3. Unlatch the cap frame strap from the support by pressing on the metal at the end of the strap adjacent to the latch and lifting the latch lever to unlock it. Remove the latch wire from the hook. 4. Lift the strap at the latch and swing it open around the hinges at the right side of the cap frame. 5. If using backing, you must have a length that is at least 11 inches long so it will be captured by the teeth at each of the supports at the sides of the cap frame. |
|
|
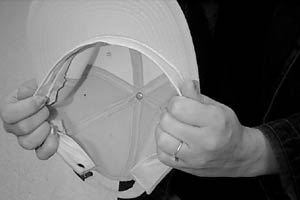
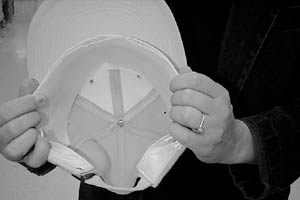
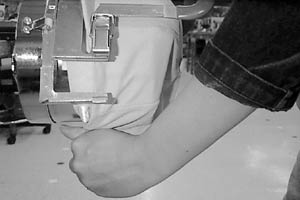
6. Obtain the cap and turn the sweat band completely out as shown. |
|
|
7. To attach the backing, you may use one of several methods. One method, described here, is to position a piece of backing cut approximately 4 1/2" by 11" inside the cap. The backing should cover the sweat band as well as the inside of the cap crown as shown. Other methods use double-back tape or spray adhesive directly on the cap frame to hold the backing. |
|
|
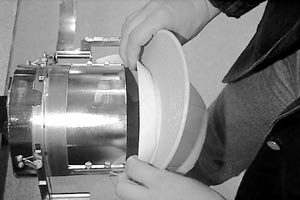
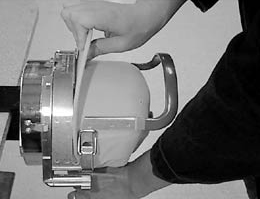
8. Slide the cap onto the cap frame with the visor facing upward and toward the rear. |
|
|
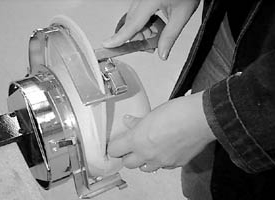
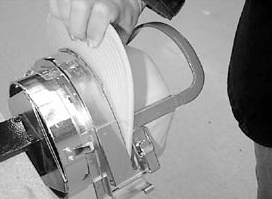
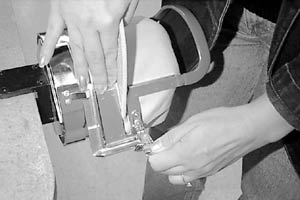
9. Insert the cap visor into the slot in the cap frame strap as you swing the strap over the front of the cap. |
|
|
10. With the strap not latched and still loose around the cap, center the front of the cap to the middle of the cap frame. |
|
|
11. Leaving your right hand free to perform the next step, grasp and gather the sweat band with your left hand and pull it downward to snug the front of the cap tightly around the cap frame supports. |
|
|
12. While maintaining the cap visor centering and front snugness as described in the previous two steps, you must now perform three basic functions in unison with your right hand:
|
|
|
|
|
|
|
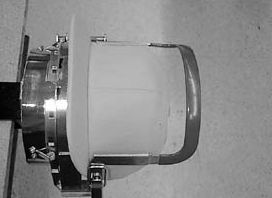
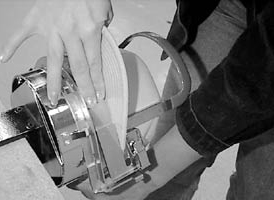
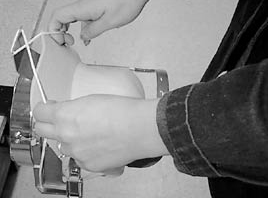
13. While holding the cap frame strap down around the sweat band, release the rear of the cap with your left hand and attach the strap latch wire over the hook on the support. |
|
|
14. Using a visor holder is optional, and one is not included with the CCF cap frame option. If a visor holder is purchased and installed, position the cap's visor in the holder at this time. |
|
|
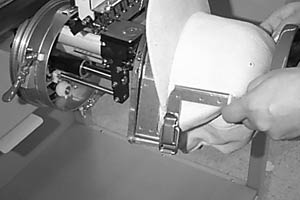
15. Remove the cap frame with hooped cap from the cap gauge and move to the already installed Wide Angle Cap driver.
16. To remove the cap from the cap frame after embroidery is complete, unlatch the cap frame strap from the support by pressing on the metal at the end of the strap adjacent to the latch as shown. Do this as you lift on the latch lever to unlock the latch and remove the wire from the hook. The cap is now free to remove from the frame. |
|