(Available in DesignShop and higher product levels)
This feature allows you use custom shapes and designs provided by the software or create your own.
DesignShop Pro+ allows you to create any design that you choose. Using any design, element, or groups of elements, you can create a custom shape. You can take these shapes and create a custom fill. Lettering is also a custom shape and can be used as a fill type in DesignShop Pro+. (See Pattern Fills.)
There are four different types of Custom Shapes:
Custom Shapes: These shapes require an input type (walk stitch, single line, complex fill, sequin, vector line, or vector fill). If no input type is selected, no vector shapes will be displayed in the shape selection dialog. Vector shapes can be used as patterns inside of complex fills.
Custom Designs: These shapes do not require an input type. They use stored embroidery elements. These cannot be used as pattern fills.
Decorative Stitches: These shapes are decorative stitches. See Decorative Stitches for more information.
Custom Ties: These shapes are tie ins and tie offs that you digitize and save as a custom shape.
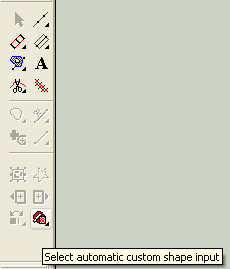
To use the Select Automatic Custom Shape Input tool:
Click on the Select Automatic Custom Shape Input button on your toolbar.
The custom shapes appear at the bottom of your screen.

In the first drop down menu you can choose Custom Designs, Custom Shapes, Decorative Stitches, Custom Ties, or Custom Sequin Stitches. The option you choose changes the categories in the second drop down menu. This is how you choose the specific custom shape or design that you want to work with.
When you find the shape or design you want to work with, you click on it , hold down your left mouse button, and then drag and drop it into your view window. Or you can double-click the specific design and then click in your view window and drag your design to the correct size. You can drag and drop as many shapes as you want to.
Clicking the Add Current... button brings you to the steps outlined below that allow you to add or create a new custom shape or design.
To create a custom shape in DesignShop Pro+:
Any element or group of elements can be used.
Select an element or group of elements.
Center the design.
Right-click. Choose Save Custom Shape.
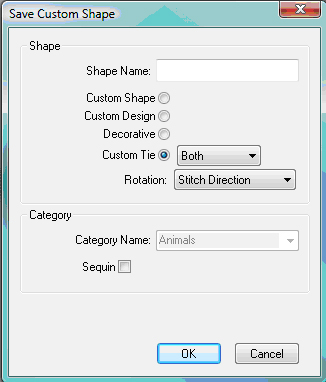
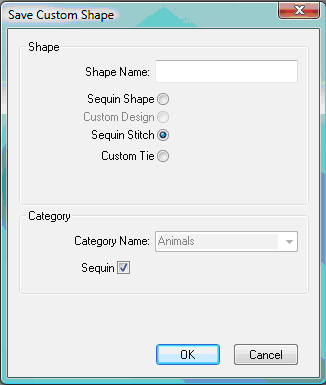
The Custom Shape dialog appears:
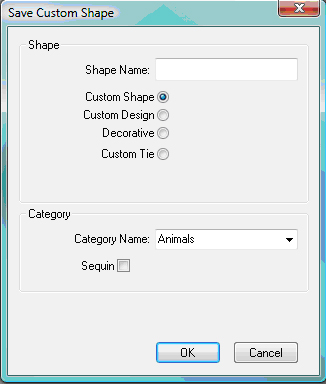
Name your shape.
Select the shape type:
Custom Shape: Created using any grouping of elements.
Custom Design: Should only have embroidery type object (not vectors). A design is saved as an exact copy of the embroidery elements (color change, etc...)
Decorative: Alternative decorative stitch digitizing interface.
Custom Tie: You see the following dialog when you choose Custom Tie. You can specify Tie In, Tie Off, or Both. You also choose the Rotation as either Stitch Direction or As Digitized.
Select the category for the new shape. If you want to add a new category for your shape, click in the Category Name field and type the name of the new category. Hit Enter. The category can now be found in the Category Name dropdown.
To create a custom sequin shape or a custom sequin stitch, check the Sequin checkbox. You will then be able to choose whether you want to create a custom shape or a custom stitch with sequins.
To remove a category, select the category to be deleted and click Remove.
To delete a custom shape or design:
To delete a custom shape, first select an input type. Custom shapes can only be deleted when an input type is selected.
Click on
the custom shapes tool  .
.
Select the correct category of your shape or design.
Select the shape you want to delete and right click on it.
Select Delete.
To rename a custom shape or design:
To rename a custom shape, first select an input type. Custom shapes can only be renamed when an input type is selected. To rename a custom design, make sure that there is not an input type selected.
Click on
the custom shapes tool.
Select the correct category of your shape or design.
Select the shape you want to rename and right click on it.
Select Rename. A blank name box appears.
Type in the new name for your custom shape or design
To use custom shapes and designs:
Select a shape. Only categories that have shapes in them are displayed.
Click on the main view window where you want your shape or design to start.
Drag the shape to be the size you want. If you drag down with your mouse, the shape will be right side up. If you drag up with your mouse, the shape will be upside down.

To maintain the aspect ratio of the design, press ALT and drag your object.
To rotate your design, press the SHIFT key and move.
(Available in DesignShop Pro and DesignShop Pro+)
This feature offers very powerful copy and paste functionality. It allows the user to copy any element, group of elements, or design to the clipboard. Then you can paste that selection at any size and orientation that you desire. Elements and designs can be very quickly reproduced which greatly increases the speed of digitizing.
Using Advanced Copy and Paste with a single element or group of elements:
1. Select the element/elements that you want to copy.
2. Copy the element/elements to the clipboard by clicking on the Copy toolbar button. 
3. Left-click on the Custom Shapes
and Designs flyout  .
.
4. Select Clipboard  .
.
5. The custom shape input tool is now set up to use the element/elements that are on the clipboard.
6. There are two methods that can now be used to input these elements from the clipboard:
Method 1: Double-click on the screen where you want these elements to be pasted. This method behaves very similar to standard paste functionality. The element/elements will be reproduced at the same size and orientation as the original element/elements.
Method 2: Click on the screen where you want the element/elements to be pasted. Hold down the left mouse button and drag the mouse until the element/elements are the desired size and shape. Below is an example of a heart created using a single complex fill being pasted using both of this feature’s input methods.

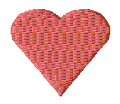
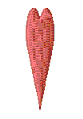
Original Method 1 Method 2
Note: When using Method 2 for pasting elements, you can hold the ALT key and the aspect ratio of the original elements will be maintained. If you hold the SHIFT key, the aspect ratio will be maintained and you will be able to rotate the elements.
Using Advanced Copy and Paste with an entire design:
1. Select the design that you want to copy.
2. Copy the design to the clipboard by clicking on the Copy
toolbar button.
3. Left-click on the Custom Shapes
and Designs flyout .
4. Select Clipboard .
5. The custom shape input tool is now set up to use the element/elements that are on the clipboard.
6. There are two methods that can now be used to input this design from the clipboard:
Method 1: Double-click on the screen where you want the design to be pasted. This method behaves very similar to standard paste functionality. The design will is reproduced at the same size and orientation of the original.
Method 2: Click on the screen where you want the design to be pasted. Hold down the left mouse button and drag the mouse until the design is the desired size and shape. Below is an example of 1Day.ofm being pasted using both of this feature’s input methods.


Original Method 1 Method 2
![]()