![]()
|
|
This repair requires timing and other adjustments and should be done only by a Melco authorized service technician. |
The bearing block assemblies would require replacement if they are damaged or if the sinterbronze bearings that are inside the block slip loose. The sinterbronze bearings are impregnated with oil and in the center is a y-guide felt that is soaked with oil at the factory when the bearing block is assembled.
|
|
CAUTION!! DO NOT apply grease to the y-rails. Grease will damage the bearings in the bearing block assemblies.
|
|
|
CAUTION!! DO NOT attempt to disassemble or rebuild the bearing block assemblies. The internal bearings are impregnated with lubricant and are easily damaged if improper tools and procedures are used for assembly.
|
|
|
CAUTION!! Never allow the internal impregnated sinterbronze bearings to come into contact with an absorbtive surface. Doing so will damage the bearings. |
Replacement Parts Needed:
left bearing block assembly
right bearing block assembly
sewing machine oil
|
|
Note: If you replace one of the bearing block assemblies, it is recommended that you always replace both of them as a pair. |
Replacement Procedures:
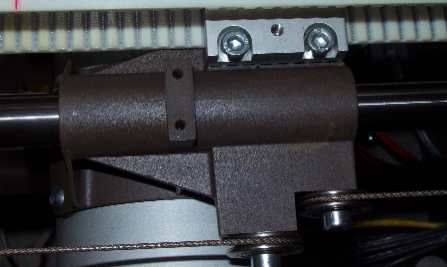
Figure 1 - Bearing Block Assemblies
1. Remove the hoop and both hoop arm assemblies (if installed).
2. Color change to Needle #16.
3. Remove the left upper arm front cover.
4. Remove both left and right upper arm transparent covers.
5. Loosen the tension on the x-cable at the cable tensioner bracket located on the left upper arm front section.
6. Remove the cable from the pulleys that are attached to the right bearing block assembly.
7. Remove the button head socket screws mounting the right bearing block assembly to the beam.
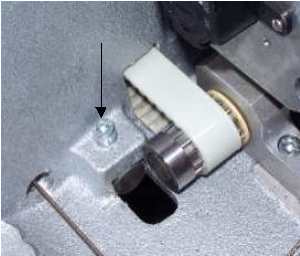
Figure 2 - Y-Rail Retaining Screw
8. Loosen the cap head socket screw retaining the y-rail in the upper arm body.
9. Slide the y-rail out towards the back of the machine until you can slide the right bearing block assembly off, then slide the bearing block off the rail.
10. Wipe the y-rail clean with a rag that is soaked with sewing machine oil.
11. Remove the pulleys from the old bearing block assembly and install them on the replacement block assembly.
12. Slide the bearing block assembly onto the y-rail with the end with two screw holes on the bottom edge facing to the front.
13. Reinstall the y-rail back into position in the upper arm body and tighten the cap head retaining screw to Melco Torque Specifications.
14. Apply red loctite (MS 222) to the button head screws and mount the x-beam assembly to the bearing block assembly. Tighten the screws to Melco Torque Specifications.
15. Reinstall the cable onto the pulleys on the right bearing block assembly.
16. Repeat the procedures from step 6 to step 15 above for the left bearing block assembly.
17. Add 10 drops of sewing machine oil to the oiling holes located on the top center of the left and right bearing block assemblies.
18. Retention the x-cable using the procedures defined in "X-Cable Tensioning".
19. Reinstall the left and right transparent upper arm covers.
20. Reinstall the left upper arm front cover.
21. Conduct machine functional tests to verify y-axis movements and make sure there are no further obstructions.
22. Conduct a registration sew test using Melco "AMRTESTXXX.EXP" test design and verify that there are no registration issues, especially on the x-axis movements.
![]()