This section will walk you through setting the color sequence for the design. The color sequence can be accessed from a few places.
- Status or Advanced Status Tab:
-
- Click on the button.
- Through the Load Design Wizard - FOR BRAVO:
-
- From the first window after the design has loaded, click on the button.
- From the Tools menu:
-
- Click on the menu and select .
- Click on the tab.
- Click on the menu and select .
Once accessed, the color sequence is set in mostly the same way.
To enter a new color sequence:
- Click the button. This removes the color sequence from the previous design to sew. In the case of a new machine, this will remove the color sequence used for the test sew pattern.
- Determine the needle order in which you would like to sew. This can be accomplished by using the design colors as a suggestion, or by using the and buttons to determine the sew order of the elements in the design. Some designs, like many stock designs, may also come with a recommended color sequence. Step Forward and Step Back work only if the design is visible. Windows may need to be moved to see the design behind the settings window.

- In the example above, the first recommended color is a light green. The second color is medium green. If you wanted to sew in those colors, find the light and medium green threads on the thread tree of your AMAYA. The position of the cones of thread on the machine correlates to the positions on thread cone display in the software.
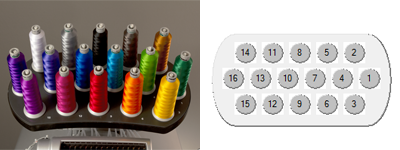
- Click on the cone number (needle number) in the thread cone display in the order you wish to sew. If the light green was on needle 4 in the example above, you would click on the circled 4 first. This would place a "1-16" in the Color-Needle field on the left. This indicates that color 1 will sew on needle 4.
- Continue in the same fashion for the rest of the color blocks in the design.
To change a color in the existing color sequence:
- Determine which color number in the color sequence you want to change.
- Double-click that color, and it will begin to flash. Now you may choose a new needle for that color. In the thread cone display, click on the needle number (cone number) that holds (or will be holding) the thread you want to sew for that color number. This will replace the current needle with the new needle.
To add a color to the existing color sequence:
- If you missed a color and need to go back an add it, you can do so in the Color - Needle box. Click on the color you want to add. If you were missing color 2, that is the color on which you would click.
- Once the color is highlighted, click on the desired thread cone number (needle number) in the thread cone display. This will insert the new needle number for that color and shift down all of the following colors in the sequence.
To remove a color from the existing color sequence:
- Select the color you wish to remove from the Color - Needle box.
- Once the color is highlighted in that box, click on the button.
- The remaining colors in the sequence will be shifted up.
