 Color Sequence Video
You can access the color sequence tab by selecting the Settings menu, or you can click on the Color Sequence button in the Machine Views toolbar.
|
Tip: When you click the Color Sequence button in the Machine Views toolbar, the Settings by Color tab will also be available in the dialog that opens. Also note that when you have a multi-ring hoop open in the AMAYA OS View Window and you click the Color Sequence button, the Multi-Ring Settings tab will open. |

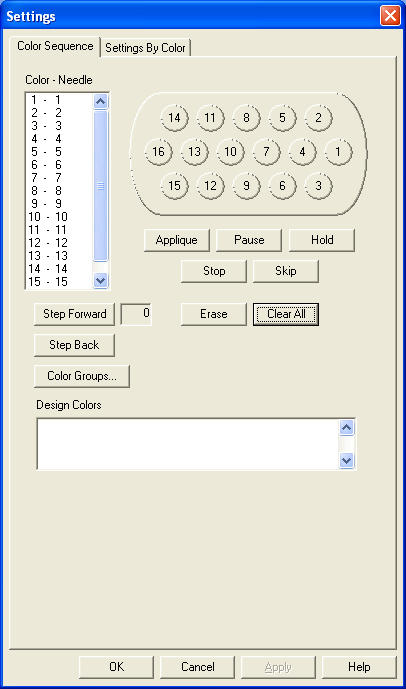
Color - Needle - This area displays what needle numbers the colors in the sequence are sewing on. (For example, in the image above, the first number in the color sequence is sewing on needle #1).
Color Groups... - This area brings you into the color groups function. See Color Groups.
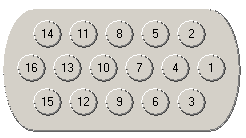
Thread Cone Display - The appearance of the thread cone display changes, depending on the settings turned on in the AMAYA OS Settings Tab. If Use Colors from Design is turned on, the cones in the thread cone display are gray. (See image below).

If this setting is not turned on, the thread cone display will show colored thread cones.
The thread cone display serves multiple functions. First, when colored thread cones are available, you can right-click on a color in the thread cone display to modify the properties of that color. (See Color Properties).
You can use the right-click functionality of the thread cone display to create a visual representation of the thread cones on your machine. For example, if you are using ARC Poly 345 on needle 1, you can right-click on needle 1 in the thread cone display, and choose that thread color to appear on the thread cone display.
Then you can use the thread cone display to change the color sequence. To do this, perform the steps below.
Determine which color number in the color sequence you want to change.
If you want to change a number in the sequence from one color to another, double-click that number (it will start blinking). In the thread cone display, click on the needle number (cone number) that holds (or will be holding) the thread you want to sew for that color number. This will replace the color number with the new color.
If you want to insert a color number in the sequence, select the color number before where you want to insert in the Color - Needle area. Then click on the desired needle number in the thread cone display. This will insert the new number in the color sequence and will also shift down all of the following colors in the sequence.
Design Colors - This area displays the colors implemented in the design when it was created. These colors do not reflect the colors that appear on the thread cone display. Remember that the thread cone display is meant to represent the actual cones of thread on the AMAYA machine.
You can, however, use the design colors to change the colors that appear on the thread cone display. You can select a color in the design colors area, then drag it to a color on the thread cone display. For example, you could open a design, and green could be one of the colors in the design. If you plan to sew with green thread, and have placed (or will place) green thread on one of the thread cones on your machine, you could drag the green to the corresponding needle on the thread cone display.
Applique - This button inserts an applique pause into the color sequence. When the machine encounters an applique pause, it pauses and moves the rack out (towards the operator). Press the Start button on the machine to resume sewing.
See Sewing an Applique for instructions on this procedure.
Pause - This button inserts a pause after a color change and commands the machine to wait for an operator restart. The machine will also pause after every following color change and will wait for the operator to restart. To restart sewing after a pause, hit the Start button on the machine. Use this when you want to stop after every color in the color sequence.
Hold - This button inserts a pause after a color change. To resume sewing press the start button. A hold is used most often when a thread color must be changed during a design.
Stop - This button replaces a color change. Inserting a stop does not insert a color change. This command is used most often when an operator wants to insert a manual color change. To resume sewing, press the Start button.
Skip - This button inserts a skip, which cause the machine to skip the next color change and continue sewing on the same needle.
Erase - This button erases the selected color change from the color change sequence.
Clear All - This button clears all color changes in the color change sequence.
Step Forward - This button allows you to walk through the color changes in the color change sequence. Click this button repeatedly and watch the design to see how each color will look as the design sews. The number zero represents the beginning of the sew sequence.
Step Back - This button allows you to walk back through the color changes on the color change sequence.
|
|
Note: Remember that when Auto Define Color Sequence is turned on, AMAYA OS will automatically match the colors in the design to colors in the color palette. If there is not a match, then you will be prompted to choose a color. You will not be prompted to choose a color if you have turned on Select Closest Match Color. |

Right-clicking on a color in the thread cone display allows you to access and change the color properties of that color.
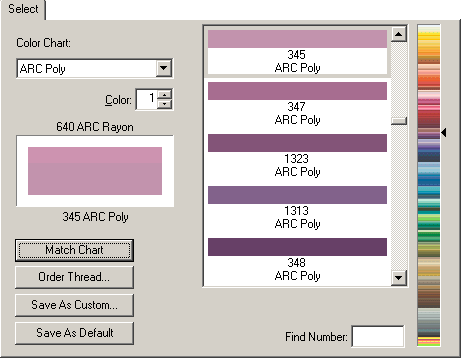
Color Chart: The Color Properties window lets you choose colors from three different color charts included with AMAYA OS. The three different color charts to choose from are System RGB Colors, ARC Poly Embroidery Thread, and ARC Rayon Embroidery Thread. To select the different charts, click on the down arrow and make your selection. If you have other color charts already installed on your computer (color charts have a file extension of .tch), you may copy these files through Windows Explorer and paste them into the AMAYA\Color Data Directory. These files can now be viewed directly in AMAYA OS via the Color Chart list box.
Color: The box next to Color displays the number of the color on the palette that you are currently changing. You can use the up and down arrows to move to the desired color on the palette. This is very useful. It allows all of the colors to be changed at one time instead of having to double click on each one to change them. The current color displays in the color box below. The name of the currently applied color and its graphical representation appear on the top half of the box. If you choose another color it will display on the bottom of the color box (until applied, then it is the current choice on top). In the Property page above shows "640 ARC Rayon" as the applied (current color) and "345 ARC Poly" as the new color (recent color that has been clicked on). If the user clicks on "Apply" "345 ARC Poly will be the current color and displayed on top. When you choose a different Color Chart than the current one, the Color Selection will automatically scroll to the closest match color (this is determined by the RGB value of the color). This closest match color will display on the bottom. You can choose to apply it or scroll through the Color Selection to another color.
Color Selection: On the right side of the color properties dialogue you can choose from a list of colors. The system RGB colors are like that of other color property dialogues in graphics programs and works the same.
The ARC Poly and ARC Rayon embroidery thread menus display the colors of embroidery threads that are available. This is very useful if you would like to match your colors in AMAYA OS with the actual thread colors. The color code numbers are listed below the color. Click to the right of the color list bar to get close to the desired color, then use the scroll bar to move through the zoomed version to get the exact color.
Find Color Code: This is very useful to use if you have the code from the spool of thread and you would like to apply the exact color to your design. Simply enter the code and once it is highlighted in the zoomed version of the color list (it will have a blue box around it), click on the color in the color list. For most color charts, you can also do a find (search) by name of thread.
Match Chart: If you would like to apply a different color thread chart than the current one, you can select a different color chart, click on match chart and all of the colors in your color palette will be updated to the new color chart.
Order Thread: If you are connected to the Internet, this link will take you directly to everythingembroidery.com where you can order threads online. The link goes directly to the melcomart.com store. Once you are in the online store look to the left of the screen where you will find a link to the section for ordering thread. For information on getting connected to the internet click here.
Replacement Box: The top half of the color box (on the left of the color property dialogue) displays what color is currently applied to the particular color in the color palette. The bottom half displays the new selection.
Save As Custom: using "Save As Custom", you can create custom color charts and custom color palettes.
Custom Color Chart: You may want to put together a Custom Color (thread) Chart that contain certain thread colors. Custom Color Charts may consist of thread colors from multiple Color Charts (i.e. colors from both ARC Poly and ARC Rayon).
To save a Custom Color Chart, right click on a color in the thread cone display:
Choose your colors by clicking on the desired color chart (from the drop down list of color charts).
Select the color (this is the number next to Color:, for instance start with color 1).
Choose a color from the color selections in the chart.
Click apply.
Move on to the next color (number next to Color:, for instance next would be number 2).
At this point you may also change the Color Chart for different color selections.
After you have selected all of your desired colors, click on the "Save As Custom" button.
Type in a desired name, select the number of colors for your palette, make sure that Color Chart has a black circle in the button to the left of it.
Click OK.
Custom Color Palette: You may want to put together Custom Color Palettes. For example an embroiderer may have different custom color palettes that they use for particular designs. When saving a Custom Color Palette you can just right click on the color palette, select "Load Custom Palette", choose your desired palette, and click OK.
To save a Custom Color Palette, follow the same steps as you would for saving a Custom Color Chart (described above), with the exception of step number 8. In step 8, make sure that Palette (not Color Chart) has a black circle in the button to the left of it.
Save As Default: Anytime that you change a setting or settings and press the Save As Default button your changes will be saved. Even if you exit out of AMAYA OS and get back in again, your default settings will be saved.