Please note that Auto-Digitizing is only available in DesignShop Pro and DesignShop Pro+ product levels.
Auto-Digitizing is an advanced automation software module, which allows custom artwork (either from a scanner or graphics program) to be directly converted to embroidery design data for DesignShop. More specifically, Auto-Digitizing has been designed to dramatically reduce the amount of time and expertise needed to create sophisticated embroidery designs from original artwork. For the digitizer, this translates into tremendous time savings, in some cases allowing work that would normally take hours to be completed within minutes. Alternatively, for the small embroidery shop, Auto-Digitizing may allow you to forgo the cost and time required to send out basic artwork for custom embroidery punching. Auto-Digitizing software does not eliminate the need for expert digitizers. However, for typical business logo artwork or basic clipart the software can provide an enormous savings in time and effort and can significantly reduce the amount of training or expertise required to quickly create custom embroidery designs.
Convert Embroidery to Vector Graphic Video
Convert Vector Graphic to Embroidery Video
Before continuing with this chapter, it is important to understand the differences between bitmap graphics and vector graphics. This will help you understand why DesignShop treats these two types of images differently when converting them to embroidery data.
Bitmap graphics are composed of pixels, each of which contains specific color information. A pixel is very small; a single image may be composed of hundreds of thousands of individual pixels. The bitmap format is ideal for complex images that contain thousands of different colors, which is why digital photographic images are most often saved in this format. DesignShop can open the following bitmap file formats: bmp, jpeg, pcx, and tiff.
Vector graphics consist of individual objects, not pixels. These objects can include points, lines, and curves, and can be filled with solid colors, gradients, and patterns. Vector graphics are based on mathematical relationships between these objects. For this reason, vector graphics are ideal for images, such as logos, that often need to be changed (e.g., resized). DesignShop can open the following vector file formats: eps, wmf, emf, dxf, and cdr (up to version 9). Note that eps files can contain bitmap information as well, but DesignShop strictly treats them as vector graphics.
When converting a vector graphic to embroidery data, DesignShop must first break down the graphic into vector objects, then convert these objects to embroidery. Because bitmap images are composed of pixels and not objects, they can be directly converted to embroidery data. Vector graphics give much better results because outlines can be imported exactly. Bitmaps don't convert as precisely and they only work with solid colors.
Auto-Digitizing can be used with any graphics that can be opened by DesignShop. Following the guidelines below will help produce the best results, particularly when working with bitmap images:
As a general rule, most scanned images are bitmap images. That is, when a picture is loaded into the computer via a scanner, it is broken down and stored as a series of pixels. Each pixel can be viewed as a small square dot of a single color that corresponds to a specific location within the original image. However, the number of dots that are scanned and stored for any given picture is dependent on the resolution at which the picture was scanned. Specifically, the resolution specifies how many pixels are generated per square inch (or per square millimeter). In order for humans to see a sharp image (i.e. without noticing these small dots), an image must have a high resolution. For example, at a resolution of 300 dots per inch (dpi), the dots become so small that they typically go unnoticed when viewed by the human eye. Alternatively, a low-resolution image, for example stored at 100 dots per inch, may appear jagged or unclear because the individual dots are much larger and become more noticeable. Thus as expected, in order for Auto-Digitizing to be effective in generating accurate embroidery designs that do not appear jagged, the source image must be relatively sharp and must be stored at a high resolution.
If you are scanning a graphic that will be used with Auto-Digitizing, it is recommended that the image be scanned at a resolution of at least 250 dpi, which roughly corresponds to the inherent resolution at which condensed data points are stored. It has been determined that for most images to be used with Auto-Digitizing, 300 dpi is the optimum resolution.
In general, you will obtain better Auto-Digitizing results with clean images (as opposed to noisy images). Clean images basically consist of clear, large, well-defined areas of solid colors (e.g., most clipart consists of clean images). Because of how they are created, vector images are always clean. Bitmap images can be noisy, which mean they contain features such as half-toning and shading that make them appear blurry or imprecise. It is easier for Auto-Digitizing to convert clean images to embroidery data. You can clean an image using third party photo editing or paint programs.
It is recommended that you convert lettering to
outlines in Adobe Illustrator before you send the graphic to DesignShop.
Also note that the examples directory (installed with your DesignShop
software; default: C:\Designs\Graphics) contains some complete examples
of noisy and clean images (all Floral designs and are noisy, others are
clean). You may want to review some of these examples in order to gain
a better idea of the differences between these types of images.
Please note that Vector Graphic functionality is only available in the DesignShop Pro+ product level.
To convert a vector graphic (eps, wmf, emf, dxf, and cdr) to embroidery data, complete the following steps:
Open a vector graphic.
Select the graphic in the Project Tree.
These objects will be displayed in the Project
Tree. The display of the graphic in the View
Window does not change, but the displayed graphic is now separated
into the vector objects. (See the following image).
These vector objects can be selected either in the Project
Tree or the View Window.
Once you have selected an object, you can edit the object’s control points
(i.e., move, add, and delete points). You can also scale and/or rotate
vector objects.
At this point you may also want to Auto-Sequence some or all of the
vector objects. Click
here for details.
You can now convert the graphic objects to embroidery
data. First select the object(s) you wish to convert. As with design elements,
you can select one, some, or all graphic objects in a project. (Click
here for details on selecting in DesignShop.)
Once you have selected all desired objects, click the Convert to Vector toolbar button  .
.
When you are ready to convert, click the Convert button. This will convert the
selected vector object(s) to embroidery data.
If you are moving through the objects one at a time, you must click
the Convert button for each object
you want to stitch.
You can now edit the embroidery data as you would in any design.
As mentioned above, vector objects can be scaled and rotated, and vector control points can be edited. DesignShop also offers several additional tools to use when working with vector objects.
When vector elements overlap each other, the Subtract
Elements tool can be used to remove the layering of these elements.
To use this tool, select two or more overlapping vector elements, then
click the Subtract Elements toolbar
button  . Any areas of the element(s) that (after conversion
to embroidery) would be sewn under other elements will be removed. The
result will be that some objects may be separated into two or more elements,
and the layering will be removed.
. Any areas of the element(s) that (after conversion
to embroidery) would be sewn under other elements will be removed. The
result will be that some objects may be separated into two or more elements,
and the layering will be removed.
You can see in the following example that the overlapping area of the two vector fills has been removed.
If two or more overlapping vector elements will be sewn in the same
color, the Combine Elements tool
can be used to combine them. To use this tool, select two or more overlapping
vector elements, then click the Combine
Elements toolbar button  . This will combine the selected
elements to create one element. When converted, this element will become
one embroidery element. This
tool is useful when you have multiple small, overlapping elements that
would be more efficiently sewn as one element.
. This will combine the selected
elements to create one element. When converted, this element will become
one embroidery element. This
tool is useful when you have multiple small, overlapping elements that
would be more efficiently sewn as one element.
DesignShop provides the ability to add two types of vector elements: vector lines and vector fills.
To add a vector line, click the Vector
Line button  . Input the line as you would digitize
a walk stitch (click here for instructions).
This tool
is useful, for example, if you need to add an underline to a graphic.
. Input the line as you would digitize
a walk stitch (click here for instructions).
This tool
is useful, for example, if you need to add an underline to a graphic.
To add a vector fill, click the Vector Fill button  . Input
the vector fill as you would digitize a complex fill (click here
for instructions). This
tool is useful, for example, if you need to add a particular shape (such
as a circle) to a graphic.
. Input
the vector fill as you would digitize a complex fill (click here
for instructions). This
tool is useful, for example, if you need to add a particular shape (such
as a circle) to a graphic.
You can right-click and select Properties from the popup menu to change the properties (such as color of these vector elements).
Once added, these vector elements can be converted to embroidery data.
When creating a vector fill or a vector line object, right-click on the object and select Properties. The following dialog appears:
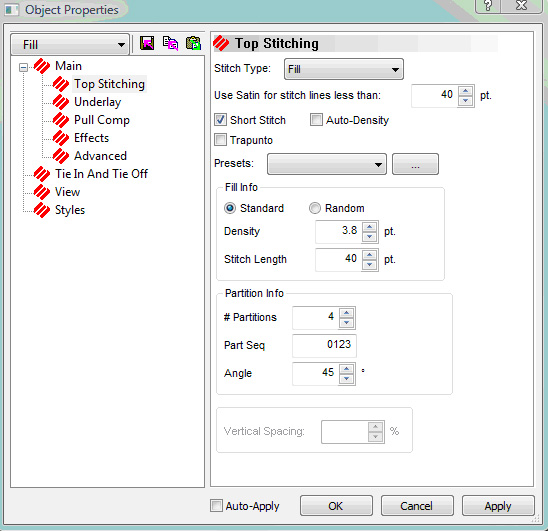
See Top Stitching for more information.
Any embroidery design can be converted to a vector graphic. To do this, open an embroidery design, then select the entire design. Copy the design, then paste it into another program, such as Microsoft Word, Paint Shop Pro, etc. This will provide you with a vector graphic of the embroidery design.
NOTE: You can also open an embroidery design in DesignShop, then select File->Save As and save the embroidery file as an eps or emf file. (This can only be done when the design contains wireframe data).
This tool can be useful for screenprinters who want use an embroidery design as a sceenprinting graphic.
To use Auto-Digitizing with bitmap images, complete the following steps:
Open the graphics file you want to convert (File->Open).
Scale and position graphic, if necessary.
Click the Convert
Graphic toolbar button  .
.
This brings up the Digitizing Wizard tool.
If Vector Objects is selected as the output in the Image Processing Options dialog, the selected bitmap image will be converted to individual vector objects. The display of the graphic in the View Window does not change, but the displayed graphic is now separated into the vector objects. (You can also select a bitmap image, then right-click and select Convert Graphic to Vector Objects to open the Image Processing Options dialog.)
Once a bitmap is converted to vector objects, you have more control over how the objects will be stitched, using the Stitch Vector dialog.
Two methods are available if you only want to convert a piece of a graphic to embroidery data.
This tool will work with both vector and bitmap graphics. To use this
tool, open a graphic, then select it. Click the Stitch
Graphic Region toolbar button  . Point the cursor
over the area you want to convert to stitches. Left-click to open the
Stitch Vector Object dialog. Make
any changes if desired, then click Convert.
(If you want to convert without opening this dialog, right-click the area
instead.) The area will then be converted to embroidery data. You can
also use this tool to convert the embroidery data back to vector objects.
. Point the cursor
over the area you want to convert to stitches. Left-click to open the
Stitch Vector Object dialog. Make
any changes if desired, then click Convert.
(If you want to convert without opening this dialog, right-click the area
instead.) The area will then be converted to embroidery data. You can
also use this tool to convert the embroidery data back to vector objects.
To use this tool, first open a graphic. Select the graphic, then click
the Custom Selection toolbar button
 . Using the custom selection cursor, within the selected
element, left-click as many times as necessary to outline the area you
wish to convert (you can also left-click, then drag the mouse to outline
the points). When you are ready to convert the area, press ENTER
or the middle mouse button. This will open the Image
Processing dialog. (Click here
for a description of this dialog). When you click OK
in this dialog, the selected area of the graphic will be converted.
. Using the custom selection cursor, within the selected
element, left-click as many times as necessary to outline the area you
wish to convert (you can also left-click, then drag the mouse to outline
the points). When you are ready to convert the area, press ENTER
or the middle mouse button. This will open the Image
Processing dialog. (Click here
for a description of this dialog). When you click OK
in this dialog, the selected area of the graphic will be converted.