Sequins can be used with the following elements: walk stitches, complex fills, and columns using e-stitch or edge fill.
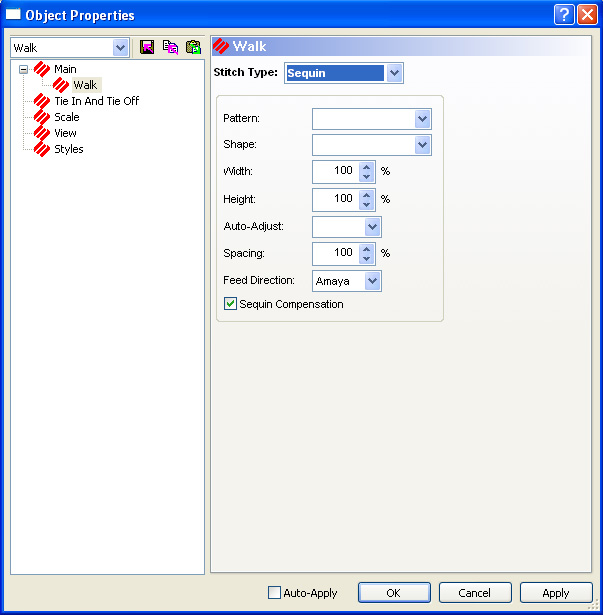
Stitch Type: Allows you to specify Sequin as the stitch type.
Pattern: Allows you to choose the sequin pattern.
Shape: Allows you to choose the sequin shape.
Width: This feature is adjusted automatically to scale the width of your sequin fixing stitch pattern between the width it was digitized and the selections you specified with the stitch and sequin types.
Height: This feature is adjusted automatically to scale the height of your sequin fixing stitch pattern between the width it was digitized and the selections you specified with the stitch and sequin types.
Auto-Adjust: Allows you to auto-adjust the sequin spacing.
Spacing: This feature is adjusted automatically to scale the spacing of your sequin fixing stitch pattern between the width it was digitized and the selections you specified with the stitch and sequin types.
Feed Direction: This feature defines the direction that the embroidery machines feeds the sequins. This needs to be set for the type of machine you are digitizing for. The choices from the drop down menu are: AMAYA (used for all AMAYA machines), North (used for all Shiffli machines), and South (used for all multi-head machines).
Sequin Compensation: When this box is checked the stitch pattern automatically adjusts for the sequin feed direction. The default is checked.
NOTE: To see the stitches behind the sequins, you must view the design in 2D mode. If you are viewing your design in 3D mode, the sequins appear solid.
Creating sequin objects:
Sequin Walk Object:
Use the following steps to create a sequin walk object:
Select Walk Stitch as your input type.
Select Decorative from the drop down menu in the Walk Type property page.
Select Sequin on the property page for the stitch type. Set up the sequin parameters as outlined above.
Click on OK to accept the settings.
Digitize the sequin walk object in the same manner as a walk using decorative stitches. See Creating Decorative Stitches for more information.
Sequin Column Object:
Use the following steps to create a sequin column object:
Right-click on the desired column object type input method.
The Column property page appears.
Choose Custom E Stitch or Custom Edge Fill from the Stitch Type dropdown menu.
The Column Effects property page appears.
Select Sequin as the stitch type. Set up the sequin parameters.
Click on the OK button in the Column Effects property sheet to accept the fill effects changes.
Click on the OK button in the Element Properties sheet to accept the element property changes.
Digitize the column object. See Digitizing Columns for more information.
Sequin Fill Object:
Use the following steps to create a sequin fill object:
Right-click on the complex fill input button.
The Element Properties page appears.
Select Sequin as the stitch type. Set up the sequin parameters.
Click on the OK button in the Fill Effects property sheet to accept the fill effects changes.
Click on the OK button in the Element Properties sheet to accept the element property changes.
Digitize the fill object. See Digitizing Complex Fills for more information.
OR
Digitize a shape and select Custom from the Fill drop down menu.
The Fill Effects Property page appears.
Select Sequin from the drop down menu.
Sequin Custom Shapes and Stitches:
See Custom Shapes and Designs for more information.
Single Sequin Eject:
Single sequin eject commands are inserted into the design by clicking
on the Sequin Eject toolbar button  . When a sequin eject
command is inserted into the design the sequin will be sewn down by the
first stitch of the next object that is digitized. You can right-click
on the Sequin Eject button and set the sequin type.
. When a sequin eject
command is inserted into the design the sequin will be sewn down by the
first stitch of the next object that is digitized. You can right-click
on the Sequin Eject button and set the sequin type.
Creating a Sequin Decorative Stitch:
Sequin and decorative stitch objects are created in the main view of Design Shop. To create a new sequin or decorative stitch object, digitize the objects that will be included in the new stitch object. Select all of the objects that will be include in the sequin/decorative object. Right-click on the selected objects and select Save Custom Shape. Refer to Custom Shapes and Designs for more information.
Opening Existing Sequin Designs:
Design Shop will open Tajima .dst files containing sequin eject commands. When the design is opened the sequin eject command will be listed in the design stitch list. Select a stitch in the stitch list and click on the Eject Sequin toolbar button to insert a sequin eject command into the design. Moving the stitch following the sequin eject command moves the sequin.
Moving Individual Walk Stitch Sequins:
Put the sequin object into wireframe editing mode. An X appears on each sequin.
Move your cursor over the X of the sequin that you want to move. The X will change to a square.
To move the sequin along the stitch, click and drag.
To move the sequin in a direction that is not along the stitch, hold down the Control key and click and drag.
Changing Element Types in a Sequin Design:
To change an element type for a sequin
design, select the object, hold down the CTRL
key, and then select the object you want to change the element to in the
toolbar. To change lettering to a sequin object, you must change the lettering
from a complex column to a complex fill. To do this, you select the lettering
object, hold down the CTRL
key, and select complex fill  .
.
Manually Inserting Individual Sequins:
Select Sequin in the walk stitch property page and then double-click in the main view where you want your sequin to go.
Adjusting Sequin Walk Stitches:
When the sequin object is selected, a handle appears. Use this handle to click and drag sequins to the location you want them. You can also rotate the sequins and delete them.
Spacing Sequin Walk Stitches:
The double handle that appears controls the spacing of the sequins. Click and drag this handle to move the sequins closer or further apart. See picture below:
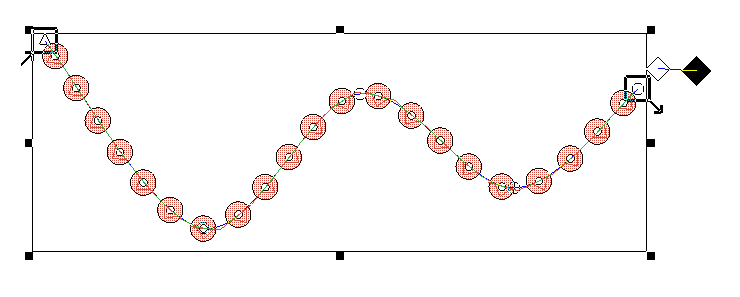
Note: If a stitch is drawn in yellow, this means that a stitch is hitting the sequin. If you are in wireframe editing, you are editing the stitches. If you are NOT in wireframe editing mode then you are editing the sequin position.
![]()