![]()
The Y-drive belts will wear out and stretch over time. To extend the useful lifetime of these belts, always ensure they are properly tensioned at all times. Incorrect tensioning of the belts will cause them to wear prematurely and might also cause damage to the machine itself.
|
|
This repair requires timing and other adjustments and should be performed by a Melco authorized service technician.
|
|
|
When replacing y-drive belts, always replace both belts as a pair. Leaving a worn belt on the machine with a new belt installed on the other side can cause both belts to wear prematurely |
|
|
CAUTION!! At any time when the machine is either powered down or in E-Stop mode, neither the X- nor Y-carriage should be moved at a high rate of speed. If there is a desire to manually move either carriage, it should be pushed or pulled GENTLY to prevent serious damage to the main control board. |
Replacement Parts Needed:
Belt, Timing, Open, AT5-16 X 1124 Long (two pieces)
Replacement Procedures:
1. Color change to Needle #16.
2. Turn the machine OFF.
3. Remove the left upper arm front cover.
4. Remove both the left and right upper arm transparent covers.
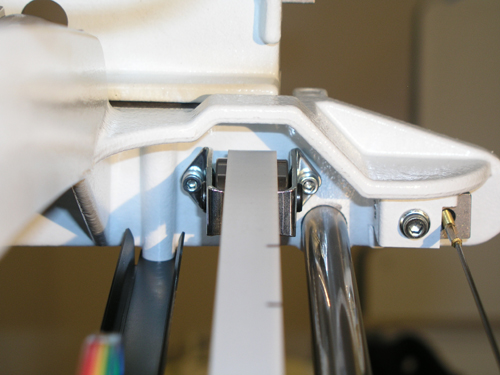
Figure 1 - Y-Drive Belt Adjusting Nuts (Left Side)
5. Loosen the tension on the y-drive belt by loosening the nuts on the idler bearing mounting bracket studs.
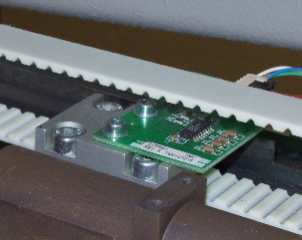
Figure 2 - Left Timing Belt Clamp and X/Y Home PCB
6. Remove the x/y home PCB from the y-drive belt clamp. Leave it hanging on the connected harnesses.
7. Remove the timing belt clamp and remove the old belt.
8. Install a replacement belt and pull the ends over the bearing block assembly so that the ends of the belt are no more than one tooth width apart and extend equally underneath the clamp.
9. Install the timing belt clamp and tighten the screws down just enough to hold the belt in position.
10. Tighten the adjusting nuts on the idler pulley studs just until the slack is removed from the belt.
11. Tighten the screws on the belt clamp to Melco Torque Specifications.
12. Reinstall the x/y home PCB back onto the left timing belt and leave the screws installed loose for now.
13 Adjust the x/y home PCB using the procedures prescribed in "X/Y Home PCB Replacement".
14 Adjust the y-axis timing belt tensions using the procedures prescribed in "Y-Axis Timing Belt Adjustment"
16. Reinstall the left upper arm front cover and tighten the screws to Melco Torque Specifications.

Figure 3 - Right Y-Drive Timing Belt Clamp
17. Color change to Needle #1.
18. Remove the right upper arm front cover.
19. Repeat steps 5 through 16 for the right y-drive timing belt, ignoring any references to the x/y home PCB.
19. Reinstall both the left and right upper arm transparent covers.
20. Double check the x- and y-home adjustments using the procedures prescribed in "X/Y Home Adjustment".
20. Do a short machine functional test and observe for correct x- and y-axis movement. Make necessary adjustments or additional repairs if needed.
21. Run the following test designs on the machine:
![]()